
Peanut Butter Lava Cookies

Warm, flaky pockets of pie crust encase molten creamy peanut butter for an irresistible ooey-gooey treat—ready in under 30 minutes and perfect for dessert or snacks.
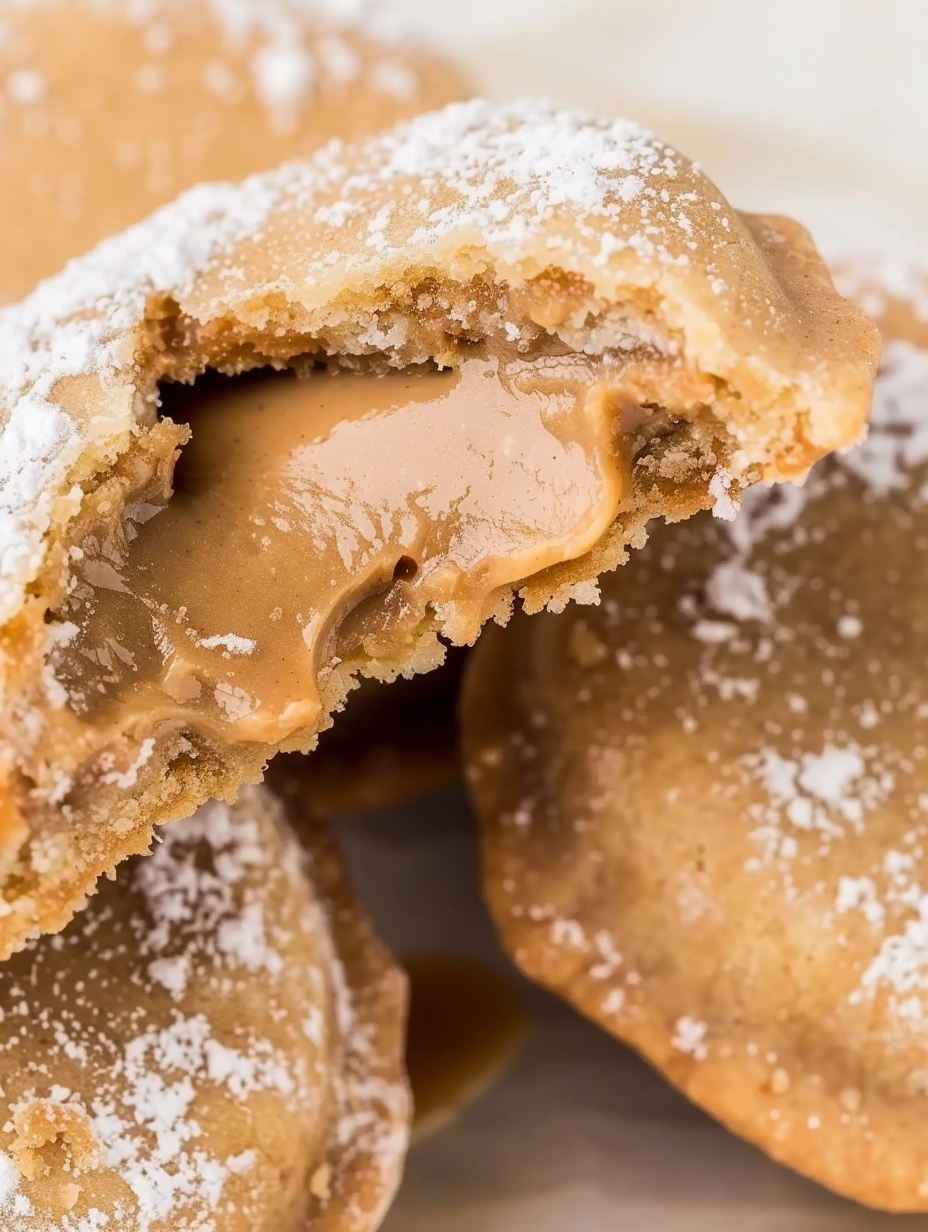
This is one of those easy-to-make treats that became an instant favorite the first time I tried it. I discovered these Peanut Butter Lava Cookies on a busy weeknight when I needed something comforting and fast to satisfy a peanut-butter craving. Using store-bought rolled pie crusts and creamy peanut butter, I learned how a couple of pantry staples can transform into something astonishingly indulgent: a crisp, flaky exterior that yields to a warm, molten peanut-butter center.
They matter because they marry convenience with a decadent texture contrast—flaky pastry and molten filling—that feels like a bakery find without the fuss. I remember pulling one from the oven, breaking it open, and watching the peanut butter slowly pool like lava; my kids hovered like seagulls and declared them "the best cookies ever." These are perfect for a last-minute dessert, a potluck contribution, or a cozy night when you want more of a hug than a full-blown baking session.
Why You'll Love This Recipe
- Ready in under 30 minutes from start to finish—15 minutes of active prep and about 12 minutes in the oven—ideal for busy evenings or unexpected guests.
- Requires only three main ingredients: premade rolled pie crust, creamy peanut butter, and granulated sugar—pantry-friendly and accessible.
- Produces 16 hand-held treats that are easy to transport and share at parties, school events, or as a quick after-school snack.
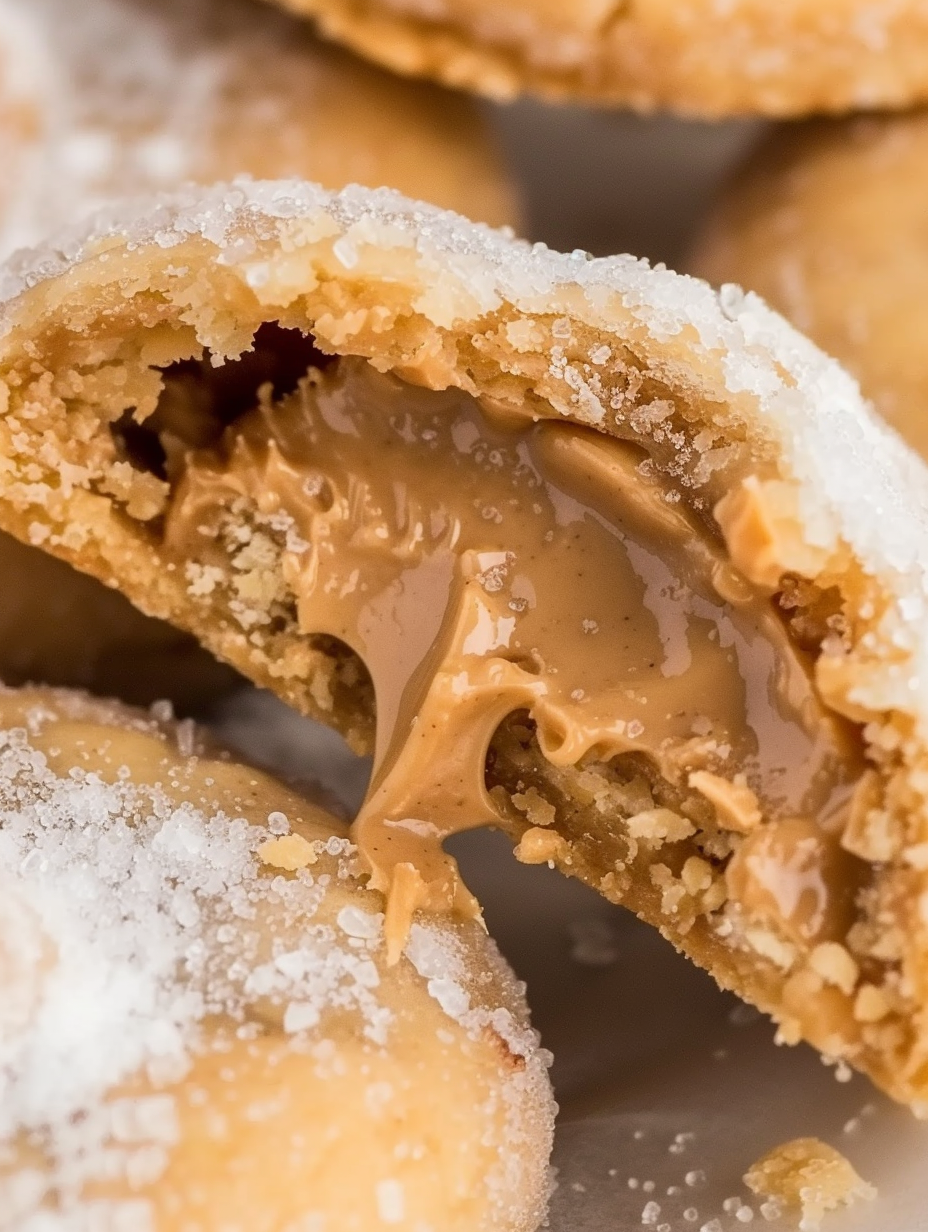
- Delivers a satisfying textural contrast: crisp, flaky shell that yields to a molten, velvety center—no tempering or special equipment needed.
- Make-ahead friendly: assemble and refrigerate, then bake when needed; freezes well if you want to keep a stash on hand.
- Customizable for dietary needs and flavor swaps—see the substitution and variation ideas below for simple adaptations.
In our house these became the cookie everyone asks for at gatherings. I found that JIF original creamy gave the most reliably molten center while staying smooth; other peanut butter brands work, but the texture can vary. Watching the first cookie break open fresh from the oven is still a tiny thrill for me each time.
Ingredients
- Premade rolled pie crusts (14 oz package): Use the refrigerated kind that comes in a box with two crusts. Look for a brand that lists butter if you want richer flavor—but any standard rolled crust works. The thin layers create a delicate, flaky shell that browns quickly.
- Creamy peanut butter (14 tablespoons): JIF original creamy works exceptionally well for a reliably smooth, molten center. Measure by tablespoon for consistent portions; natural peanut butter can be used but may produce a slightly oilier center that firms faster.
- Granulated sugar (1 cup plus small amounts): Coats the formed cookie and is lightly sprinkled on the peanut butter to prevent sealing issues. The coarse sugar gives a subtle crunch without overpowering sweetness.
Instructions
Preheat and prepare: Preheat the oven to 400°F. Line baking sheets with parchment paper. Remove the pie crusts from the refrigerator and let them come to room temperature according to the package instructions so they are easier to unroll and roll thinly without cracking. Roll and cut rounds: On a piece of parchment, unroll one crust and lightly roll with a rolling pin to make it a touch thinner than the package thickness (about 1/16–1/8 inch). Use a 3-inch round cutter or a similarly sized glass to cut circles. Arrange circles on parchment with scraps to be rerolled later. Portion the filling: Spoon 1 tablespoon of creamy peanut butter into the center of each round. Sprinkle approximately 1/8 teaspoon granulated sugar directly on the peanut butter—this small sugar dot reduces surface oil transfer and helps prevent the top piece from sticking to the bottom during sealing. Seal and shape: Top with another round of crust to form a sandwich. Pinch edges firmly all the way around, sealing completely; you can use fork tines to crimp the edge for a decorative seal. Gently roll the sealed cookie in granulated sugar to coat the exterior and place on the prepared baking sheet, spaced about 1 inch apart. Bake: Bake in the preheated 400°F oven for 12 minutes. The crust should just begin to turn golden at the edges—do not overbake or the center will lose its lava-like quality. Remove from the oven and let cool on the baking sheet for about 2 minutes before handling. Repeat and serve: Continue assembling the second crust while the first batch bakes so you have warm cookies ready quickly. Serve warm to reveal the molten center; expect the filling to firm up as the pastries cool.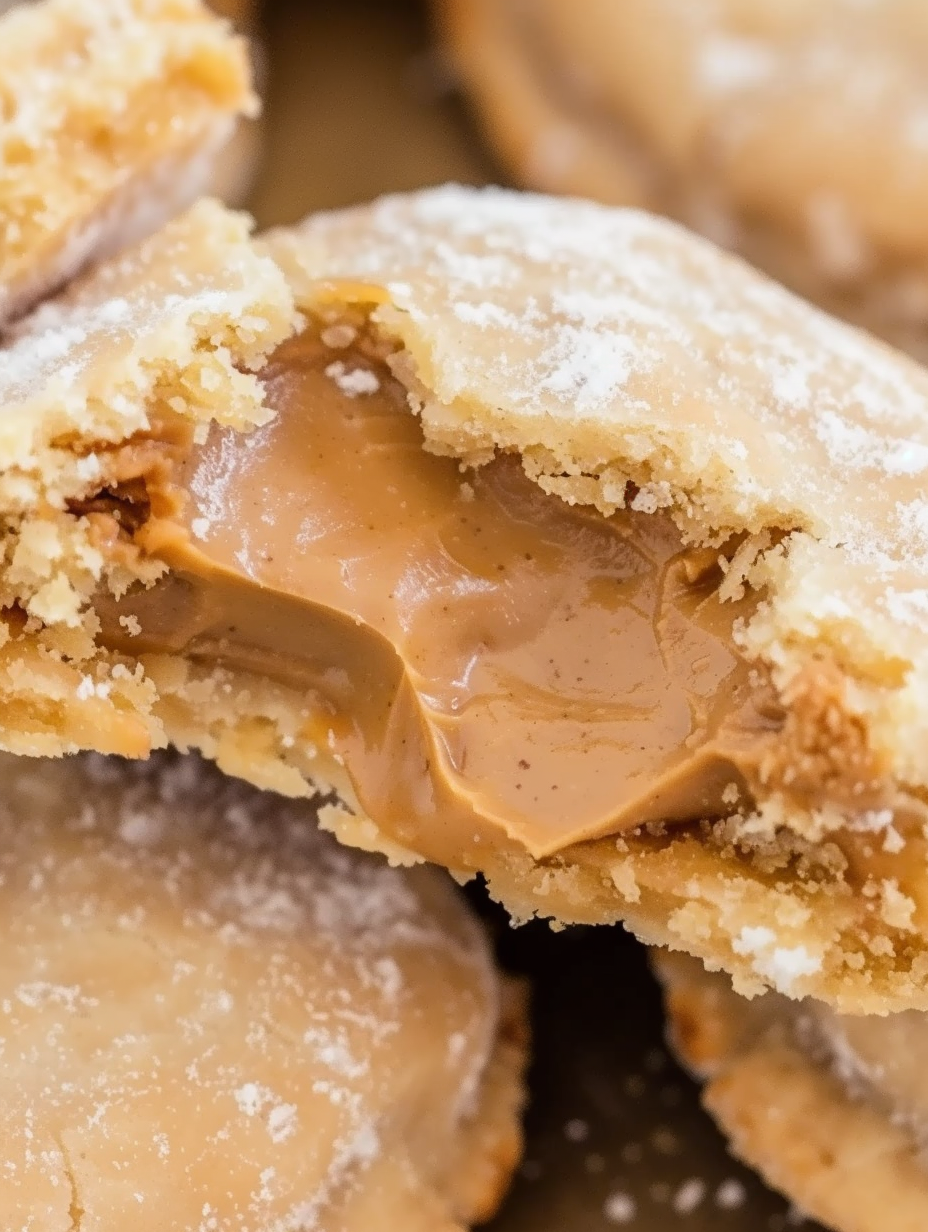
You Must Know
- These are best enjoyed warm—the center will be molten right out of the oven and will firm as they cool; allow at least 2 minutes after removing from the oven before serving.
- Cookies freeze well either baked or unbaked: freeze formed, unbaked cookies for up to 3 months on a sheet, then transfer to a bag; bake from frozen with an extra 2–3 minutes.
- High in calories and fat per serving—each cookie is roughly 244 kcal and best enjoyed as an occasional treat or shared delight.
- Store in an airtight container at room temperature for up to 2 days; refrigeration will firm the filling and change the texture.
My favorite part is the communal nature of these cookies: everyone wants to open theirs at the same time to see the lava inside. They bring a kind of theatrical delight to simple gatherings, and I love how a tiny change in temperature transforms the center from molten to set.
Storage Tips
Keep cooled cookies in an airtight container at room temperature for up to 48 hours; the centers will be softer at room temperature and firmer if refrigerated. For longer storage freeze baked cookies on a tray until solid, then transfer to a freezer-safe bag for up to 3 months. To reheat from frozen, warm in a 325°F oven for 6–8 minutes or microwave briefly in 10–15 second increments until the center loosens—watch carefully to avoid overheating the peanut butter.
Ingredient Substitutions
If you need a dairy-free option, choose a pie crust labeled dairy-free or make a simple dairy-free laminated dough. Swap creamy peanut butter for a natural style, but note that natural peanut butter separates and may yield a looser filling—stir well before measuring. For a hazelnut twist, use 1 tablespoon Nutella or another chocolate-hazelnut spread in place of peanut butter; the lava effect remains delightful. To reduce sugar, try cutting the exterior coating sugar in half, though it will slightly affect the crunch and shine.
Serving Suggestions
Serve warm with a scoop of vanilla ice cream or alongside cold milk for dipping. For a party platter, dust lightly with powdered sugar and garnish with roasted peanuts or a drizzle of melted chocolate. These are equally at home plated as an elegant mini dessert when paired with fresh berries and a mint leaf or passed around casually on a napkin for laid-back entertaining.
Cultural Background
These cookies are a playful hybrid of classic American ingredients: ready-made pie crust and peanut butter. While not a historical traditional dessert, they reflect American baking’s love of convenience and novelty—transforming pantry staples into nostalgic, shareable sweets. They borrow the molten-center concept found in fondant-style cakes but adapt it to a rustic, hand-held format that fits the ethos of approachable home baking.
Seasonal Adaptations
In autumn add a pinch of cinnamon or pumpkin spice to the peanut butter for a seasonal note; in winter fold a few mini chocolate chips into the filling for extra richness. For summer serve cooled with a citrus-flecked whipped cream or a strawberry compote to balance the richness. Small adjustments—like adding orange zest to the coating sugar—can tailor the flavor profile to holidays or special occasions.
Meal Prep Tips
Assemble sandwiches and freeze them raw on a sheet tray; once solid, transfer to a bag and bake straight from frozen as needed. This makes them ideal for last-minute dessert plans. Alternatively prepare the filling into tablespoon scoops and refrigerate; when you need cookies, roll out the crusts and assemble quickly. Use parchment rounds to keep cookies from sticking during storage and to simplify reheating.
These cookies capture the joy of simple ingredients turning into something unexpectedly luxurious. Whether you make them for a crowd or a quiet night in, they reward you with buttery flakiness and molten peanut-butter bliss—share generously and enjoy the smiles.
Pro Tips
Let pie crusts come to room temperature before working so they roll and seal without cracking.
Use exactly 1 tablespoon of peanut butter per cookie for uniform baking and consistent lava centers.
Avoid overbaking: remove when edges just begin to brown to maintain a molten center.
If using natural peanut butter, stir thoroughly and chill scooped portions briefly before assembling to reduce oil separation.
This nourishing peanut butter lava cookies recipe is sure to be a staple in your kitchen. Enjoy every moist, high protein slice — it is perfect for breakfast or as a wholesome snack any time.
FAQs about Recipes
Can I freeze these cookies?
Yes. You can freeze assembled unbaked cookies on a sheet tray until firm, then transfer to a freezer bag. Bake from frozen, adding 2–3 minutes to the baking time.
Is the filling safe to eat right after baking?
The center will be very hot right out of the oven; allow at least 2 minutes of cooling and warn diners before biting to avoid burns.
Tags
Peanut Butter Lava Cookies
This Peanut Butter Lava Cookies recipe makes perfectly juicy, tender, and flavorful steak every time! Serve with potatoes and a side salad for an unforgettable dinner in under 30 minutes.
Ingredients
Main
Instructions
Preheat and rest crusts
Preheat oven to 400°F. Line baking sheets with parchment paper. Remove crusts from the refrigerator and let them sit until they reach room temperature per package guidance so they roll without cracking.
Roll and cut
Unroll one crust on parchment and roll lightly to slightly thin (about 1/16–1/8 inch). Use a 3-inch cutter to cut circles, saving scraps to reroll and recut.
Portion filling
Place 1 tablespoon creamy peanut butter in the center of each round. Sprinkle ~1/8 teaspoon granulated sugar on top of the peanut butter to reduce sticking between layers.
Seal cookies
Top with a second round, pinch edges firmly to seal, and crimp with a fork if desired. Roll each sealed cookie in granulated sugar and place on the prepared baking sheet.
Bake
Bake at 400°F for 12 minutes, until edges just begin to brown. Remove from oven and let cool on the sheet for 2 minutes before serving to avoid burns from the hot filling.
Repeat and serve warm
Assemble remaining cookies while the first batch bakes so you can serve them warm. The molten peanut butter center will firm as the cookies cool.
Last Step: Please leave a rating and comment letting us know how you liked this recipe! This helps our business to thrive and continue providing free, high-quality recipes for you.
Nutrition
Did You Make This?
Leave a comment & rating below or tag
@savoryte on social media!
Categories:
You might also like...

Tilapia with Lemon Butter
Flaky pan-seared tilapia topped with a velvety lemon butter sauce. Quick to cook, bright with citrus, and weeknight-easy yet dinner-party special.

Healthy Egg Muffin Cups
Start your morning with veggie-loaded, protein-packed egg muffins at just 50 calories each. Perfect for make-ahead breakfasts, freezer-friendly, and easy to customize.

TikTok Breakfast Tortilla Fold
Crispy, cheesy, and ready in minutes, this viral tortilla fold layers bacon, egg, avocado, and melty cheese into a perfectly portable triangle.
Did You Make This?
Leave a comment & rating below or tag @savoryte on social media!
Rate This Recipe
Share This Recipe
Enjoyed this recipe? Share it with friends and family, and don't forget to leave a review!
Comments (1)
This recipe looks amazing! Can't wait to try it.
Comments are stored locally in your browser. Server comments are displayed alongside your local comments.

Hi, I'm Sophia!
What's Popular

30-Minute Meals!
Join to receive our email series which contains a round-up of some of our quick and easy family favorite recipes.