
>>

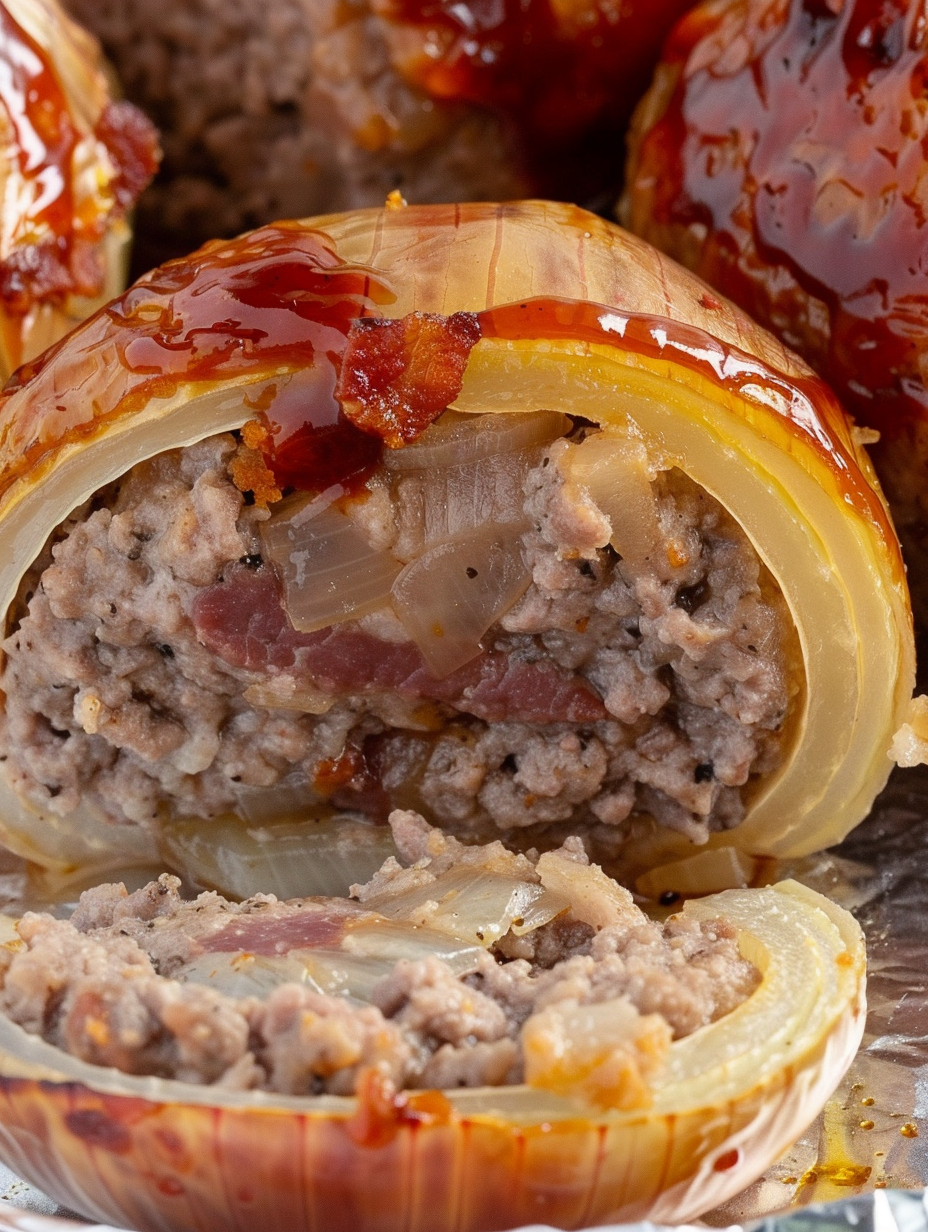
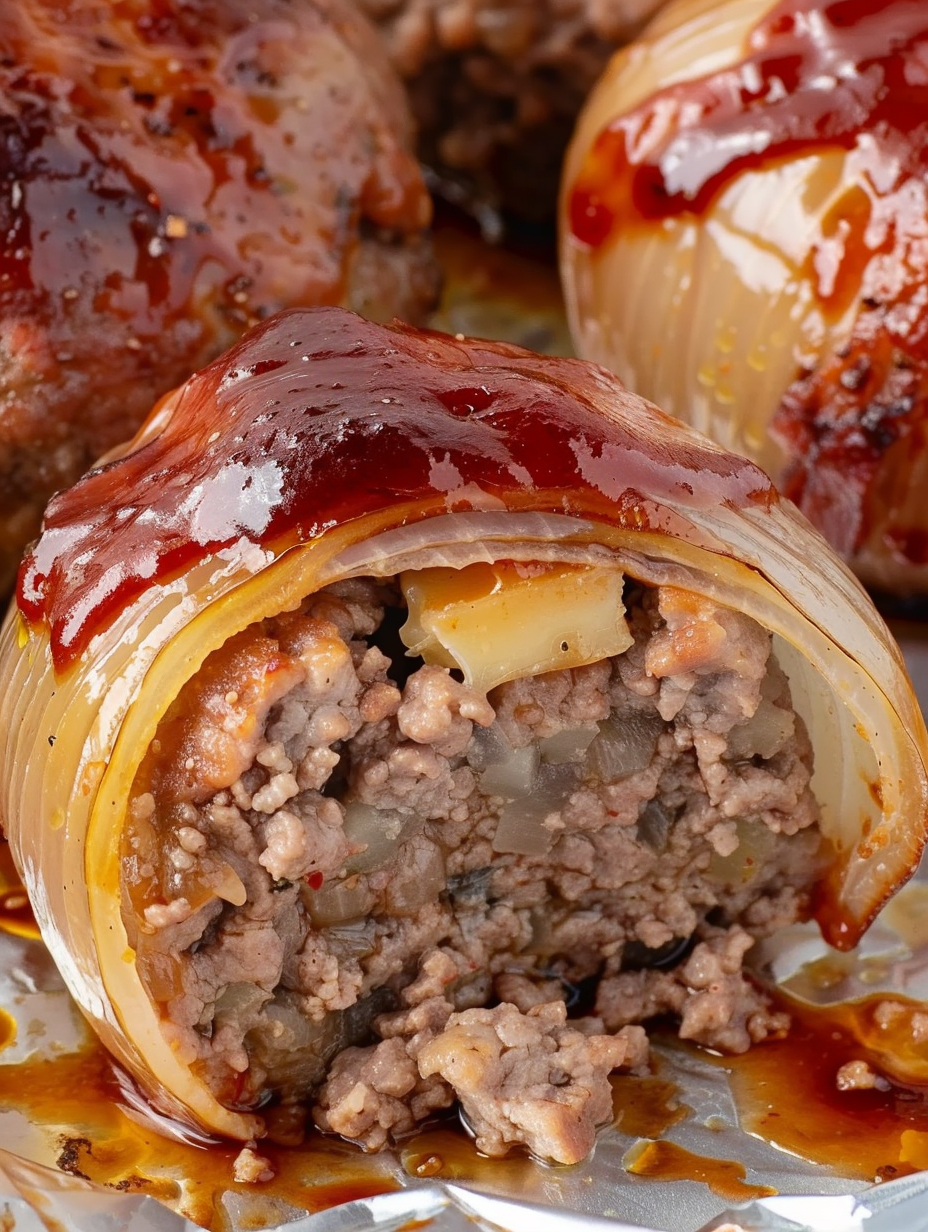
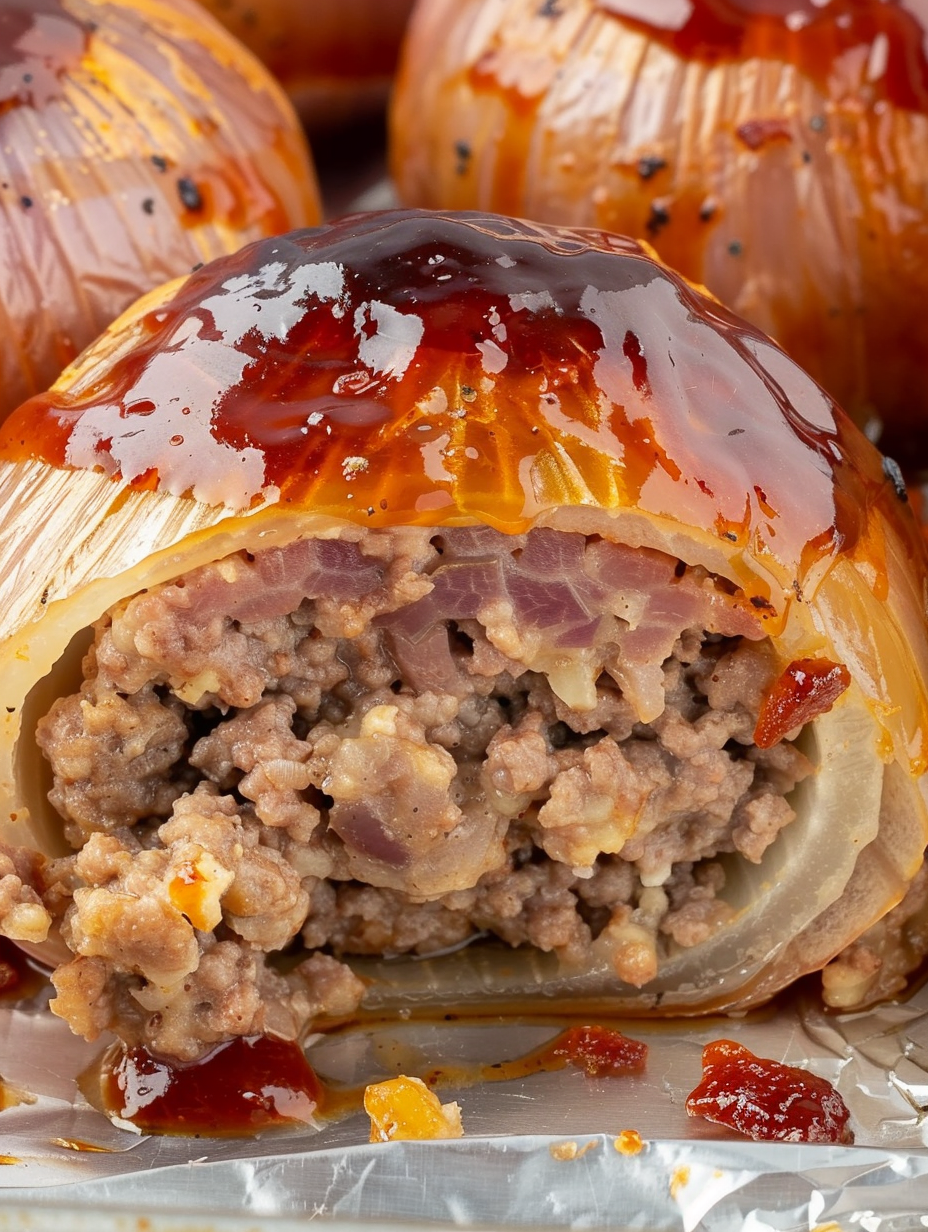
Juicy beef and melted cheddar tucked into onion layers, wrapped in smoky bacon and glazed with barbecue sauce — a fun, crowd-pleasing dish perfect for game day or dinner.
This recipe is all about bold comfort food flavors wrapped in a playful package. I first made these onion bombs on a cool autumn evening when friends were coming over for a casual game night. The combination of sweet, softened onion layers, a well-seasoned beef filling, an oozy cube of cheddar, and crisp, smoky bacon won over the whole group. They were messy in the best possible way — everyone laughed as they unwrapped them and the first bite elicited an almost unanimous "wow." Since that first batch I've adapted technique details to make assembly easier and results more consistent, and they now appear at nearly every gathering where I want something substantial, finger-food friendly, and unforgettable.
Onion bombs balance textures and flavors: the onion becomes tender and slightly sweet as it bakes, contrasting with the savory beef and the salty, crispy bacon. The barbecue glaze caramelizes to add a sticky, sweet-savory finish that ties everything together. I’ll walk you through small but important tricks — from choosing the right onion size and bacon cut to sealing the cheddar inside the beef so it stays put — so you get consistent, restaurant-worthy results at home. They make a brilliant main for a casual dinner or a hearty hot appetizer for a crowd.
Personal note: the first time I served these, my nephew who normally avoids onions went back for seconds. That turned this dish from a novelty into a repeat request. Over time I've learned to match onion thickness and meat portion size for even cooking; now I never skip the toothpick to secure bacon when using leaner ground beef.
One of my favorite parts about these is how adaptable they are. At a backyard cookout I swapped the cheddar for pepper jack and everyone loved the little heat kick; at a holiday appetizer party I used maple-cured bacon for a festive note. They consistently draw compliments because they’re visually fun and each bite delivers multiple contrasting flavors — I still smile remembering my neighbor’s surprised face at the first cheesy pull.
Store cooled bombs in a single layer in an airtight container in the refrigerator for up to three days. Reheat in a 350°F oven for 10–12 minutes or until warmed through to help recrisp the bacon; avoid microwaving, which makes the bacon soggy and the onion rubbery. For freezing, flash-freeze assembled and uncooked bombs on a tray until solid, then transfer to a freezer bag for up to three months. To reheat from frozen, bake at 375°F for 25–30 minutes, then glaze and finish under the broiler for a minute if you want extra caramelization.
If you prefer a different protein, replace ground beef with ground turkey or pork — keep an eye on moisture and increase breadcrumbs slightly for fattier pork. For a gluten-free option swap the breadcrumbs for gluten-free crumbs or almond flour; the texture will be slightly denser. Swap cheddar for Monterey Jack, pepper jack, or a smoked Gouda for different melting profiles; if avoiding dairy, omit the cheese and add a small cube of roasted red pepper for moisture and flavor.
Serve hot as a centerpiece for casual dinners with a simple green salad and roasted potatoes, or present them as substantial appetizers with small plates and cocktail napkins. Garnish with finely chopped fresh parsley for color and a sprinkle of flaky sea salt to brighten the bacon. Offer dipping options like extra barbecue sauce, spicy mustard, or a creamy ranch for those who love a cooling contrast.
These bombs are inspired by American comfort-food traditions — think meatball, bacon-wrapped appetizers, and barbecue glaze fused into a playful handheld. The concept borrows from stuffed meat preparations and the modern trend of crowd-pleasing, shareable bites frequently seen at tailgate parties and backyard barbecues. Though not a historic dish, it celebrates regional American flavors: smoky bacon, barbecue sauce, and cheddar are staples across many U.S. regions.
In summer, add fresh corn kernels and diced jalapeño to the meat mixture for brightness and a little heat. For winter entertaining, use smoked cheddar and swap maple-glazed bacon for a festive sweetness. In spring, swap yellow onions for sweet Vidalias when available; they caramelize quickly and add a floral sweetness that pairs beautifully with the barbecue glaze.
Assemble bombs and store them on a tray covered tightly with plastic wrap in the refrigerator for up to six hours; baking from chilled only requires an extra 5–8 minutes. For larger batches, assemble and freeze uncooked on a sheet pan, then transfer to bags — bake from frozen and add a few extra minutes to ensure the center reaches 160–165°F. Label containers with dates and reheat in the oven to maintain texture.
These onion bombs are a celebration of simple ingredients executed with a few smart techniques. Whether serving them as a hearty main or a show-stopping appetizer, they bring the kind of comfort and surprise that turns casual gatherings into memorable moments. Try them once and you’ll likely find reasons to make them again.
Press the meat tightly around the cheese cube to create a full seal and prevent leakage during baking.
If separating onion layers is difficult, soak onion halves in hot water for 3–4 minutes to soften the membranes.
Wait until the last 10–15 minutes to brush on barbecue sauce to avoid excessive burning from the sauce's sugars.
Use a meat thermometer and aim for an internal temperature of 160–165°F for safe, juicy results.
This nourishing onion bombs — bacon-wrapped beef & cheddar filled onions recipe is sure to be a staple in your kitchen. Enjoy every moist, high protein slice — it is perfect for breakfast or as a wholesome snack any time.
This Onion Bombs — Bacon-Wrapped Beef & Cheddar Filled Onions recipe makes perfectly juicy, tender, and flavorful steak every time! Serve with potatoes and a side salad for an unforgettable dinner in under 30 minutes.
Preheat oven to 425°F. Line a large rimmed baking sheet with aluminum foil. If available, place a wire rack on the baking sheet to allow rendered fat to drip away from the bombs during baking.
Trim tops and bottoms from each onion, peel outer skin, slice in half top to bottom, and carefully remove the two outermost layers from each half to form the curved onion pieces used to cover the meatball.
In a large bowl, combine ground beef, breadcrumbs, egg, milk, 3 tablespoons barbecue sauce, garlic powder, onion powder, salt, and pepper. Mix gently until evenly combined without overworking.
Divide mixture into 8 equal portions. Flatten one portion, place a 1-inch cheddar cube in the center, and fold the meat around it to form a sealed ball to prevent cheese leakage.
Place two outer onion halves around each meatball so they cover most of the surface. Choose onion pieces that fit snugly to promote even cooking.
Lay two bacon strips in an X pattern, set the onion-wrapped meatball in the center, then pull bacon up and around. Secure with a toothpick if necessary and place on the prepared sheet.
Bake at 425°F for 30 minutes. Rotate the sheet halfway if needed for even browning. The meat should be mostly cooked and bacon beginning to render.
Brush each bomb with remaining 1/3 cup barbecue sauce and return to the oven for 10–15 minutes, or until sauce caramelizes and internal temperature reaches 160–165°F.
Allow bombs to rest 5 minutes before serving to let juices settle and cheese firm slightly. Serve warm with extra sauce on the side if desired.
Last Step: Please leave a rating and comment letting us know how you liked this recipe! This helps our business to thrive and continue providing free, high-quality recipes for you.
Leave a comment & rating below or tag
@savoryte on social media!

Flaky pan-seared tilapia topped with a velvety lemon butter sauce. Quick to cook, bright with citrus, and weeknight-easy yet dinner-party special.

Start your morning with veggie-loaded, protein-packed egg muffins at just 50 calories each. Perfect for make-ahead breakfasts, freezer-friendly, and easy to customize.

Crispy, cheesy, and ready in minutes, this viral tortilla fold layers bacon, egg, avocado, and melty cheese into a perfectly portable triangle.
Leave a comment & rating below or tag @savoryte on social media!
Enjoyed this recipe? Share it with friends and family, and don't forget to leave a review!
This recipe looks amazing! Can't wait to try it.
Comments are stored locally in your browser. Server comments are displayed alongside your local comments.

Join to receive our email series which contains a round-up of some of our quick and easy family favorite recipes.
