
No Bake Apple Pie Cheesecake In A Jar

Individual no-bake apple pie cheesecake jars — a quick, portable dessert that layers spiced apples, creamy cheesecake filling, and graham crumbs for perfect portion control.
This no bake apple pie cheesecake in a jar is one of those small joys that changed how I approach dessert for parties and busy weeknights. I first put these together on an autumn afternoon when I had a basket of apples and a craving for something sweet but not fussy. The combination of gently spiced apples and a smooth, tangy cheesecake filling felt like an instant upgrade to the simple apple slice. Because everything is served in a jar, they are portable, portion-controlled, and endlessly adaptable for gifts or picnics.
What makes these jars special is the contrast of textures: crunchy graham crumbs, silky no bake filling, and warm apple compote. I discovered this version by swapping honey for agave and using thick Greek yogurt to lighten the filling without losing creaminess. My family remembers the first batch because we ate them straight from the fridge while watching a movie; the youngest asked for two jars and the oldest declared it the best quick dessert I had ever made. If you want a dessert that feels thoughtful but comes together in minutes, this one will become a go-to.
Why You'll Love This Recipe
- Ready in about 15 minutes from start to finish, making it ideal for last minute guests or a fast weekend treat.
- Uses pantry staples like graham cracker crumbs and common baking spices, plus two small apples, so you do not need specialty ingredients.
- Portion-controlled jars keep servings tidy and make storage, gifting, and transport effortless.
- No oven required: the apples cook quickly on the stovetop and the rest is simply mixing and layering.
- Flexible: swap sweeteners, use different cookies for the crust, or make it dairy-free with simple swaps.
- Great for make-ahead: jars hold in the fridge up to 7 days and travel well for picnics or potlucks.
When I first brought these to a neighborhood potluck everyone asked how long they had been in the oven. The surprise that it is no bake always sparks conversation. Over the years I have learned small tricks, like lightly toasting graham crumbs for extra depth and using thick yogurt to stabilize the filling. Family members now request these for birthdays because they feel both homey and a little special.
Ingredients
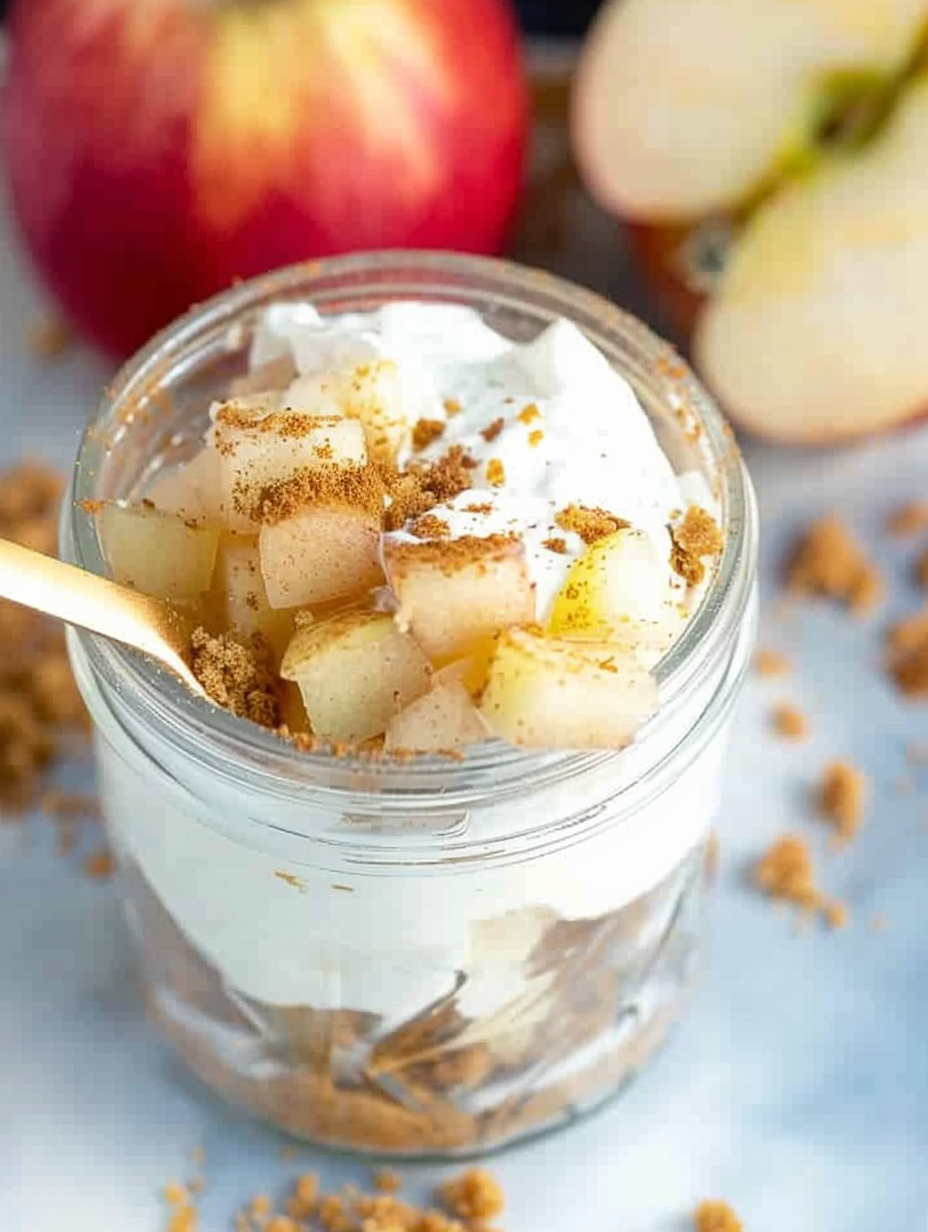
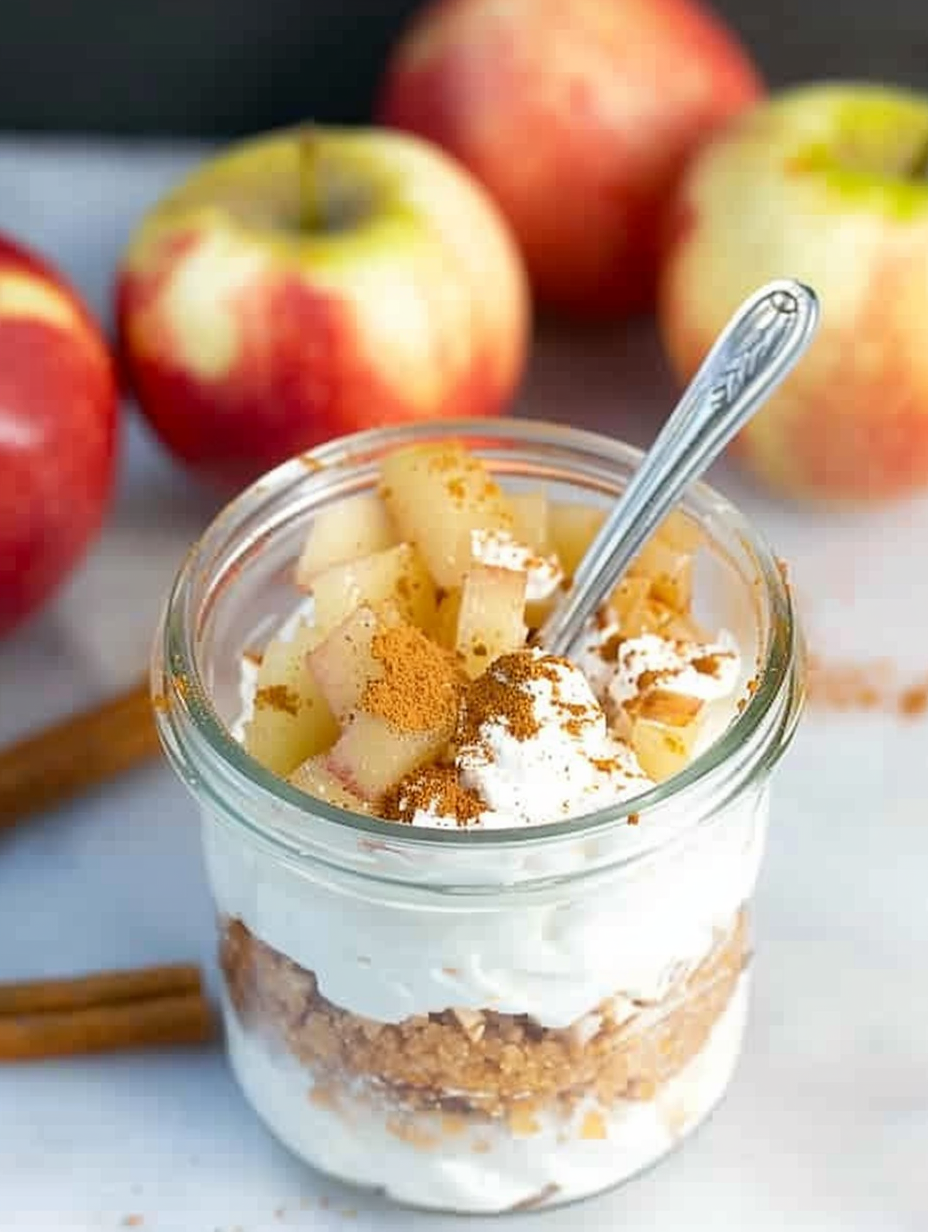
- Apples: 2 small apples, peeled and cored, sliced into small cubes. Choose firm varieties like Fuji or Honeycrisp for the best texture; they hold up during quick cooking and provide a sweet-tart contrast.
- Coconut oil or butter: 1/2 tablespoon to sauté the apples. Coconut oil adds a subtle, tropical note while butter delivers a richer mouthfeel; either works well.
- Brown sugar: 2 tablespoons to help the apples caramelize and give that classic pie sweetness. Light or dark brown sugar will both work.
- Apple pie spice or cinnamon: 1/2 teaspoon for the apples and 1/2 tablespoon for the filling. If you do not have apple pie spice, combine cinnamon, a pinch of nutmeg, and ground ginger.
- Cream cheese: 8 ounces, softened. Full fat gives the creamiest result, but you can use reduced fat for a lighter version; make sure it is at room temperature for smooth mixing.
- Thick Greek yogurt: 2/3 cup such as Fage. The yogurt brightens the filling and provides a pleasant tang while keeping the texture soft and scoopable.
- Agave nectar: 6 tablespoons as the sweetener in the filling. Honey or maple syrup can be substituted at a 1 to 1 ratio if preferred.
- Vanilla extract: 1 tablespoon to round out the filling with warm aromatics and complexity.
- Graham cracker crumbs: 2/3 cup total for layering. You can lightly toast them in a skillet to enhance nuttiness.
Instructions
Cook the apples: In a medium saucepan over medium heat, combine the chopped apples, 2 tablespoons brown sugar, and 1/2 tablespoon coconut oil or butter. Sprinkle in 1/2 teaspoon apple pie spice or cinnamon. Cook, stirring occasionally, for about 5 minutes until the apples are softened and edges are lightly browned. Watch carefully near the end so they caramelize without burning. Make the cheesecake filling: In a mixing bowl, beat together 8 ounces softened cream cheese, 6 tablespoons agave nectar, 2/3 cup thick Greek yogurt, 1 tablespoon vanilla extract, and 1/2 tablespoon apple pie spice. Use a hand mixer or whisk until very smooth and airy, about 2 to 3 minutes. The yogurt keeps it light while the cream cheese provides structure. Assemble the jars: Place 2 tablespoons graham cracker crumbs into the bottom of each 8-ounce mason jar. Spoon 2 to 3 tablespoons of the cheesecake filling over the crumbs, followed by 2 tablespoons of the warm apple mixture. Add another 2 to 3 tablespoons filling, 2 tablespoons graham crumbs, 2 tablespoons filling, and finish with 2 tablespoons of apples. The layers should be neat so each spoonful has balance. Chill and serve: Refrigerate jars for at least 30 minutes to let layers settle, though they can be served immediately if you prefer a warmer apple contrast. Store covered in the refrigerator for up to 7 days. For a firmer set, chill 2 to 4 hours.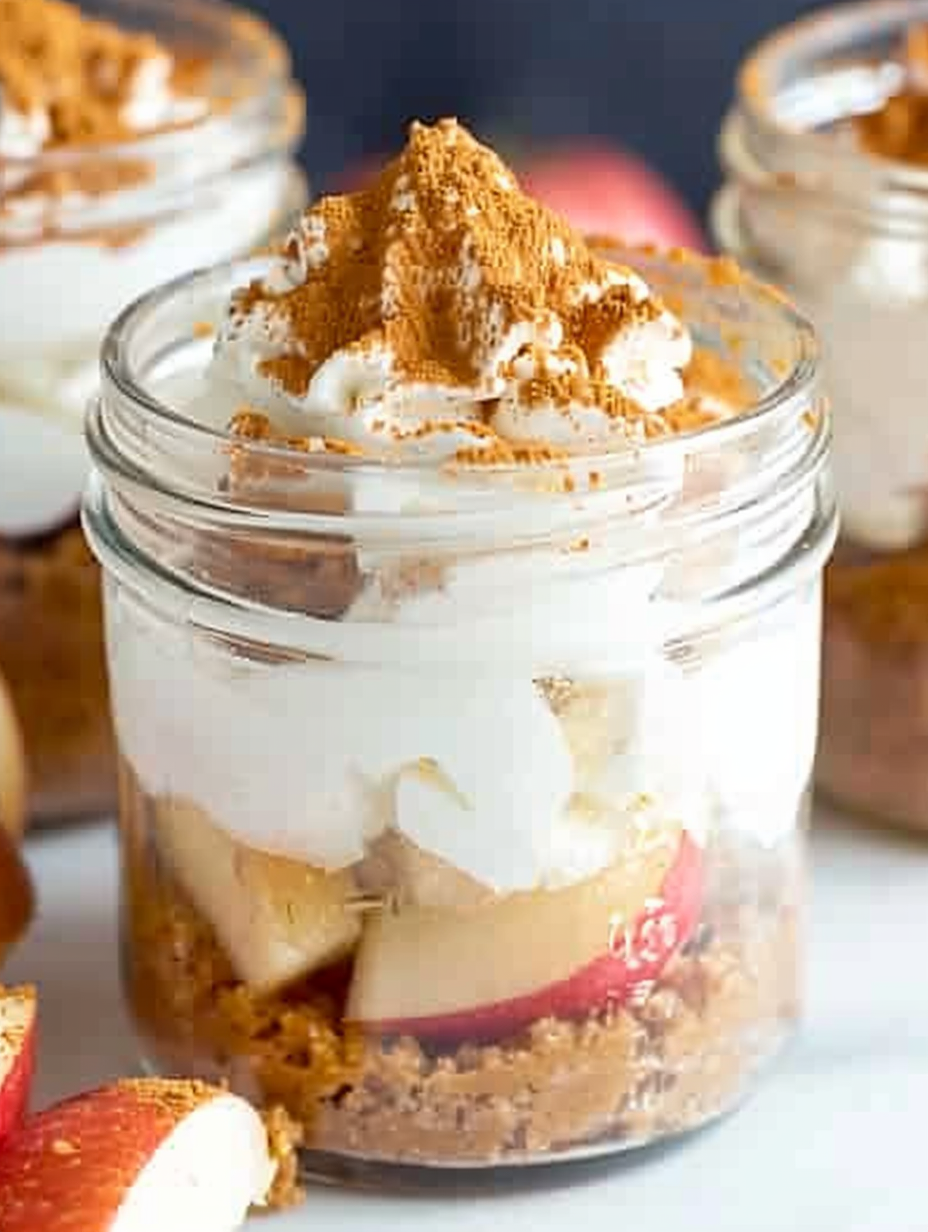
You Must Know
- These jars keep well in the refrigerator for up to 7 days, which makes them excellent for make-ahead meals or snacks.
- Because the apples are quickly sautéed, they retain a pleasant bite; if you like softer fruit, simmer an extra 2 to 3 minutes.
- This dessert is fairly high in sugar and fat per serving, so consider smaller jars for calorie control if needed.
- Freezing is not recommended because the texture of the cream cheese mixture changes after thawing, but the cooked apples freeze well for future use.
My favorite part of these jars is how adaptable they are. One autumn I doubled the apple topping for a small gathering and the jars disappeared first. The balance between bright yogurt tang and sweet agave makes the filling feel lighter than a classic baked filling. I also like to toast the graham crumbs briefly in a dry skillet to bring a slightly smoky note when guests report the dessert as unexpectedly complex for something so quick to prepare.
Storage Tips
Store completed jars in airtight mason jars with lids and refrigerate immediately. For best texture keep lids on at all times to prevent the graham crumbs from absorbing excess moisture. Jars last up to 7 days refrigerated; before serving, let sit 10 minutes at room temperature if they have chilled for a long time so the filling softens slightly. If you want to prepare apples ahead, freeze the cooked apples in a freezer-safe container for up to 3 months and thaw in the refrigerator overnight before using.
Ingredient Substitutions
If you need dairy-free options, replace cream cheese with a full-fat plant-based cream cheese and use coconut yogurt in place of Greek yogurt. For a gluten-free version, swap graham crumbs with a gluten-free cookie crumb or ground nuts like almonds at a 1 to 1 ratio. Agave can be replaced with honey or maple syrup measure for measure. To reduce sugar, cut the agave to 4 tablespoons and increase vanilla and spice to maintain flavor.
Serving Suggestions
Serve jars chilled with a small dollop of whipped cream or a thin apple slice garnish. For a brunch or tea service place jars on a tray with small spoons and fresh mint for color. These are lovely paired with a cup of spiced tea or a light, sparkling wine for an evening gathering. For kid-friendly presentations, add a drizzle of caramel sauce on top and a cinnamon stick as a stirrer.
Cultural Background
The flavor profile is rooted in classic American apple pie spices blended into a creamy cheesecake finish, reflecting how American desserts often combine familiar ingredients into hybrid preparations. Serving desserts in jars emerged from a recent trend favoring portable, portion-controlled dishes popular at picnics and farmers markets. This jar format is practical and visually appealing, echoing Southern and Midwestern traditions of canning and sharing seasonal fruit preparations.
Seasonal Adaptations
In autumn use a mix of tart and sweet apples for depth. In winter, fold in a spoonful of pumpkin puree and pumpkin pie spice to the filling for a holiday twist. During summer swap apples for lightly macerated peaches or berries and reduce cooking time. For holiday parties add toasted pecans to the graham layer and a drizzle of warm bourbon caramel for an adult variation.
Meal Prep Tips
To batch-make, cook a double batch of the apples and keep them in the refrigerator for up to 5 days or freeze portions. Prepare the filling in advance and refrigerate for up to 3 days; bring to room temperature before whipping to restore softness. Assemble jars the day before serving to let flavors meld, or layer them the morning of an event for maximum freshness. Use 8-ounce jars for generous single servings or 4-ounce jars for bite-sized portions.
Success Stories
One reader told me she used this recipe to create dessert jars for a school bake sale and sold out within an hour. Another family used the jars as part of a picnic menu because they travel so well without leaking. Small touches like a handwritten tag and a ribbon turn a simple jar into a thoughtful gift that friends often asked for again. These anecdotes remind me that quick, well-made food can create moments people remember.
These jars are a reliable, joyful way to share dessert without stress. Whether for weekday treats, holiday gatherings, or a sweet everyday finish, they invite creativity and make dessert approachable. Give them a try, personalize the spices, and watch how small changes yield delicious results.
Pro Tips
Soften cream cheese to room temperature for silky, lump-free filling.
Toast graham cracker crumbs briefly in a dry skillet to intensify flavor.
Cook apples only until softened to retain pleasant bite; overcooking makes them mushy.
Chill jars at least 30 minutes for the best layered texture.
Use 8-ounce mason jars for generous single servings or 4-ounce for smaller portions.
This nourishing no bake apple pie cheesecake in a jar recipe is sure to be a staple in your kitchen. Enjoy every moist, high protein slice — it is perfect for breakfast or as a wholesome snack any time.
Tags
No Bake Apple Pie Cheesecake In A Jar
This No Bake Apple Pie Cheesecake In A Jar recipe makes perfectly juicy, tender, and flavorful steak every time! Serve with potatoes and a side salad for an unforgettable dinner in under 30 minutes.
Ingredients
For the apples
For the no bake cheesecake filling
Other
Instructions
Cook the apples
In a medium saucepan over medium heat combine diced apples, 2 tablespoons brown sugar, and 1/2 tablespoon coconut oil or butter. Add 1/2 teaspoon apple pie spice and cook 5 minutes, stirring occasionally, until apples are softened and lightly browned. Remove from heat and let cool slightly.
Prepare the filling
In a mixing bowl, beat together 8 ounces softened cream cheese, 6 tablespoons agave nectar, 2/3 cup Greek yogurt, 1 tablespoon vanilla extract and 1/2 tablespoon apple pie spice until smooth and airy, about 2 to 3 minutes with a hand mixer or vigorous whisking.
Layer the jars
Divide 2/3 cup graham cracker crumbs among four 8-ounce jars, about 2 tablespoons each. Spoon 2 to 3 tablespoons cheesecake filling over crumbs, add 2 tablespoons cooked apples, then repeat layering: 2 to 3 tablespoons filling, 2 tablespoons graham crumbs, 2 tablespoons filling, and finish with 2 tablespoons apples on top.
Chill and serve
Refrigerate jars for at least 30 minutes to allow layers to set, or serve immediately if you prefer warm apples. Keep covered in the refrigerator up to 7 days. For firmer texture chill 2 to 4 hours before serving.
Last Step: Please leave a rating and comment letting us know how you liked this recipe! This helps our business to thrive and continue providing free, high-quality recipes for you.
Nutrition
Did You Make This?
Leave a comment & rating below or tag
@savoryte on social media!
Categories:
You might also like...

Tilapia with Lemon Butter
Flaky pan-seared tilapia topped with a velvety lemon butter sauce. Quick to cook, bright with citrus, and weeknight-easy yet dinner-party special.

Healthy Egg Muffin Cups
Start your morning with veggie-loaded, protein-packed egg muffins at just 50 calories each. Perfect for make-ahead breakfasts, freezer-friendly, and easy to customize.

TikTok Breakfast Tortilla Fold
Crispy, cheesy, and ready in minutes, this viral tortilla fold layers bacon, egg, avocado, and melty cheese into a perfectly portable triangle.
Did You Make This?
Leave a comment & rating below or tag @savoryte on social media!
Rate This Recipe
Share This Recipe
Enjoyed this recipe? Share it with friends and family, and don't forget to leave a review!
Comments (1)
This recipe looks amazing! Can't wait to try it.
Comments are stored locally in your browser. Server comments are displayed alongside your local comments.

Hi, I'm Sophia!
What's Popular

30-Minute Meals!
Join to receive our email series which contains a round-up of some of our quick and easy family favorite recipes.