
Mini No-Bake Biscoff Cheesecakes

Six-ingredient, vegan no-bake mini Biscoff cheesecakes—creamy, dreamy and ready after an overnight chill. Perfect for parties, make-ahead treats, and Biscoff lovers.

This recipe is my go-to when I want a fuss-free but show-stopping dessert. I first discovered this mini Biscoff cheesecake idea while adapting a layered cookie-cup dessert for a vegan menu; turning the concept into single-serve no-bake cheesecakes felt like the perfect way to marry buttery cookie crunch with a silky dairy-free filling. The result is a small, indulgent bite that tastes rich and creamy while being entirely plant-based. The texture contrast—crispy cookie base, airy whipped filling, and a ribbon of sticky Lotus Biscoff spread—makes every mouthful feel luxurious, even though the ingredient list stays delightfully short.
These little treats are especially wonderful for gatherings because they can be made ahead and look impressive on a dessert table. I remember serving them at a small family get-together: they disappeared within minutes and everyone raved about how the filling was almost indistinguishable from traditional cheesecake. Using a push-up cookie cup tin makes un-molding effortless, but you can also serve them in silicone molds or small jars if preferred. The key is chilling overnight so the filling sets perfectly and holds its shape when plated.
Why You'll Love This Recipe
- Only six core ingredients plus a little extra for decorating—this is ideal when you want something decadent but simple. Uses pantry staples like Lotus Biscoff biscuits and spread so you don’t need specialty shopping.
- No baking required: just assemble, freeze overnight, and finish with a quick thaw. Great for hot-weather cooking or when your oven is busy.
- Make-ahead friendly—prepare the cups a day in advance and store them in the refrigerator for up to 3 days or freeze for longer storage. Perfect for parties and events.
- Single-serve presentation means easy portion control and elegant plating. Push-up tins make removal tidy and professional-looking, while silicone molds or ramekins work well too.
- Vegan and dairy-free but still ultra-creamy thanks to a good dairy-free double cream alternative; Elmlea Plant Based Double Cream Alternative is my favorite for structure and mouthfeel.
- Huge crowd-pleaser—kids and adults love the familiar caramelized spice of Biscoff. Ready prep time is short, about 20–30 minutes active time before chilling.
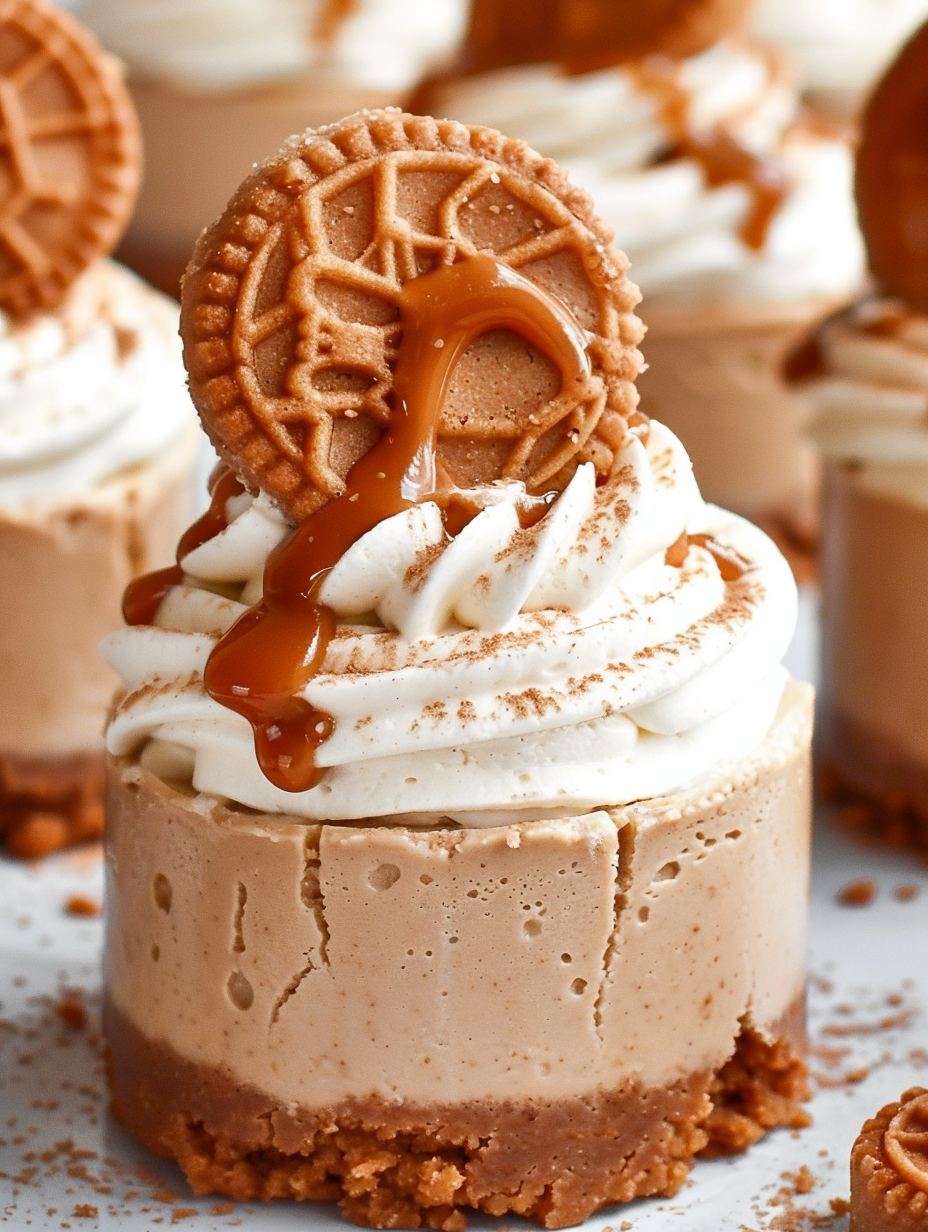
In my kitchen these have become the dessert I bring when I want to impress without stress. My partner will happily eat three in one sitting, and friends always ask for the recipe. I’ve also learned small tricks—like piping a dollop of cooled Biscoff spread into the center before freezing—which make the finished result look bakery-made.
Ingredients
- For the base: 150 g Biscoff biscuits (about 20 cookies). Use Lotus Biscoff original biscuits for the characteristic caramelized flavor; crush finely for a compact, stable base.
- 50 g dairy-free butter or margarine (about 3 1/2 tablespoons). Choose a block-style vegan butter that solidifies when chilled so the base binds well—brands like Flora Plant or Naturli work nicely.
- For the filling: 260 ml dairy-free whipping cream (approx. 1 cup + 2 tablespoons). I recommend Elmlea Plant Based Double Cream Alternative for thickness and whipping stability.
- 160 g dairy-free cream cheese (about 5.6 oz, roughly 2/3 cup). I use Sainsbury’s Free From coconut-based or Violife Dairy-free Cream Cheese; aim for a firm, spreadable style rather than soft dessert creams.
- 6 Biscoff biscuits, finely crushed to fold into the filling for texture and depth of flavor.
- 2 heaped tablespoons Biscoff spread (about 1.5–2 tablespoons) folded into the filling for that classic cookie-butter swirl.
- Extra: 30 ml dairy-free whipping cream (about 2 tablespoons) and 80 g Biscoff spread (approx. 2.8 oz or 5 tablespoons) for filling accents and drizzling. Plus extra biscuits for decoration.
Instructions
Prepare the base: Start by melting the dairy-free butter in a small saucepan over low heat until fully liquid. Meanwhile, blitz 150 g (about 20) Biscoff biscuits in a food processor until they reach fine crumbs. Combine the crumbs with the melted butter in a medium heatproof bowl; the texture should resemble damp sand and be able to hold together when pressed between fingers. Press roughly 50 g of the mixture into each cavity of a push-up cookie cup tin (or silicone muffin cups)—compact firmly using your fingers or the back of a spoon. Transfer the tray to the freezer while you prepare the filling; this helps the base set and keeps it crisp. Make the filling: In a mixing bowl, add 260 ml (about 1 cup + 2 tbsp) dairy-free whipping cream and 160 g (5.6 oz) dairy-free cream cheese. Whip starting on low to avoid splatter, then increase to high until the mixture becomes thick and holds peaks—this takes around 4–6 minutes with a stand mixer fitted with a balloon whisk, slightly longer with a hand mixer. Fold in the 6 crushed Biscoff biscuits and the 2 heaped tablespoons of Biscoff spread, whisking gently to keep the mixture airy but evenly flavored. Taste and adjust—if you prefer a stronger cookie-butter hit, add another teaspoon of spread. Assemble the cups: Transfer the filling into a piping bag fitted with a large round nozzle (or snip the end of a disposable bag). Pipe the filling into each chilled cookie cup, leveling the tops with an offset spatula. Spoon or pipe about 40 g (about 1 1/2 tablespoons) of Biscoff spread into a small piping bag and add a thin stripe down the center of each cheesecake, smoothing with the back of a spoon to embed the swirl. Freeze the tray for at least 4 hours until firm; overnight is best for a clean removal and perfect texture. When ready to unmold, push up from the base if using push-up tins, or pop out silicone cups gently. Finish and decorate: Gently melt 30 g (about 1 tablespoon) of Biscoff spread in short bursts in the microwave or over a double boiler until just pourable—avoid heating too much. Drizzle a small puddle on top of each chilled cheesecake; do this while cold so the melted spread sets without melting the filling. Whip the reserved 30 ml (2 tbsp) dairy-free cream to firm peaks and pipe a swirl atop each cake. Finish with a whole Biscoff biscuit, a small extra drizzle (about 10 g) and some cookie crumbs for texture. Place in the fridge for an hour to slightly defrost before serving, or serve chilled directly for a firmer bite.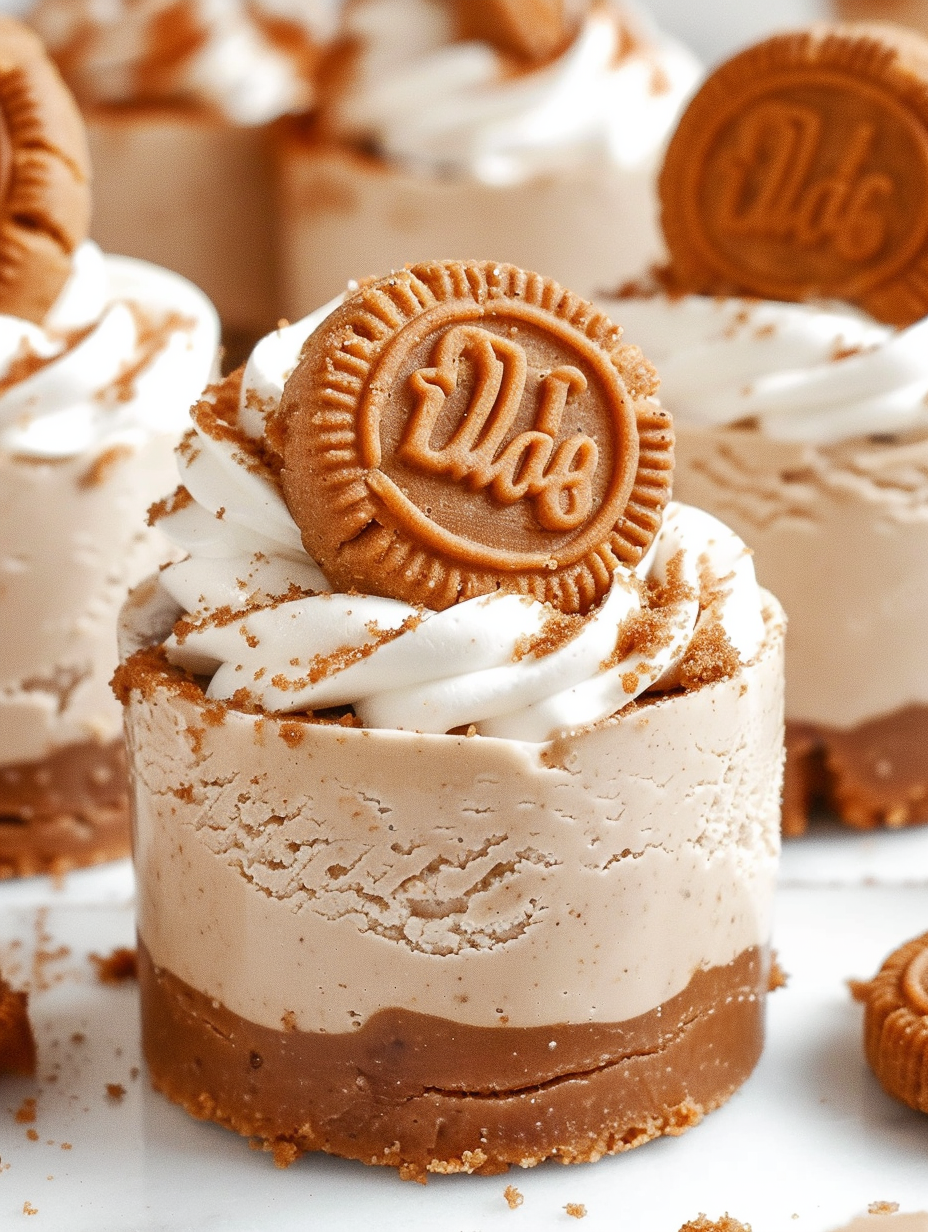
You Must Know
- Storage: keep refrigerated and eat within 3 days for best texture; these freeze well for up to 3 months if wrapped airtight—thaw overnight in the fridge.
- Set time: although no baking is involved, firm setting requires at least 4 hours in the freezer; overnight chilling gives the cleanest slices and easiest removal.
- Texture tip: using a high-quality dairy-free double cream alternative will make a big difference—coconut-based single creams often lack structure and will be too soft.
- Allergens: contains wheat (Biscoff biscuits) and may contain traces of soy or nuts depending on the brand—check labels.
- Make-ahead advantage: assemble up to two days ahead and store chilled; for longer storage, freeze assembled cups and thaw in the fridge the day before serving.
What I love most is how reliably these please a crowd—I've brought them to potlucks and birthdays and always get asked for the recipe. The little push-up bases make presentation playful and nostalgic, like an adult-party version of a childhood treat.
Storage Tips
Store in an airtight container in the refrigerator for up to 3 days; place a sheet of parchment between layers to prevent sticking. For longer storage, freeze on a tray until solid, then transfer to a sealed container or freezer bag for up to 3 months. Thaw in the refrigerator for several hours or overnight before serving. If storing frozen, avoid heat when melting Biscoff for drizzling—let it cool slightly before decorating frozen cheesecakes to prevent melting.
Ingredient Substitutions
If you can't find Lotus Biscoff biscuits or spread, speculoos cookies and a comparable cookie butter are acceptable substitutes though the exact spice profile will vary. For the dairy-free cream, Elmlea Plant Based Double Cream Alternative gives the closest texture; if unavailable, try a thick coconut-based creamer but add a stabilizer like 1/2 teaspoon agar-agar powder dissolved in a tablespoon of warm water (set briefly) to help firmness. For cream cheese alternatives, Violife or Nush almond-based spreads work well—avoid ultra-soft dessert spreads that are too loose to whip.
Serving Suggestions
Serve chilled as single-serve desserts on a small dessert plate, garnished with a drizzle of extra Biscoff spread and a whole biscuit. Pair with fresh berries or a tangy raspberry coulis to cut through the sweetness, or serve with coffee for a classic flavor match. These mini treats are perfect for afternoon tea, dinner parties, and holiday buffets where small bites are preferred.
Cultural Background
Biscoff (speculoos) biscuits originate from Belgium and the Netherlands and are characterized by their caramelized sugar and warm spice notes. The trend of folding cookie butter into desserts has grown internationally, and combining this flavor with a cheesecake-style filling brings together two beloved textures: dense cookie crumb and airy cream. This adaptation celebrates that European cookie heritage in a vegan, no-bake format.
Seasonal Adaptations
In autumn and winter, enhance the spice profile by stirring 1/4 teaspoon ground cinnamon or nutmeg into the base crumbs. For summer, lighten the topping with a citrusy compote of orange or passionfruit as an accompaniment. Around holidays, decorate with chopped toasted hazelnuts or edible gold leaf for a festive touch.
Meal Prep Tips
Make the bases and filling separately up to 24 hours in advance—store the crumb bases frozen and the filling chilled. On the day you want to serve, assemble, swirl in the extra Biscoff, and freeze overnight. Transport chilled in a cooler if taking to an event. Use small airtight containers or a shallow cooler with ice packs to maintain temperature during travel.
These tiny cheesecakes are a beloved staple in my repertoire: quick to assemble, spectacular to serve, and endlessly adaptable. Give them a try—you might find they become your favorite make-ahead dessert too.
Pro Tips
Whip the cream and cream cheese thoroughly so the filling is light and holds its shape; start on low speed and increase to high to avoid splashes.
Press the base mixture very firmly into the cups so the cookie shell doesn’t crumble when unmolding.
When melting Biscoff spread, heat gently and briefly—too hot will melt the filling on contact.
This nourishing mini no-bake biscoff cheesecakes recipe is sure to be a staple in your kitchen. Enjoy every moist, high protein slice — it is perfect for breakfast or as a wholesome snack any time.
FAQs about Recipes
Can I freeze these?
Yes. Assemble and freeze for up to 3 months; thaw overnight in the fridge before serving.
What dairy-free cream works best?
Use Elmlea Plant Based Double Cream Alternative or another stable dairy-free whipping cream. Avoid thin coconut creams.
What tin should I use?
A push-up cookie cup tin with a push-up base works best for neat unmolding; silicone molds or small ramekins are good alternatives.
Tags
Mini No-Bake Biscoff Cheesecakes
This Mini No-Bake Biscoff Cheesecakes recipe makes perfectly juicy, tender, and flavorful steak every time! Serve with potatoes and a side salad for an unforgettable dinner in under 30 minutes.
Ingredients
Base
Filling
Topping & Finish
Instructions
Make the base
Melt dairy-free butter over low heat and combine with finely crushed Biscoff crumbs. Press about 50 g of mixture into each cavity of a push-up cup tin, compacting firmly. Freeze while preparing the filling.
Prepare the filling
Whip dairy-free whipping cream with dairy-free cream cheese until thick and holding peaks (4–6 minutes). Fold in crushed biscuits and Biscoff spread until evenly combined.
Assemble and chill
Pipe the filling into chilled bases, add a small stripe of Biscoff spread in the center, and freeze for at least 4 hours or overnight until firm.
Decorate and serve
Melt a small amount of Biscoff spread and drizzle onto chilled cheesecakes. Whip remaining cream to firm peaks and pipe swirls, then top with a biscuit and crumbs. Thaw in the fridge for 1–2 hours before serving if frozen.
Last Step: Please leave a rating and comment letting us know how you liked this recipe! This helps our business to thrive and continue providing free, high-quality recipes for you.
Nutrition
Did You Make This?
Leave a comment & rating below or tag
@savoryte on social media!
Categories:
You might also like...

Tilapia with Lemon Butter
Flaky pan-seared tilapia topped with a velvety lemon butter sauce. Quick to cook, bright with citrus, and weeknight-easy yet dinner-party special.

Healthy Egg Muffin Cups
Start your morning with veggie-loaded, protein-packed egg muffins at just 50 calories each. Perfect for make-ahead breakfasts, freezer-friendly, and easy to customize.

TikTok Breakfast Tortilla Fold
Crispy, cheesy, and ready in minutes, this viral tortilla fold layers bacon, egg, avocado, and melty cheese into a perfectly portable triangle.
Did You Make This?
Leave a comment & rating below or tag @savoryte on social media!
Rate This Recipe
Share This Recipe
Enjoyed this recipe? Share it with friends and family, and don't forget to leave a review!
Comments (1)
This recipe looks amazing! Can't wait to try it.
Comments are stored locally in your browser. Server comments are displayed alongside your local comments.

Hi, I'm Sophia!
What's Popular

30-Minute Meals!
Join to receive our email series which contains a round-up of some of our quick and easy family favorite recipes.