
Mini Lemon Meringue Pies

Tiny lemon tarts with a flaky buttery crust, bright tangy curd, and cloud-like toasted meringue—perfect for parties, potlucks, and sunshine-filled afternoons.
Why You'll Love This Recipe
- They are ready in under an hour from start to finish when using store-bought crust and curd, making them ideal for last-minute entertaining and quick celebrations.
- The handheld size makes them perfect for potlucks, showers, and picnics, eliminating the need for slicing and plating while keeping presentation elegant.
- Ingredients are pantry-friendly and widely available; two pre-made pie crusts and two 10-ounce jars of lemon curd deliver consistent, bright flavor every time.
- Technique-focused steps such as whipping egg whites to stiff peaks and careful browning of the meringue teach foundational skills that transfer to many other desserts.
- Make-ahead flexibility: bake the shells in advance and fill and brown the meringue just before serving for the freshest presentation.
- Swappable elements allow adaptations for dietary needs and seasonal variations without losing the core lemon-meringue identity.
I remember the first time I served these to a skeptical aunt who prefers classic slices. She popped one into her mouth, closed her eyes, and said it reminded her of summer lemon bars from her childhood. That quiet moment of approval convinced me to keep this on my menu whenever bright, shareable treats are needed.
Ingredients
- Pie crust: Two pre-made 9-inch pie crusts, store-bought or use a homemade shortcrust. Look for refrigerated crusts in familiar brands such as Pillsbury for even, neutral flavor; a butter crust contributes flakiness and a rich background to the lemon curd.
- Lemon curd: 20 ounces lemon curd, about two 10-ounce jars. Choose a high-quality curd with a bright lemon flavor and balanced sweetness so the filling is tangy without being overly sharp.
- Egg whites: Four large egg whites at room temperature for the meringue. Room temperature whites whip up faster and reach greater volume than cold whites.
- Cream of tartar: 1/2 teaspoon to stabilize the meringue and help create a glossy, dense structure that holds its peaks under heat.
- Granulated sugar: 1 cup, added gradually for a smooth, shiny meringue with stiffness and body. Use standard granulated sugar for the best results.
Instructions
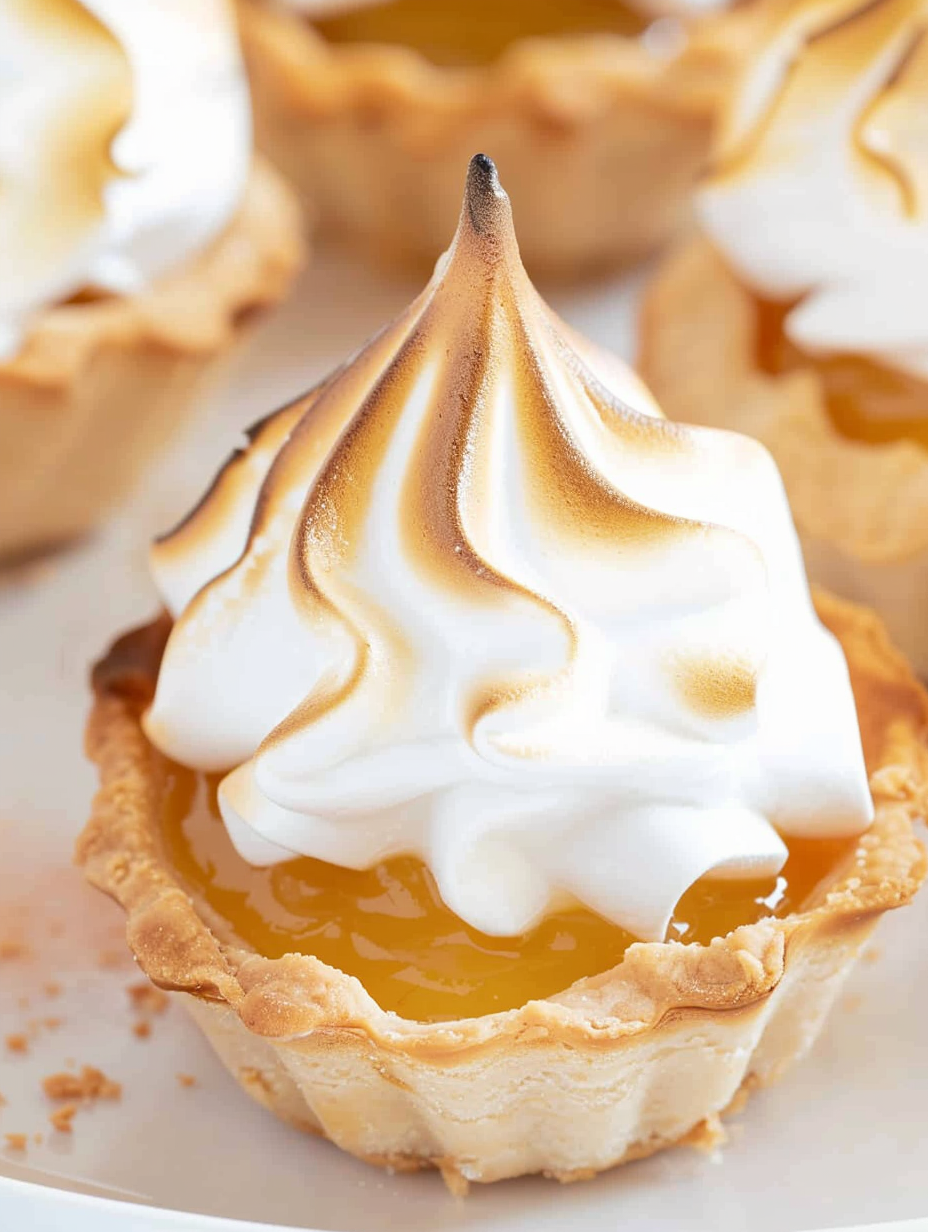
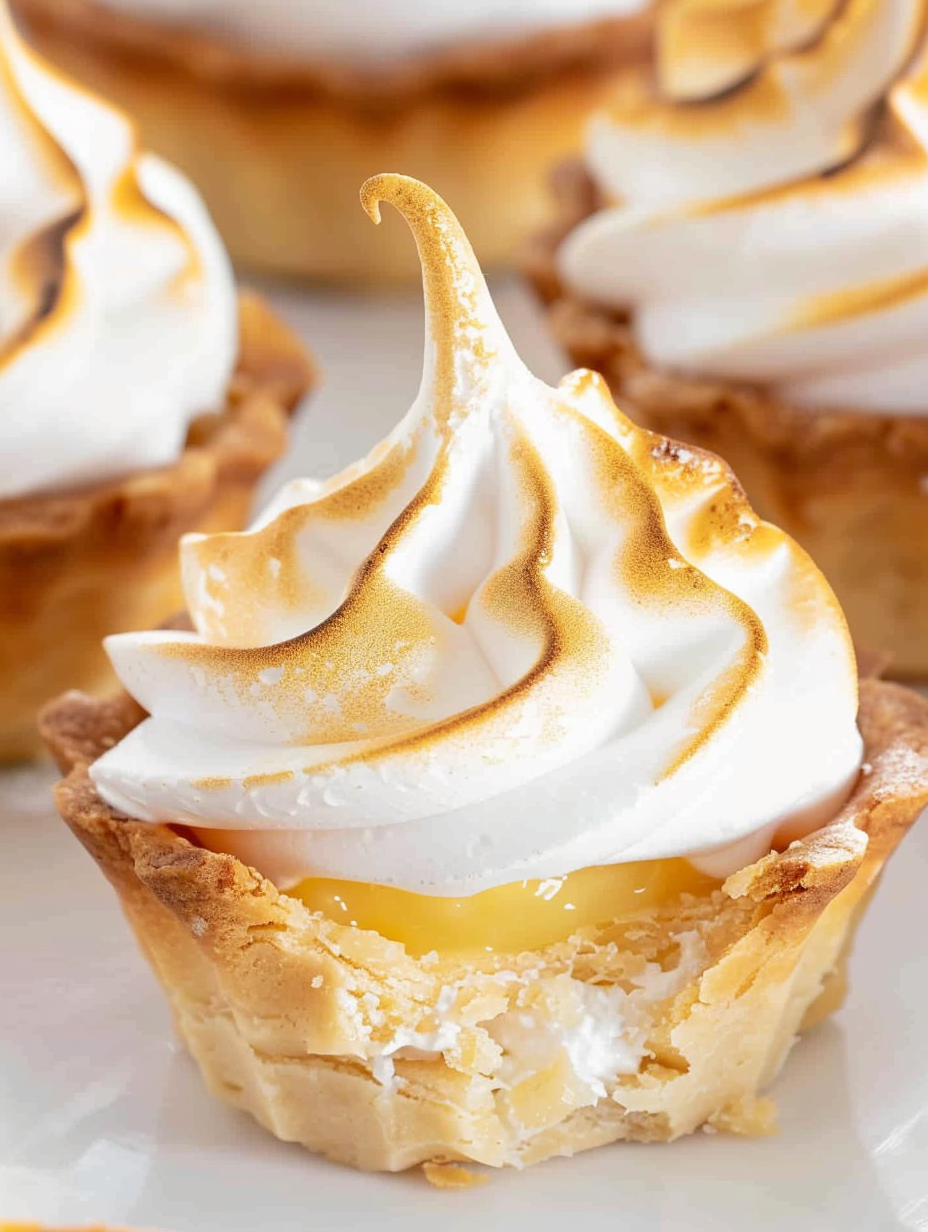
Prepare the crusts: Take the two pie crusts out of the refrigerator and let them rest on the counter for about 15 minutes so they relax. Preheat the oven according to your crust package directions, usually 375 degrees Fahrenheit. Lightly flour a work surface and unroll one crust. Using a round cookie cutter slightly larger than the diameter of your mini muffin tins, cut circles and gently press each circle into the muffin cavities. Use your fingers to push the dough down and shape it, ensuring an even thickness. Dock the bottoms lightly with a fork to prevent excessive bubbling. Follow the package bake time as a guideline and watch for a light golden color. Transfer baked shells to a wire rack to cool completely before filling. Bake the second batch: Repeat the cutting and pressing process with the second crust. If your mini tins are nonstick, you can brush cavities with a tiny amount of melted butter or spray to ensure easy removal. Bake until the edges are slightly browned and the centers set, then cool completely on a wire rack so the curd does not melt when filled. Fill with lemon curd: Once the shells are cool, spoon or pipe lemon curd into each shell up to the rim. For speed and neater filling, transfer curd into a resealable plastic bag, snip a small corner, and pipe into each shell. Leave a small margin for the meringue to sit without overflowing. Place the filled tins on a baking sheet while you prepare the topping. Make the meringue: In a stand mixer fitted with the whisk attachment, place room-temperature egg whites and beat on medium-high until frothy and soft peaks begin to form, about one minute. Add 1/2 teaspoon cream of tartar, then reduce speed slightly and begin adding 1 cup granulated sugar one tablespoon at a time. Increase speed to high and continue beating until stiff, glossy peaks form and the sugar is fully dissolved. This step takes 5 to 10 minutes. Scrape the bowl occasionally to ensure even mixing. Do not overbeat as over-mixing can deflate the foam. Pipe and brown the meringue: Transfer the meringue to a piping bag fitted with your preferred tip, filling the bag about three quarters full. Pipe generous swirls onto each lemon-filled shell, making decorative peaks that will brown beautifully. Preheat your oven broiler to high and place the filled mini muffin pan under the broiler about 4 to 6 inches from the heat. Toast until the meringue develops an even golden brown, which should take approximately two minutes. Watch closely to avoid burning. Alternatively, use a handheld kitchen torch to brown the meringue for more control.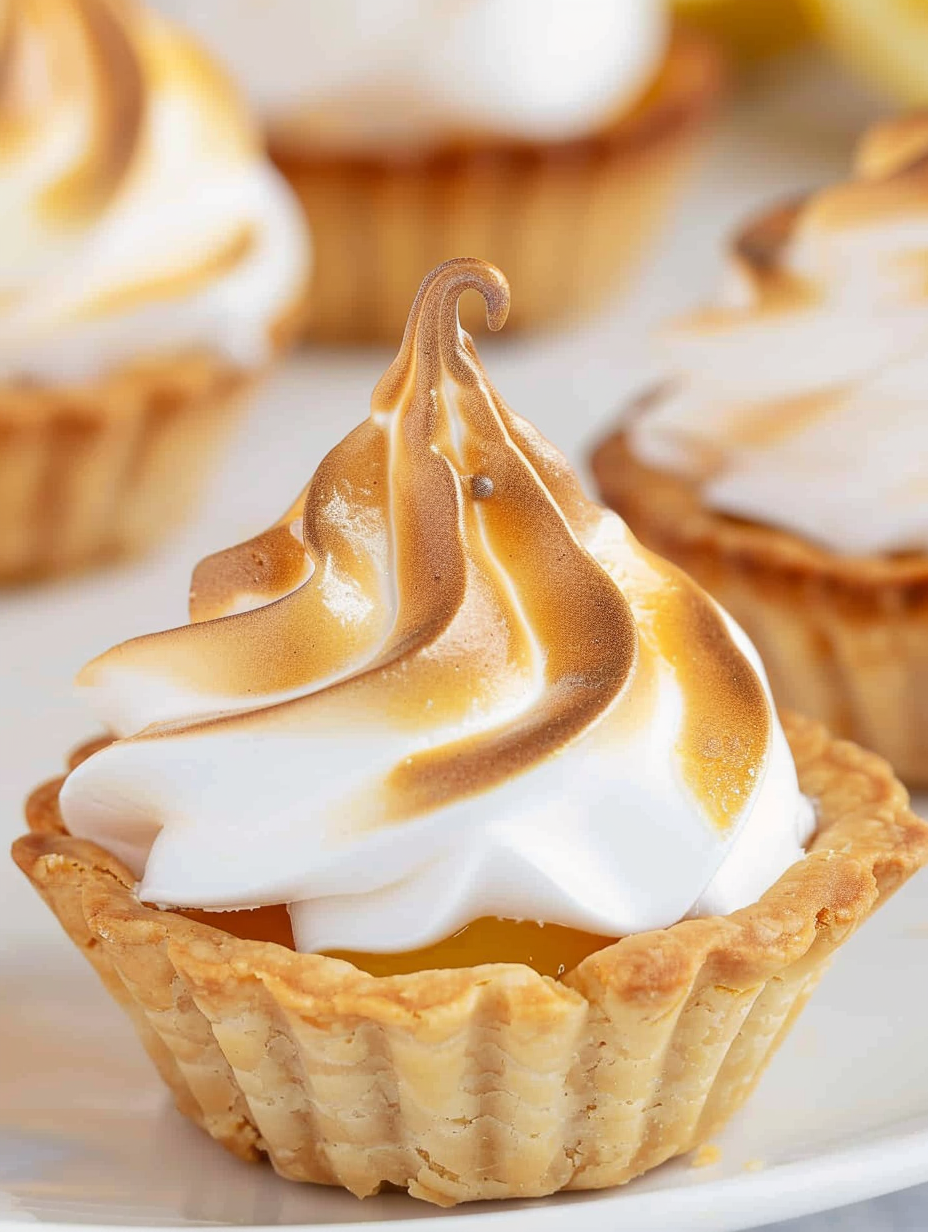
You Must Know
- These portions freeze well for up to three months if you freeze the baked shells and curd separately and assemble after thawing to maintain crispness.
- Because egg whites are a primary ingredient, store leftovers in the refrigerator and consume within 24 to 48 hours for best texture and safety.
- Each mini pie is approximately 214 calories, with a carbohydrate-heavy profile. The lemon curd contributes most of the sugar, while the crust adds fat from butter or shortening.
- Use a kitchen torch for targeted browning to avoid heating the filling; broilers are faster but require constant attention to prevent scorching.
My favorite aspect of making these is how the meringue transforms with a quick blast of heat. The contrast between the bright curd and the smoky-sweet meringue makes every bite feel celebratory. Family members often ask for the shells to be baked a day ahead so assembly is quick when guests arrive.
Storage Tips
Store unfilled baked shells in an airtight container at room temperature for up to two days to keep them crisp. If already filled with curd and topped with meringue, refrigerate in a single layer covered loosely with plastic wrap for 24 to 48 hours. For longer storage, freeze baked shells individually on a tray until solid, transfer to a freezer bag for up to three months, and thaw at room temperature before filling. Reheat assembled pies briefly under a low oven or torch the meringue again to refresh the browning. Look for sogginess as the main sign of declining quality.
Ingredient Substitutions
For a dairy-free option, choose a dairy-free pie crust made from vegetable shortening or a dairy-free butter substitute; check labels carefully. Swap the lemon curd for homemade curd made with coconut milk and cornstarch if you need a dairy-free curd. To reduce sugar, use a lower-sugar curd and reduce sugar in the meringue slightly, but be cautious since sugar contributes to stability and gloss; do not reduce sugar by more than 10 percent. For a gluten-free version, use store-bought gluten-free pie crusts or a simple almond flour crust, though texture will be slightly different.
Serving Suggestions
Serve these mini pies on a tiered dessert tray during parties for a polished presentation. Garnish each tart with a thin lemon twist, a light dusting of powdered sugar, or a tiny candied lemon slice. They pair beautifully with lightly brewed tea, sparkling wine, or a small scoop of vanilla bean ice cream for a plated dessert. For a brunch offering, place a few alongside fresh berries and yogurt to create a balanced dessert spread.
Cultural Background
Lemon meringue is a classic in American and European baking traditions, tracing roots back to the 19th century when cooks paired acidic curds with sweet, airy meringues to balance flavors. Miniaturizing large tarts has been a popular trend in modern pastry because it allows single-serve convenience while preserving classic contrasts. These small versions echo the same balance of sweet, tart, and creamy textures that made the full-size dessert a staple at celebrations for generations.
Seasonal Adaptations
In spring and summer, boost citrus brightness by adding a teaspoon of grapefruit or lime zest to the curd for a layered citrus profile. For autumn, switch to a spiced orange curd with a pinch of ground ginger and cinnamon. Holiday variations can include a dollop of cranberry compote beneath the curd or a rosemary-infused crust for savory-sweet complexity. Adjust the garnish to reflect the season, such as candied citrus peels for winter festivities.
Meal Prep Tips
To streamline assembly for a party, bake all shells up to two days ahead and store them in an airtight container. Jarred curd can be portioned into piping bags and refrigerated. Whip the meringue just before guests arrive and pipe and brown as needed to maintain loft. If you must prepare meringue in advance, pipe it onto a parchment-lined tray and bake at low temperature to make meringue kisses; these will keep longer but will not have the same fresh texture as newly whipped meringue.
These mini lemon meringue pies are a joyful way to share a classic flavor in a bite-size form. They reward attention to technique but remain accessible to bakers of all levels. Make them for a crowd, a special occasion, or any time you want a little sunshine on a plate. Enjoy and share them generously.
Pro Tips
Ensure egg whites are at room temperature so they whip to maximum volume and stability.
Add the granulated sugar slowly, one tablespoon at a time, to allow it to dissolve and produce a glossy meringue.
Use a kitchen torch for controlled browning to avoid heating the curd and deflating the meringue.
Bake shells ahead of time and store in an airtight container to keep them crisp before assembly.
This nourishing mini lemon meringue pies recipe is sure to be a staple in your kitchen. Enjoy every moist, high protein slice — it is perfect for breakfast or as a wholesome snack any time.
Tags
Mini Lemon Meringue Pies
This Mini Lemon Meringue Pies recipe makes perfectly juicy, tender, and flavorful steak every time! Serve with potatoes and a side salad for an unforgettable dinner in under 30 minutes.
Ingredients
Pie Crust
Lemon Curd
Meringue
Instructions
Relax and cut crusts
Remove pie crusts from the refrigerator and let sit for 15 minutes to relax. Preheat oven according to package instructions, usually 375 degrees Fahrenheit. Roll out one crust and cut circles slightly larger than your mini muffin cavities.
Form shells and bake
Gently press each dough circle into the mini muffin tin, shaping with fingers and docking bottoms with a fork. Bake until lightly golden, then transfer shells to a wire rack to cool completely.
Bake second batch
Repeat the cutting and baking process with the second crust so you have about 20 shells total depending on cutter size.
Fill with curd
Fill cooled shells to the rim with lemon curd. For neat results, pipe curd from a snipped resealable bag.
Whip meringue
Whip room-temperature egg whites and cream of tartar until frothy, then add granulated sugar one tablespoon at a time while beating on high until stiff, glossy peaks form, about 5 to 10 minutes.
Pipe and brown
Pipe meringue onto each filled shell, creating peaks. Brown evenly under a high broiler for approximately two minutes or use a kitchen torch to toast the meringue.
Last Step: Please leave a rating and comment letting us know how you liked this recipe! This helps our business to thrive and continue providing free, high-quality recipes for you.
Nutrition
Did You Make This?
Leave a comment & rating below or tag
@savoryte on social media!
Categories:
You might also like...

Tilapia with Lemon Butter
Flaky pan-seared tilapia topped with a velvety lemon butter sauce. Quick to cook, bright with citrus, and weeknight-easy yet dinner-party special.

Healthy Egg Muffin Cups
Start your morning with veggie-loaded, protein-packed egg muffins at just 50 calories each. Perfect for make-ahead breakfasts, freezer-friendly, and easy to customize.

TikTok Breakfast Tortilla Fold
Crispy, cheesy, and ready in minutes, this viral tortilla fold layers bacon, egg, avocado, and melty cheese into a perfectly portable triangle.
Did You Make This?
Leave a comment & rating below or tag @savoryte on social media!
Rate This Recipe
Share This Recipe
Enjoyed this recipe? Share it with friends and family, and don't forget to leave a review!
Comments (1)
This recipe looks amazing! Can't wait to try it.
Comments are stored locally in your browser. Server comments are displayed alongside your local comments.

Hi, I'm Sophia!
What's Popular

30-Minute Meals!
Join to receive our email series which contains a round-up of some of our quick and easy family favorite recipes.