
>>

Crispy, simple, and healthier than store-bought — these oven-baked potato chips are a pantry-friendly snack you’ll make again and again.

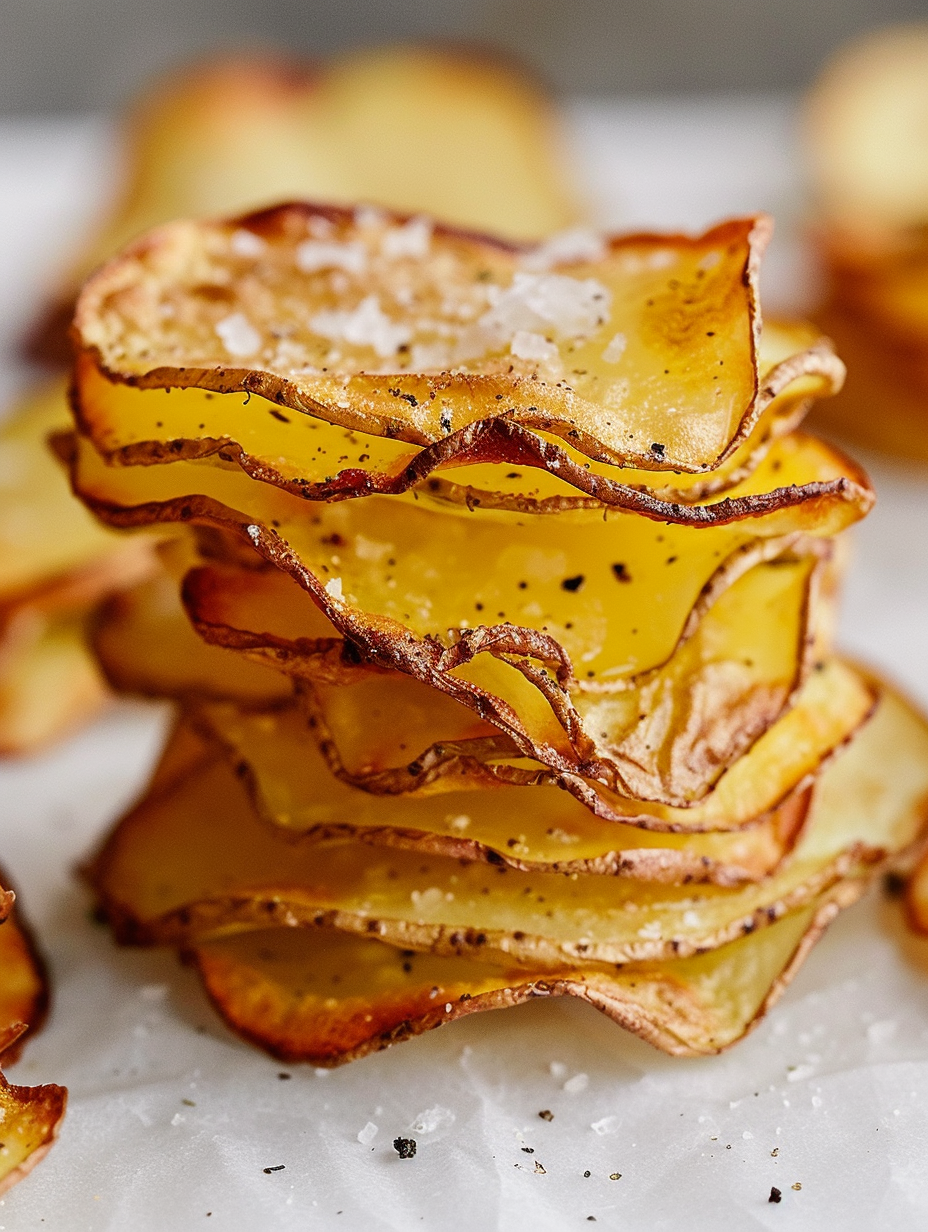
This simple baked potato chips recipe has been my go-to crunchy snack ever since I learned to make them at home. I discovered this method on a weekend when I wanted something lighter than fried chips but still crave-worthy. The result was a thin, crisp chip with a delicate golden edge and a soft heart when sliced slightly thicker — a balance that transformed how my family snacks. The beauty is in its simplicity: just potatoes, a little olive oil, and salt, yet the texture and aroma far surpass anything in a bag.
I remember the first time I stacked a tower of these chips on the counter and my partner peeked over, surprised that something so plain-looking could taste so vibrant. The thin slices roast into crinkled, lacy edges that snap when bitten. Because they’re baked, they feel lighter but still deliver that satisfying crunch. Everyone who tries them asks for the recipe, and once you make your own, it’s hard to go back to store-bought — the freshness and ability to season them exactly how you like makes all the difference.
I first made these during a cozy afternoon cooking session and quickly learned that slightly thinner slices (about 1/16 inch) are the secret to the best snap. Family reactions were immediate: thumbs up, then silence — the telltale sign after everyone’s crunching happily. Over time I’ve experimented with different potato varieties and seasoning blends, finding that gold potatoes offer a mild, buttery flavor while russets crisp a little more at the edges.
What I love most about these is how forgiving they are: small variations in thickness or oven times are easy to correct once you know the visual cues. Friends and family have served these at gatherings and always comment on how fresh and crisp they taste compared to store-bought chips. They were a hit at a picnic where everyone preferred my lightly salted rosemary version over heavier commercial snacks — such moments remind me that simple, well-made food brings people together.
Store cooled chips in an airtight container at room temperature to maintain their crunch. For best texture, avoid refrigeration because cold, moist environments make the chips soften. If you live in a humid climate, add a small paper towel inside the container to absorb residual moisture. Chips keep best for 2–3 days; after that they begin to lose crispness. If they soften, re-crisp them briefly in a 300 F oven for 3–5 minutes — watch carefully to avoid burning. Use shallow containers to avoid crushing the chips.
If you don’t have Yukon Gold, russets or red potatoes work well — russets yield slightly crisper edges while reds keep a waxier interior. Swap olive oil for avocado or grapeseed oil for a milder flavor and higher smoke point. If you’re avoiding salt, try a sprinkle of lemon zest plus minced fresh herbs after baking to boost flavor without sodium. For a smoky profile, substitute smoked paprika for plain paprika and add a touch of nutritional yeast for umami without dairy.
These chips are perfect on their own or paired with dips like hummus, guacamole, or a zesty vegan yogurt dip. For parties, present them in stacked bowls with small labels indicating seasoning (garlic, rosemary, smoky paprika). They also work as an accompaniment to soups or salads in place of croutons. Garnish with finely chopped fresh rosemary or a light dusting of smoked salt for a restaurant-style finish.
Thinly sliced, fried potatoes evolved into classic chips in the 19th century and have countless regional takes. Baked versions are a healthier, modern adaptation, favored by home cooks seeking crispness without deep frying. This simple oven technique is rooted in everyday frugality and home economics — transforming a humble tuber into a refined snack with minimal resources, much like many traditional snacks worldwide that rely on texture and technique over elaborate ingredients.
In spring and summer use new potatoes with tender skins and sprinkle with lemon zest and chives. Fall calls for hearty russets with cinnamon and maple sugar for a sweet-savory twist. For winter gatherings, add rosemary and cracked black pepper with a dash of sea salt for warmth. Holiday versions can be made with rosemary and orange zest or a holiday spice blend to pair with roasted mains and festive spreads.
Pre-slice potatoes and store them submerged in cold water in the refrigerator for up to 24 hours to prevent browning; pat dry immediately before baking. If preparing multiple batches, bake on staggered racks and swap trays mid-way to ensure even browning. For packed lunches, portion chips into small airtight containers with a paper liner to keep them crisp until midday. Double or triple the baking sheets and cool completely before stacking for events.
These homemade baked potato chips are a small labor of love that rewards you with crisp, customizable snacks — healthy, simple, and endlessly flexible. Make a batch, experiment with seasonings, and share the crunch.
Slice potatoes uniformly about 1/16 inch for consistent crispness; a mandolin is the fastest way to achieve this.
Pat potato slices thoroughly dry before oiling to remove surface moisture that prevents browning.
Bake in a single layer and flip halfway through; remove chips that brown early to avoid bitterness.
To re-crisp softened chips, warm them in a 300 F oven for 3–5 minutes until crunchy again.
This nourishing homemade baked potato chips recipe is sure to be a staple in your kitchen. Enjoy every moist, high protein slice — it is perfect for breakfast or as a wholesome snack any time.
This Homemade Baked Potato Chips recipe makes perfectly juicy, tender, and flavorful steak every time! Serve with potatoes and a side salad for an unforgettable dinner in under 30 minutes.
Preheat oven to 400 F. Line a baking sheet with parchment paper or a silicone baking mat. Position oven rack in the center for even heat circulation.
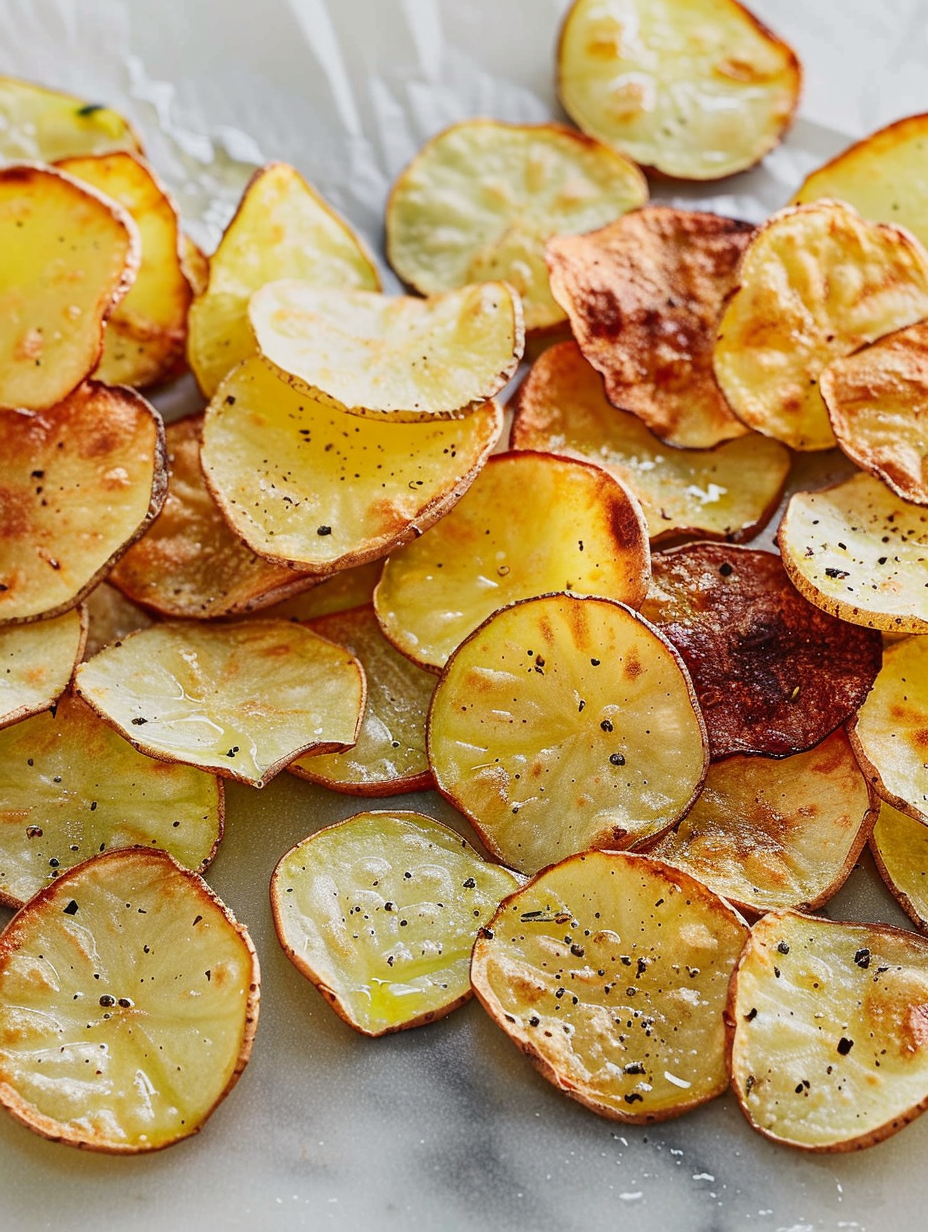
Using a mandolin, knife, or food processor attachment, slice potatoes to about 1/16 inch thickness. Pat slices dry with a clean towel to remove moisture for crisping.
Place dried slices in a bowl, drizzle with 2 teaspoons olive oil and toss lightly to coat. Alternatively brush oil directly onto slices on the sheet. Sprinkle a light pinch of salt.
Lay slices in a single layer on the prepared sheet, ensuring they don't touch. Bake 10 minutes, remove and flip each chip, then bake another 7–9 minutes until edges are golden and centers translucent. Remove any chips that brown earlier.
Let chips cool 2–5 minutes to finish crisping. Transfer to a wire rack or plate and add any additional seasonings while slightly warm. Serve at room temperature.
Last Step: Please leave a rating and comment letting us know how you liked this recipe! This helps our business to thrive and continue providing free, high-quality recipes for you.
Leave a comment & rating below or tag
@savoryte on social media!

Flaky pan-seared tilapia topped with a velvety lemon butter sauce. Quick to cook, bright with citrus, and weeknight-easy yet dinner-party special.

Start your morning with veggie-loaded, protein-packed egg muffins at just 50 calories each. Perfect for make-ahead breakfasts, freezer-friendly, and easy to customize.

Crispy, cheesy, and ready in minutes, this viral tortilla fold layers bacon, egg, avocado, and melty cheese into a perfectly portable triangle.
Leave a comment & rating below or tag @savoryte on social media!
Enjoyed this recipe? Share it with friends and family, and don't forget to leave a review!
This recipe looks amazing! Can't wait to try it.
Comments are stored locally in your browser. Server comments are displayed alongside your local comments.

Join to receive our email series which contains a round-up of some of our quick and easy family favorite recipes.
