
Christmas Cheesecake Bars

Buttery sugar-cookie crust layered with creamy cheesecake, glossy cherry topping and an almond crumble — festive bars perfect for holiday gatherings.

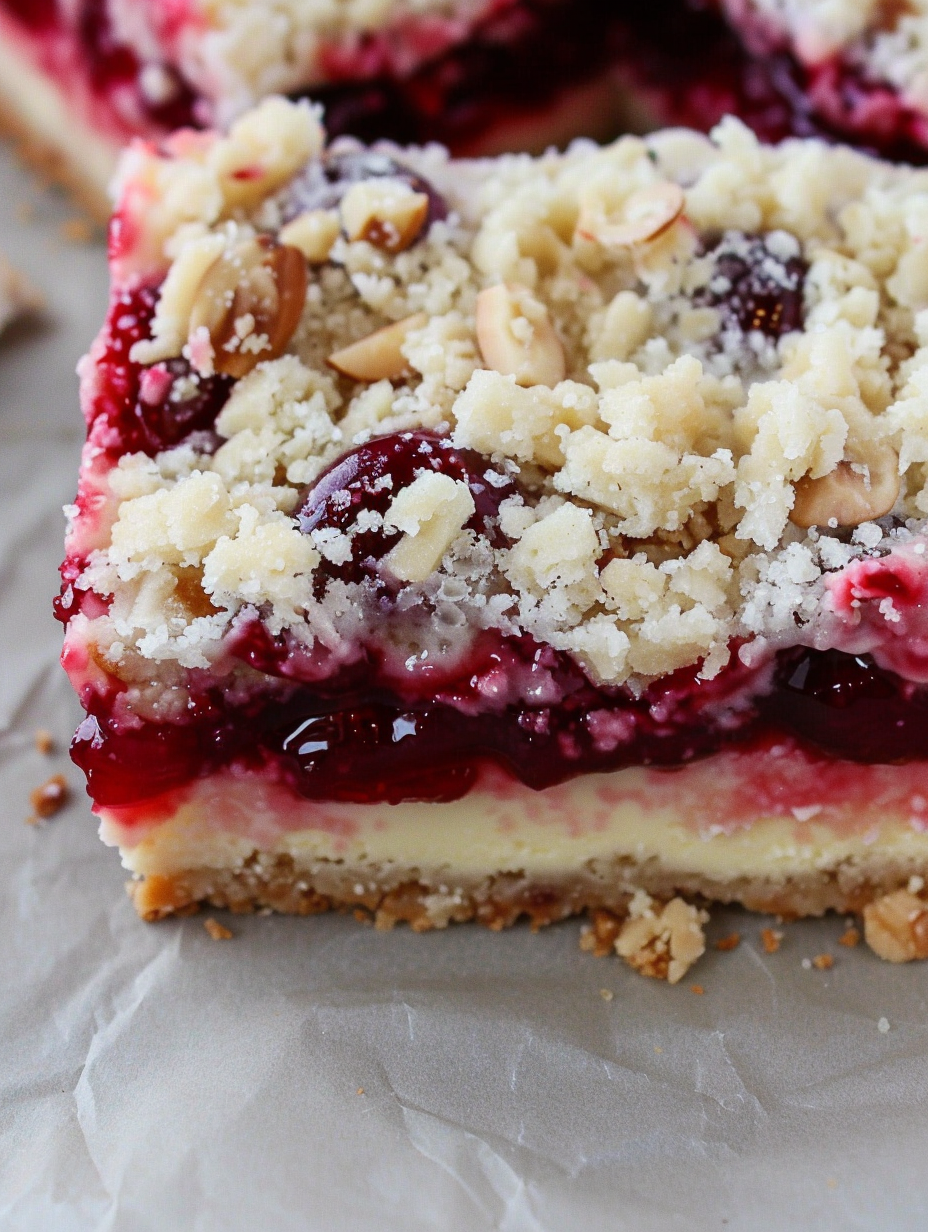
This Christmas cheesecake bars recipe has been a holiday staple in my kitchen for years. I first made it the winter my sister flew home from college — she wanted something festive but simple to bring to our family cookie swap. The result was a tray of squares with a sweet, buttery sugar cookie base, a lush, tangy cream cheese layer, bright cherry pie filling and a crunchy almond-studded crumble. The contrast of textures — a firm yet tender crust, a silky cheesecake center and a crunchy topping — is what keeps everyone reaching for seconds.
I remember pulling the pan from the oven and the scent of butter and vanilla filling the house; my mom declared them better than store-bought and my niece insisted on eating the crumble by the handful while I finished frosting other treats. These bars are forgiving, quick to assemble and travel well, which makes them ideal for holiday parties, potlucks or a tray of treats left on the counter for neighbors. The recipe is designed to be approachable: it uses a sugar cookie mix for speed, a single egg to bind the filling, and sliced almonds for texture — all pantry-friendly ingredients that come together into something that tastes undeniably celebratory.
Why You'll Love This Recipe
- Fast holiday favorite: ready to bake in about 20 minutes and finished in roughly 1 hour 30 minutes, so you can make these on a weekday evening or the morning of a party.
- Pantry-friendly ingredients: uses a sugar cookie mix, cream cheese and a can of cherry pie filling — most of which you likely have or can grab quickly.
- Texture contrast: tender, buttery crust, creamy center and crunchy almond crumble make every bite interesting and satisfying.
- Make-ahead friendly: chills well overnight and slices cleanly when fully cold, making it perfect for prep the day before entertaining.
- Crowd-pleaser: bright cherry topping gives a festive look and flavor, while the mild cheesecake layer appeals to guests of all ages.
- Customizable: easy swaps for nuts, toppings or fruit fillings allow you to adapt to dietary needs or to what’s in season.
In my home these bars have turned up at gift exchanges, served alongside mulled cider and packed into care packages for college kids. The cherry layer always attracts compliments and the almond crumble gives a handmade finish that looks like you spent hours fussing — when really you were simply efficient.
Ingredients
- Sugar cookie mix (1 - 8.5 oz box): Using a quality mix (I prefer Pillsbury or store brands with a short ingredient list) yields a consistent, buttery crust and quick crumble. The mix provides the right balance of sweetness and structure without needing to make dough from scratch.
- Butter, cold (4 tablespoons): Cold butter cut into the mix creates a tender, sandy texture for the crust and topping. Use unsalted butter so you can control salt; plug in salted if you prefer a slightly savory contrast.
- Cream cheese, softened (1 - 8 oz block): Full-fat cream cheese provides the creamiest, most stable filling. Bring it to room temperature and beat until smooth to avoid lumps.
- Sugar (1/4 cup): Fine granulated sugar sweetens the cheesecake layer without overpowering. For a slightly finer texture, you can use caster sugar.
- All-purpose flour (1 tablespoon): Adds structure to the filling so it sets nicely while still remaining silky.
- Vanilla extract (1/2 teaspoon): Pure vanilla enhances the dairy flavors; use pure extract for best aroma.
- Egg (1 large): Binds the cream cheese layer and helps it set; room temperature is best for even mixing.
- Cherry pie filling (3/4 can): A glossy, slightly tart fruit layer; use a good-quality filling for bright color and flavor. If using a standard 21 oz can, 3/4 is roughly 15–16 oz.
- Sliced almonds (1/3 cup): Toast lightly for extra flavor before mixing into the reserved crumble. They contribute a crisp, nutty finish against the sweet filling.
Instructions
Preheat and prepare the pan: Preheat the oven to 350°F. Spray an 8 x 8 inch pan with non-stick spray or line it with parchment so you can lift the finished slab out. Proper pan prep ensures even baking and easy removal of neat bars. Make the crust and reserve crumble: Place the sugar cookie mix in a small bowl and cut in the cold, cubed butter with a fork until the mixture resembles coarse crumbs. Measure out and set aside 3/4 cup of this crumbly mixture for the topping; press the remaining crumbs firmly into the bottom of the prepared pan to form an even layer. Press with the back of a measuring cup for a compact base. Bake this crust for 10 minutes to set; then transfer to the refrigerator for a quick cool down so the filling doesn’t melt when spread. Prepare the cream layer: While the crust chills, beat the softened cream cheese on medium speed until smooth and lump-free. Add the 1/4 cup sugar, 1 tablespoon flour, 1/2 teaspoon vanilla and the egg, beating just until homogeneous. Overbeating incorporates extra air which can cause cracks, so mix until combined and silky. Assemble the layers: Spread the cream cheese mixture evenly over the cooled crust, using a spatula to smooth the surface. Spoon the cherry pie filling over the cream layer and spread gently so the filling covers but doesn’t seep down the sides. Keep the filling even to ensure uniform slices. Top with almond crumble and bake: Stir the sliced almonds into the reserved crumble and sprinkle evenly across the cherry layer. Return the pan to the oven and bake at 350°F for about 40 minutes. The center should be set with a slight jiggle; edges may be lightly golden. Avoid overbaking to maintain a creamy center. Cool and chill: Remove from oven and cool on a wire rack for about 30 minutes. Then refrigerate until thoroughly cold and firm, at least 2 hours or ideally overnight for the cleanest slices. Cut into squares with a sharp knife warmed under hot water and wiped dry between cuts for clean edges.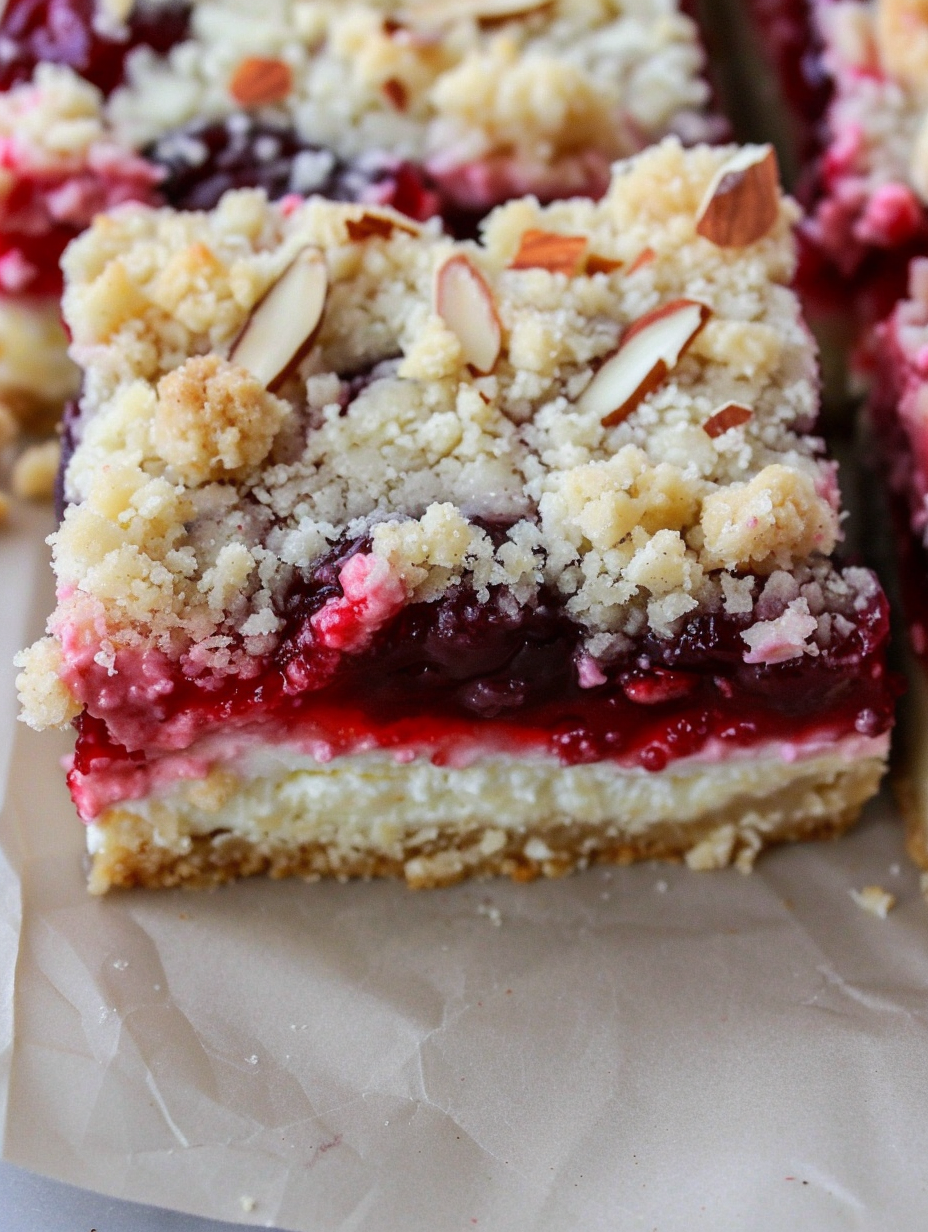
You Must Know
- These bars are best chilled: allow at least 2 hours refrigerated to achieve clean slices and a fully set texture.
- They freeze well for up to 3 months; wrap tightly in plastic and foil. Thaw overnight in the refrigerator before serving.
- High in dairy and nuts: contains cream cheese, butter and almonds — not suitable for those with dairy or nut allergies unless modified.
- Use room-temperature cream cheese and egg for a lump-free filling and even baking.
One of my favorite things about these squares is how they disguise how little time they take. Guests always assume I spent hours on them because of the layered look and neat slices. The cherry topping brings a holiday color that makes a simple pan look party-ready, and the almond crumble always gets compliments for adding homemade texture. I love making a double batch and freezing half to have on hand for unexpected visitors.
Storage Tips
Store the cooled bars in an airtight container in the refrigerator for up to 4 days. To prevent the topping from getting soggy, layer parchment between pieces if stacking. For longer storage, freeze in a single layer on a baking sheet until firm, then transfer to a freezer-safe container with parchment between layers. Label with the date and use within 3 months. To serve from frozen, transfer to the refrigerator the night before; if you’re short on time, place on the counter for 30–60 minutes to take the chill off before serving.
Ingredient Substitutions
If you need to avoid nuts, replace the sliced almonds in the crumble with rolled oats for a toasty bite or use crushed graham crackers for added crunch. For a gluten-free version, use a gluten-free sugar cookie mix and certified gluten-free flour; check that the pie filling is also gluten-free. To reduce added sugar, choose a no-sugar-added cherry filling and reduce the 1/4 cup sugar in the cream layer by a tablespoon, tasting as you go. For a dairy-free approach, try cream cheese alternatives and vegan butter, though texture will differ and chilling times may need adjustment.
Serving Suggestions
Serve these squares chilled, garnished with a light dusting of powdered sugar or a few fresh cherries for presentation. They pair beautifully with hot beverages: mulled cider, hot chocolate or strong coffee. For a dessert plate, add a dollop of softly whipped cream and a drizzle of cherry syrup. These are ideal for cookie trays, potlucks, or plated desserts after a holiday meal — slice into small squares for buffet-style serving or cut larger pieces for plated courses.
Cultural Background
Layered bars combining cookie crusts, creamy cheese layers and fruit toppings have been popular in American home baking for decades. They draw inspiration from classic cream cheese desserts and fruit-topped cheesecakes that are common at holiday gatherings. Using a commercial cookie mix for crusts became popular mid-20th century as convenience baking rose, and mixing in nuts for a homemade feel is a simple tradition that adds texture and regional flair depending on available nuts.
Seasonal Adaptations
In winter, swap the cherry filling for cranberry-orange compote and use chopped pecans in the crumble for a festive twist. In summer, swap cherries for fresh berry compote and replace almonds with toasted coconut for a lighter profile. For Valentine’s Day, use raspberry filling and sprinkle with white chocolate shavings. Adjust the topping and garnish seasonally to match flavors and colors of holiday tables.
Meal Prep Tips
These bars are an excellent make-ahead dessert: bake a day early, chill overnight and slice the morning of serving. For parties, transfer pre-sliced bars to a platter and keep refrigerated until serving time. If transporting, place bars in a shallow container with parchment layers and keep chilled in a cooler if the drive is long. Bring a small bottle of cherry syrup to brighten the topping if it looks a little dull after travel.
These Christmas cheesecake bars bring a classic holiday look and a crowd-pleasing mix of flavors with very little fuss — perfect for making ahead, sharing and enjoying with family. I encourage you to customize the topping and nuts to suit your pantry and make this recipe your own this season.
Pro Tips
Use room-temperature cream cheese and egg to ensure a smooth, lump-free filling.
Reserve the 3/4 cup crumble and mix with sliced almonds for the topping to add crunch and texture.
Warm a sharp knife under hot water and dry between cuts for clean bar edges.
This nourishing christmas cheesecake bars recipe is sure to be a staple in your kitchen. Enjoy every moist, high protein slice — it is perfect for breakfast or as a wholesome snack any time.
FAQs about Recipes
How long should I chill the bars before cutting?
Chill the bars at least 2 hours, preferably overnight, to ensure clean slices and a fully set filling.
Can I freeze these bars?
Yes. Freeze in a single layer until firm, then stack with parchment and freeze for up to 3 months. Thaw overnight in the refrigerator.
Tags
Christmas Cheesecake Bars
This Christmas Cheesecake Bars recipe makes perfectly juicy, tender, and flavorful steak every time! Serve with potatoes and a side salad for an unforgettable dinner in under 30 minutes.
Ingredients
Crust & Topping
Filling
Instructions
Preheat and prepare pan
Preheat oven to 350°F. Spray an 8 x 8 inch pan with non-stick spray or line with parchment for easy removal.
Make crust and reserve crumble
Combine sugar cookie mix and cold cubed butter; cut in with a fork until crumbly. Reserve 3/4 cup of the mixture for topping and press remaining crumbs into the pan. Bake 10 minutes and chill briefly.
Prepare cream layer
Beat softened cream cheese until smooth. Add sugar, flour, vanilla and egg and mix until just combined to avoid excess air.
Assemble layers
Spread cream mixture over the cooled crust. Spoon cherry pie filling evenly across the top, taking care not to push it into the cream layer.
Top and bake
Mix sliced almonds into the reserved crumble and sprinkle over the cherries. Bake at 350°F for about 40 minutes until set with a slight jiggle in the center.
Cool and chill
Cool on a rack for 30 minutes, then refrigerate at least 2 hours or overnight. Slice into squares with a warm, dry knife for clean edges.
Last Step: Please leave a rating and comment letting us know how you liked this recipe! This helps our business to thrive and continue providing free, high-quality recipes for you.
Nutrition
Did You Make This?
Leave a comment & rating below or tag
@savoryte on social media!
Categories:
You might also like...

Tilapia with Lemon Butter
Flaky pan-seared tilapia topped with a velvety lemon butter sauce. Quick to cook, bright with citrus, and weeknight-easy yet dinner-party special.

Healthy Egg Muffin Cups
Start your morning with veggie-loaded, protein-packed egg muffins at just 50 calories each. Perfect for make-ahead breakfasts, freezer-friendly, and easy to customize.

TikTok Breakfast Tortilla Fold
Crispy, cheesy, and ready in minutes, this viral tortilla fold layers bacon, egg, avocado, and melty cheese into a perfectly portable triangle.
Did You Make This?
Leave a comment & rating below or tag @savoryte on social media!
Rate This Recipe
Share This Recipe
Enjoyed this recipe? Share it with friends and family, and don't forget to leave a review!
Comments (1)
This recipe looks amazing! Can't wait to try it.
Comments are stored locally in your browser. Server comments are displayed alongside your local comments.

Hi, I'm Sophia!
What's Popular

30-Minute Meals!
Join to receive our email series which contains a round-up of some of our quick and easy family favorite recipes.