
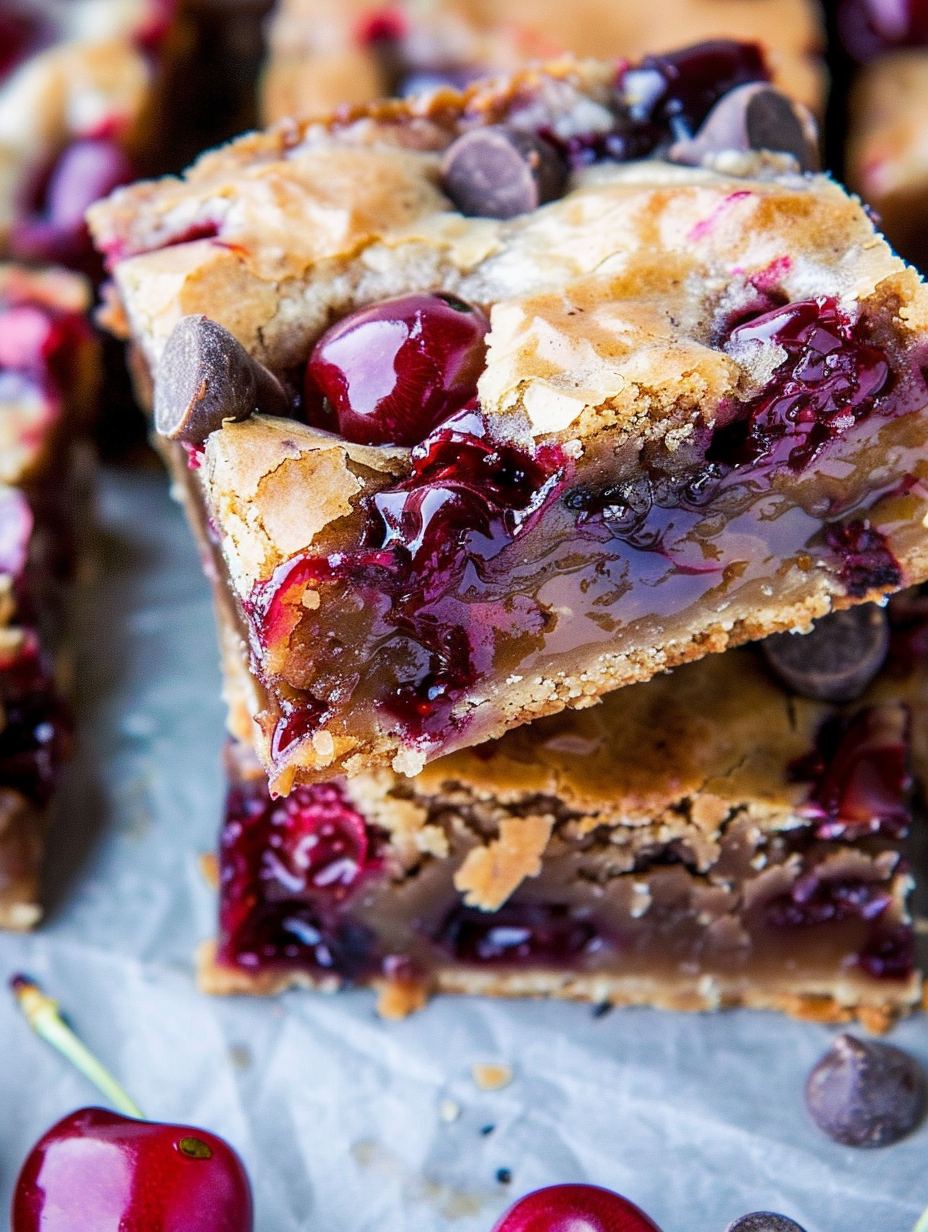
Chocolate Chip Cherry Bars

A favorite blondie base studded with juicy cherries and semi-sweet chocolate chips—easy, dependable, and perfect for any season.
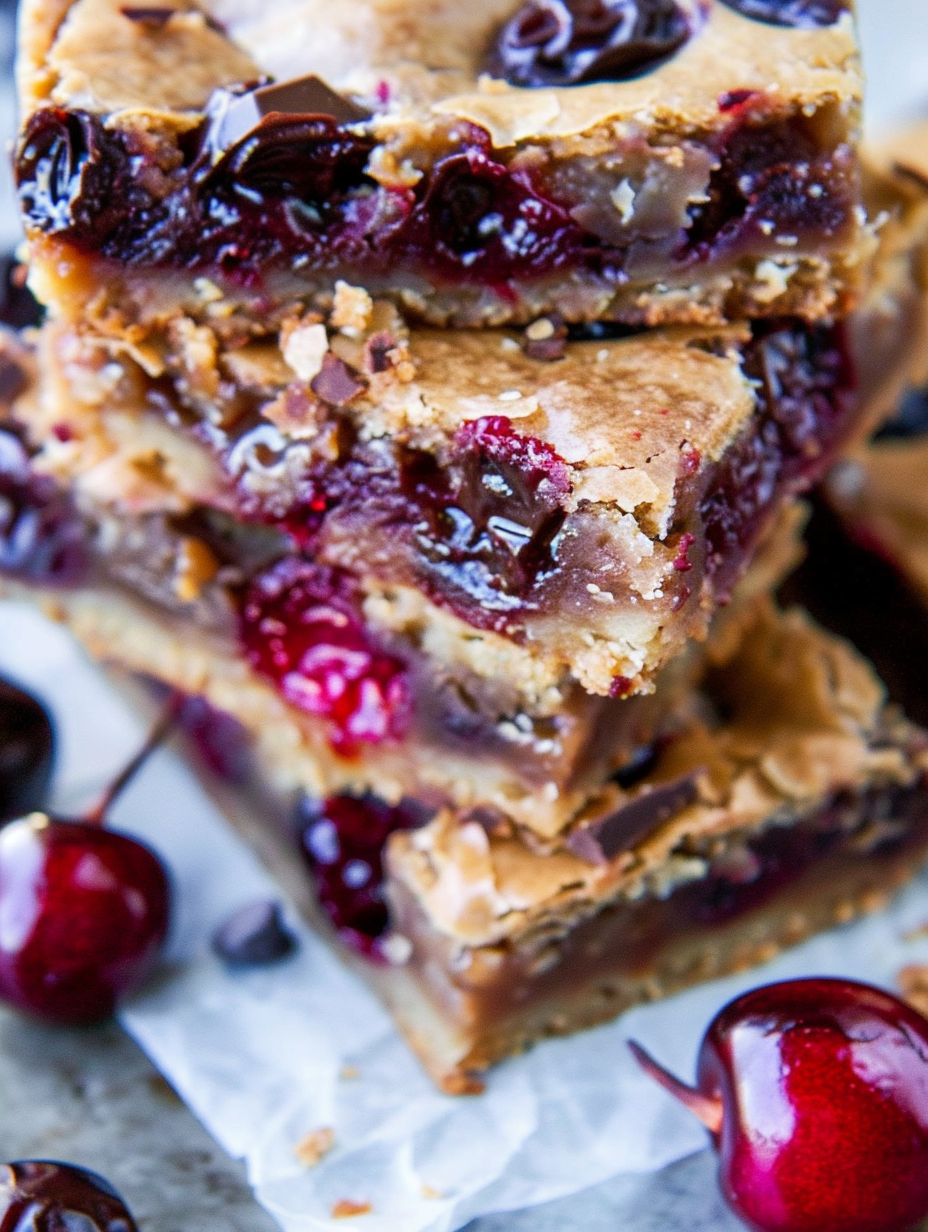
This batch of chocolate chip cherry bars started out as a simple experiment and quickly became our family's go-to sweet treat. I fell in love with this combination the first summer I layered sweet cherries into my favorite blondie batter; the cherries burst and made pockets of bright, juicy tartness that contrasted beautifully with the caramel-like brown sugar base and pockets of melted chocolate. I often make these when friends come over for coffee or when I need something portable to drop at a neighbor's house. They travel well, slice cleanly when cooled, and everyone seems to adore the contrast of textures: a tender, slightly chewy blondie crumb, chunks of fruit, and glossy chocolate ribbons.
I discovered this version during a late-June cherry glut—so many ripe cherries that I wanted to use them in a reliable bar I could bake in an 8-by-8-inch pan. The recipe is forgiving: the batter comes together with one bowl and one melted stick of butter, and the bake time gives you leeway depending on how juicy your fruit is. These bars are special because they combine the nostalgia of a blondie with the brightness of fresh fruit; they feel both homey and a little elevated. When I serve them warm with a scoop of vanilla ice cream, the room lights up with happy smiles and second-helping requests.
Why You'll Love This Recipe
- Simple one-bowl preparation and a quick 10-minute active prep time make this perfect for busy afternoons or last-minute entertaining.
- Uses pantry staples—brown sugar, flour, butter—plus seasonal cherries or frozen fruit, so you can make it year-round.
- Flexible bake time: for slightly gooey centers bake 27 minutes, for firmer bars toward the 32-minute mark; either way the edges caramelize beautifully.
- Crowd-pleasing: semi-sweet chocolate chips balance the cherries' sweetness and tartness, appealing to both kids and adults.
- Make-ahead and freezer-friendly: stash whole bars or cut portions for picnics, potlucks, or quick afternoon snacks.
- Adaptable: swap fruit, chocolate types, or add nuts for texture without disrupting the dependable blondie base.
My family’s reactions have made this a staple: my sister insists on picking cherries straight from the bowl while I’m slicing, and a neighbor once requested this exact combination for her daughter's school bake sale. I like that the recipe is forgiving—I've used both fresh Bing cherries and frozen pitted cherries with equally good results—so it quickly became a reliable option whenever I want a dessert that feels homemade but looks special.
Ingredients
- Unsalted butter (1/2 cup / 1 stick, melted): Use high-quality butter for flavor—brands like Kerrygold or Plugrá give a richer buttery note. Melt gently to avoid brown bits and allow to cool slightly before mixing with egg.
- Light brown sugar (1 cup, packed): Provides the caramel, chewy chew and moisture that defines a blondie. Packed light brown sugar for consistent sweetness; dark brown will give a deeper molasses flavor.
- Large egg (1): Acts as binder and helps create a tender structure. For room-temperature mixing, let the egg sit out 15 minutes or warm in a bowl of hot water for a minute.
- Vanilla extract (2 teaspoons): Choose pure vanilla extract for best aroma. I sometimes add 1/4 teaspoon almond extract for a subtle nutty lift when using cherries.
- All-purpose flour (1 cup): The base for texture—measure by spooning into the cup and leveling for accuracy. For a slightly denser bar, use 1 cup plus 1 tablespoon.
- Salt (1/4 teaspoon, optional): Enhances flavor; omit only if using salted butter and you prefer less salt.
- Semi-sweet chocolate chips (3/4 to 1 cup): Ghirardelli or Guittard semi-sweet chips melt nicely without being overly sweet; use 1 cup if you want more chocolate pockets.
- Cherries (1 cup fresh or frozen): Fresh Bing or Rainier cherries are lovely; if using frozen, do not thaw completely to avoid extra moisture—toss frozen fruit directly into the batter.
Instructions
Preheat and prepare pan: Preheat the oven to 350F. Line an 8-by-8-inch pan with aluminum foil or parchment, leaving overhang for easy removal, and spray lightly with cooking spray. Proper lining ensures neat slices and easier cleanup. Melt butter and combine sugars: In a medium microwave-safe bowl, melt the 1/2 cup butter for about 60 seconds until completely liquid. Immediately stir in the packed brown sugar until smooth—this helps dissolve the sugar and prevents graininess in the final texture. Add egg and flavoring: Whisk the large egg and 2 teaspoons vanilla into the warm butter-sugar mixture until glossy. Warm butter helps incorporate the egg smoothly; if the butter is very hot, let it cool for a minute to avoid scrambling. Fold in dry ingredients: Add the 1 cup flour and 1/4 teaspoon salt and stir gently until just combined. Overmixing develops gluten and will yield tougher bars—mix until the flour streaks disappear, then stop. Incorporate add-ins and assemble: Fold in 3/4 to 1 cup semi-sweet chips and 1 cup cherries. I prefer leaving cherries chunky rather than halving them; if you prefer smaller bites, halve or quarter the cherries. Pour batter into the prepared pan and smooth the top with a spatula or offset knife. Bake and test for doneness: Bake 27 to 32 minutes, rotating the pan halfway through for even browning. Edges should pull away slightly and the center should feel set when pressed gently. Due to melted chocolate and juicy fruit, a toothpick might not come out completely clean; look for a firm top and golden edges. Cool before slicing: Allow bars to cool in the pan for at least 1 hour so they firm up for clean slicing. Use the foil overhang to lift the block out, then slice into 9 equal bars. Serve warm or at room temperature.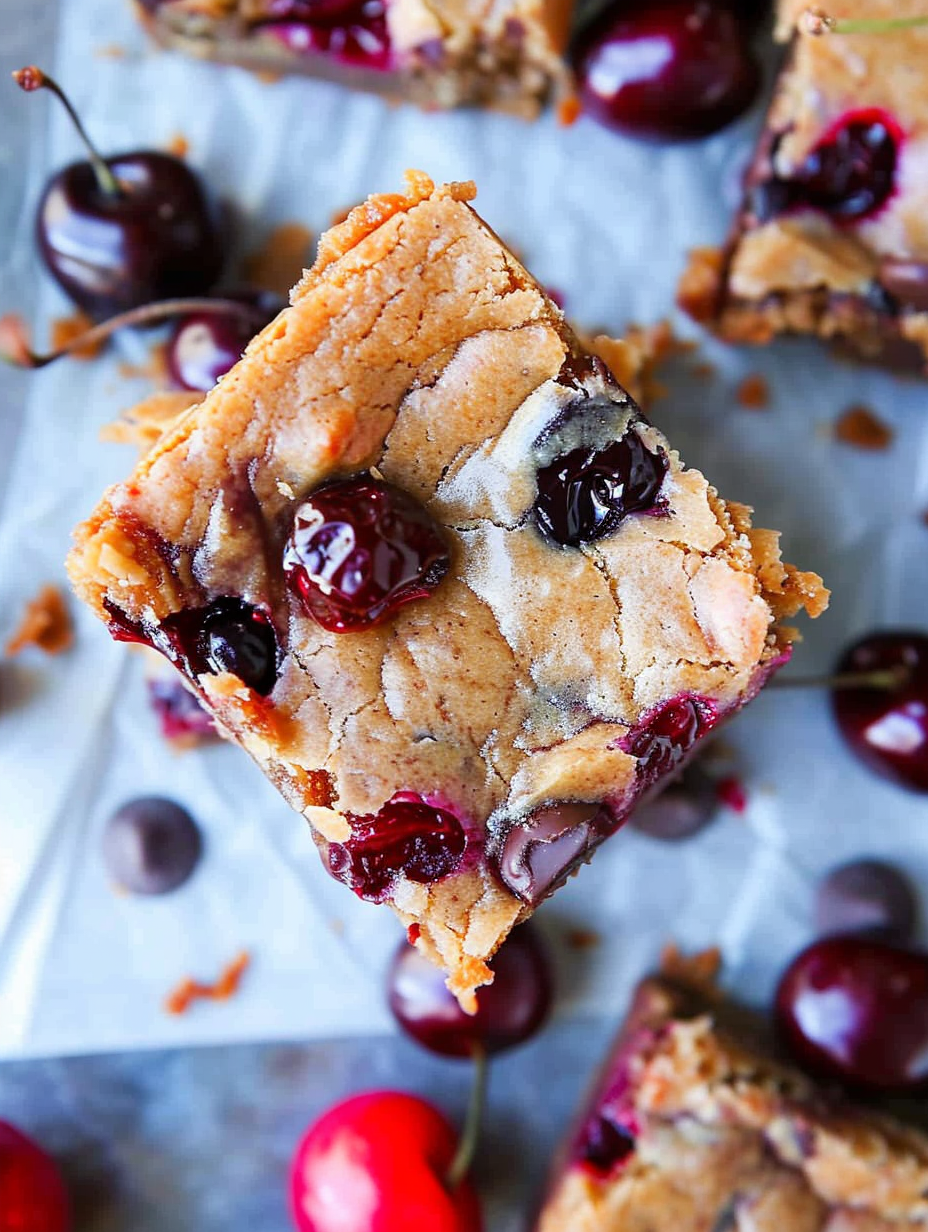
You Must Know
- These bars keep well at room temperature in an airtight container for up to 1 week; refrigerate in hot weather to extend freshness.
- Freezing is excellent: wrap individual bars tightly and freeze up to 3 months—thaw at room temperature or microwave briefly to soften.
- Fruit moisture affects bake time—juicier fruit may require an extra few minutes; start checking at 27 minutes and go up to 32 minutes as needed.
- Because of chocolate and fruit, the center may remain slightly gooey; for firmer bars let them cool fully before slicing.
My favorite aspect is how forgiving this batter is—I've swapped cherries for peaches or mixed berries, and the base always yields a tender, caramel-colored blondie. Once I brought a tray to a picnic and someone asked for the recipe on the spot; I consider that the highest compliment. The simple technique means you can scale, tweak, and still end up with consistently satisfying results.
Storage Tips
Store cooled bars in an airtight container at room temperature for up to one week. If your kitchen is warm, refrigerate to prevent the butter from becoming too soft—bring to room temperature before serving for best flavor. For longer storage, freeze whole slab wrapped in plastic and foil, then slice from frozen or thaw in the refrigerator overnight. When freezing single portions, wrap bars individually to avoid freezer burn. Reheat gently in a 300F oven for 6–8 minutes or microwave for 10–15 seconds to revive a just-baked feel.
Ingredient Substitutions
Swap semi-sweet chips for dark chocolate (60–70%) for a less sweet bar, or use milk chocolate for a sweeter treat. For dairy-free, use vegan butter and dairy-free chocolate chips—texture will be similar but flavor slightly different. To make them gluten-free, substitute a 1-to-1 gluten-free flour blend (ensure it contains xanthan or guar gum) and slightly reduce baking time. Use frozen cherries straight from the freezer if fresh are unavailable; toss briefly in a tablespoon of flour to limit bleeding. Almond extract (1/4 teaspoon) complements cherries beautifully if you want a nutty note.
Serving Suggestions
Serve warm with a scoop of vanilla ice cream and a drizzle of caramel for a decadent dessert, or dust with powdered sugar for a simple finish. For breakfast or brunch, pair a bar with a strong coffee or latte—the brown sugar and cherry pairing is delightful in the morning. Garnish with toasted sliced almonds or flaky sea salt to add texture and a sophisticated contrast. Cut into small squares for a party platter or into larger bars for a hearty snack.
Cultural Background
Blondies originated as the blond sibling of the brownie—an American creation that emphasizes brown sugar and butter rather than cocoa. Incorporating fruit into bars is a long-standing American tradition of stretching seasonal produce into baked goods, from cherry cobblers to fruit-filled squares. Cherries themselves have a storied history in American baking, especially in midwestern and Pacific Northwest kitchens where fresh cherries were abundant each summer. These bars echo that heritage by marrying a classic blondie base with summer fruit for a hybrid that feels both contemporary and familiar.
Seasonal Adaptations
In summer, use fresh cherries—Bing for sweet depth or Rainier for a floral, lighter taste. Late summer and fall invite stone fruit swaps: peaches, plums, or nectarines work wonderfully. In winter, frozen cherries or a mix of berries keeps the recipe accessible; reduce added moisture by patting thawed fruit dry. For holiday baking, fold in chopped toasted pecans and a sprinkle of cinnamon for warmth, or add orange zest to brighten the flavor during darker months.
Meal Prep Tips
Make the batter and pour into the lined pan, cover tightly, and refrigerate up to 24 hours before baking—this can deepen flavors and save time on bake day. Alternatively, bake the slab, cool completely, and portion into single-serve containers for grab-and-go snacks. For freezer-friendly prep, slice bars before freezing and separate layers with parchment. Label and date packages so you can rotate older items first. When reheating portions, a quick zap in the microwave or a short oven warm-through brings the texture back to just-baked.
These bars are testimony to how a small change—adding fresh cherries to a reliable blondie base—can create a dessert that is both comforting and surprising. I hope they become one of your dependable favorites, ready for picnics, coffee dates, or simply an afternoon treat.
Pro Tips
Do not overmix the batter once flour is added; overworking develops gluten and makes bars tough.
Allow the bars to cool for at least 1 hour before slicing to ensure clean edges.
If using frozen cherries, fold them in frozen to limit extra moisture and bleeding in the batter.
Rotate the pan halfway through baking for even color and doneness.
This nourishing chocolate chip cherry bars recipe is sure to be a staple in your kitchen. Enjoy every moist, high protein slice — it is perfect for breakfast or as a wholesome snack any time.
Tags
Chocolate Chip Cherry Bars
This Chocolate Chip Cherry Bars recipe makes perfectly juicy, tender, and flavorful steak every time! Serve with potatoes and a side salad for an unforgettable dinner in under 30 minutes.
Ingredients
Base
Add-ins
Instructions
Preheat and prepare pan
Preheat the oven to 350F and line an 8x8-inch pan with foil or parchment. Spray lightly with cooking spray to prevent sticking and allow easy removal.
Melt butter and combine
Melt 1/2 cup unsalted butter in a microwave-safe bowl for about 60 seconds. Stir in 1 cup packed light brown sugar until smooth to dissolve sugar.
Add egg and vanilla
Whisk in 1 large egg and 2 teaspoons vanilla extract until glossy and combined, taking care that the butter is not too hot to avoid curdling the egg.
Fold in dry ingredients
Stir in 1 cup all-purpose flour and 1/4 teaspoon salt until just combined. Mix gently to avoid developing gluten and keep bars tender.
Add chips and cherries
Fold in 3/4 to 1 cup semi-sweet chips and 1 cup cherries (fresh or frozen). Pour batter into prepared pan and smooth the top with a spatula.
Bake and cool
Bake 27 to 32 minutes until edges pull away slightly and the top is set. Cool in pan at least 1 hour before lifting out and slicing into 9 bars.
Last Step: Please leave a rating and comment letting us know how you liked this recipe! This helps our business to thrive and continue providing free, high-quality recipes for you.
Nutrition
Did You Make This?
Leave a comment & rating below or tag
@savoryte on social media!
Categories:
You might also like...

Tilapia with Lemon Butter
Flaky pan-seared tilapia topped with a velvety lemon butter sauce. Quick to cook, bright with citrus, and weeknight-easy yet dinner-party special.

Healthy Egg Muffin Cups
Start your morning with veggie-loaded, protein-packed egg muffins at just 50 calories each. Perfect for make-ahead breakfasts, freezer-friendly, and easy to customize.

TikTok Breakfast Tortilla Fold
Crispy, cheesy, and ready in minutes, this viral tortilla fold layers bacon, egg, avocado, and melty cheese into a perfectly portable triangle.
Did You Make This?
Leave a comment & rating below or tag @savoryte on social media!
Rate This Recipe
Share This Recipe
Enjoyed this recipe? Share it with friends and family, and don't forget to leave a review!
Comments (1)
This recipe looks amazing! Can't wait to try it.
Comments are stored locally in your browser. Server comments are displayed alongside your local comments.

Hi, I'm Sophia!
What's Popular

30-Minute Meals!
Join to receive our email series which contains a round-up of some of our quick and easy family favorite recipes.