
Chocolate Cherry Thumbprint Cookies

Soft, chewy chocolate cookies with a bright cherry center and glossy chocolate glaze — a nostalgic treat that’s simple to make and perfect for sharing.
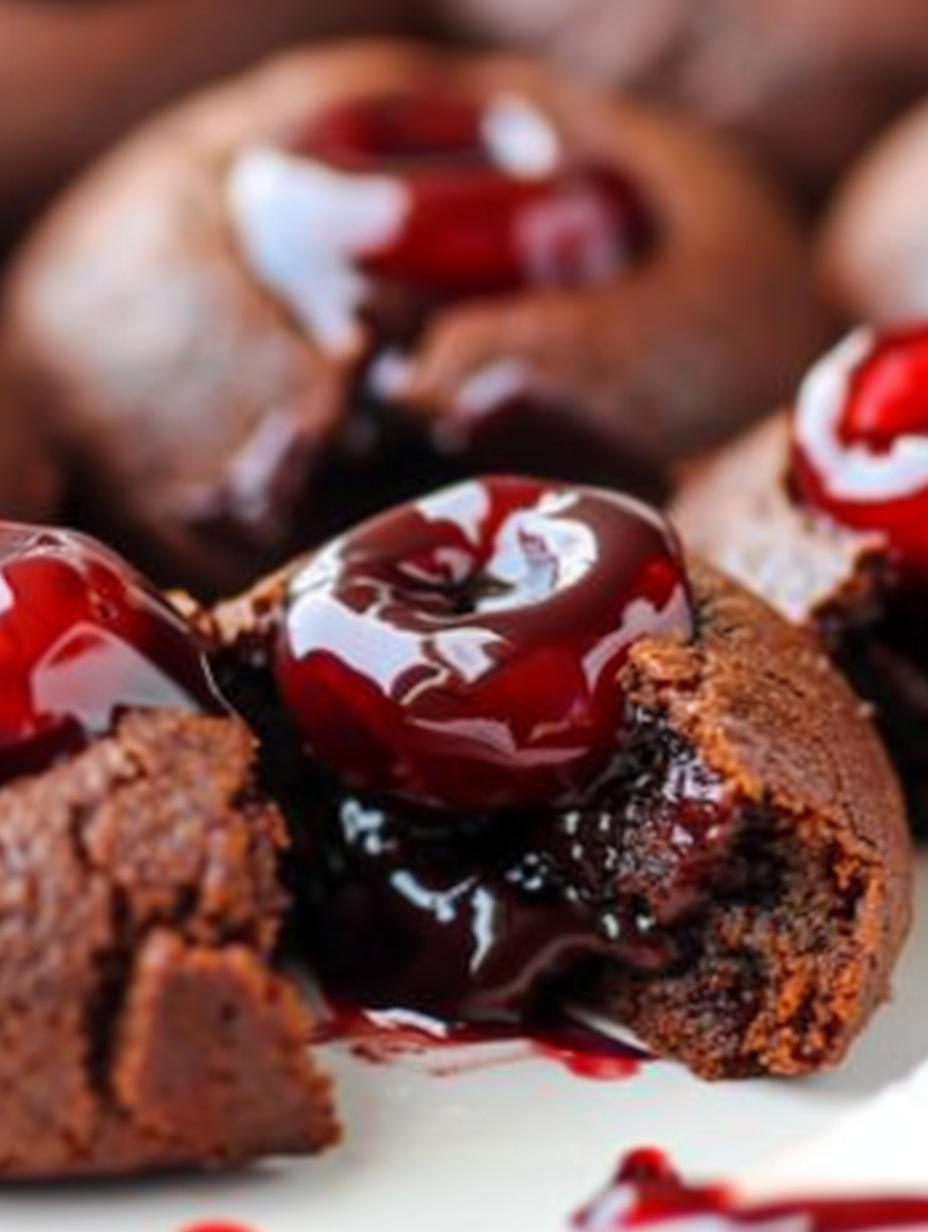
This recipe for Chocolate Cherry Thumbprint Cookies has been a holiday favorite in my kitchen for years. I first made them on a snowy afternoon when I wanted something comforting that would remind me of the jam-filled cookies my grandmother used to make. The combination of a tender, cocoa-forward cookie with a jewel-like cherry center and a thin chocolate glaze never fails to draw people to the counter. The cookie is soft at the edges with a slight chew in the middle, and the cherry filling adds bursts of tart-sweet contrast that keeps you coming back for one more.
I discovered this specific balance between chocolate and cherry when experimenting with pantry staples and a can of pie filling left over after a pie experiment went wrong. Converting the dough to a thumbprint-style cookie produced the kind of nostalgic, comforting result I wanted: an easy make-ahead treat that travels well and always impresses. Friends and family often ask for the recipe because the texture is forgiving — the cookies stay soft for days if stored correctly — and the assembly is quick enough to make with kids. If you love classic cookie tins, these will become a staple.
Why You'll Love This Recipe
- Quick to prepare: active prep time is about 15 minutes and baking takes only 9–10 minutes, so you can have a batch ready in under 30 minutes.
- Uses pantry staples: all-purpose flour, cocoa, butter, and common sugars are the base; a single can of cherry pie filling transforms the cookies into a festive treat.
- Kid-friendly assembly: rolling, pressing thumbprints, and spooning cherries are simple, hands-on tasks that make this a great baking activity with children.
- Make-ahead and freeze-friendly: dough balls can be frozen and baked later, or baked cookies freeze well for up to 3 months.
- Perfect balance of textures: crisp edges with a soft, chewy center and a glossy chocolate drizzle that adds richness without being cloying.
- Crowd-pleasing presentation: the bright cherries in the center create an appealing contrast against the dark cookie that’s ideal for gift tins and dessert platters.
I always find guests gravitate toward these cookies at parties. One year I packed them into a mason jar ribboned with twine and gave them as teacher gifts; the feedback was so enthusiastic that I’ve kept the jar-gift idea ever since. The reliability and friendly technique make this a recipe I return to again and again.
Ingredients
- All-purpose flour (1 1/2 cups): Use a spoon-and-level method when measuring for consistent texture. I prefer King Arthur or Gold Medal brands for steady results; too much flour makes cookies dry.
- Baking soda (1/2 teaspoon) & baking powder (1/2 teaspoon): A double leavening system gives the cookie a gentle lift while keeping the center tender — don’t omit the powder.
- Salt (1/4 teaspoon): Balances the sweetness and enhances the chocolate flavor; use fine sea salt or table salt.
- Unsweetened cocoa powder (1/2 cup): Dutch-process gives a plush chocolate flavor; natural cocoa is fine too but expect a slightly brighter chocolate note.
- Butter (1/2 cup / 1 stick): Use unsalted butter at room temperature unless you prefer a slightly saltier cookie; plug in European butter for a richer flavor.
- Granulated sugar (1/2 cup) & packed brown sugar (1/2 cup): The brown sugar provides moisture and chew while granulated sugar gives a subtle snap to the edges.
- Egg (1 large) & vanilla (1 teaspoon): The egg binds the dough and adds tenderness; real vanilla extract improves depth of flavor.
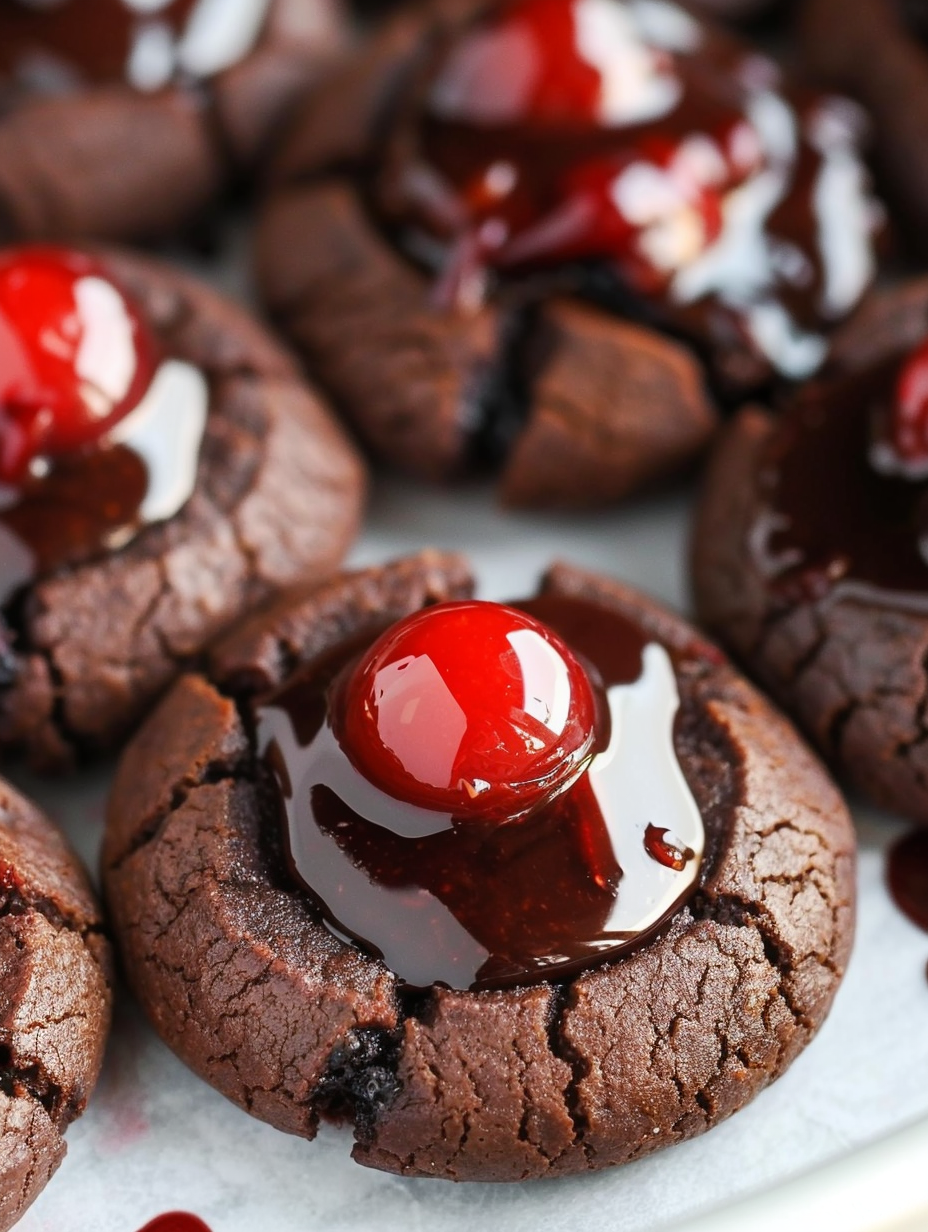
- Cherry pie filling (1 can): About 20–21 ounces is perfect; choose a brand you enjoy — the cherries are the visual and flavor highlight.
- Semi-sweet chocolate chips (1 cup), butter (2 tbsp), light corn syrup (2 tbsp), milk (3 tbsp): These make a shiny, thin glaze for drizzling; use good-quality chocolate chips for the best gloss and flavor.
Instructions
Combine dry ingredients: Whisk together 1 1/2 cups all-purpose flour, 1/2 teaspoon baking soda, 1/2 teaspoon baking powder, 1/4 teaspoon salt, and 1/2 cup unsweetened cocoa powder in a medium bowl. Sifting is optional but helpful if your cocoa clumps; the goal is a uniform dry mix so the dough comes together evenly. Cream butter and sugars: In a large bowl, cream 1/2 cup (1 stick) unsalted butter with 1/2 cup granulated sugar and 1/2 cup packed brown sugar until light and fluffy, about 2–3 minutes with an electric mixer on medium speed. Scrape the bowl, then add 1 large egg and 1 teaspoon vanilla and beat until fully incorporated. Proper creaming traps air, which contributes to a tender crumb. Mix dough: Gradually add the dry mixture to the butter-sugar mixture and beat on low until just combined. Avoid overmixing—the dough should be soft and slightly sticky. If it feels too wet to shape, chill in the refrigerator for 10–15 minutes. Shape and thumbprint: Scoop rounded tablespoon-sized portions of dough and roll them into balls. Place them on a parchment-lined baking sheet about 2 inches apart. Use your thumb to press a depression in the center of each ball; press a second time crossing the original mark to create a shallow X shape. These visual cues help the cherries sit in the center without sinking during baking. Fill with cherries: Spoon roughly three cherries with a bit of syrup into each indentation. Use a small spoon to avoid overfilling; the cherries will warm and the syrup will loosen slightly as they bake. Bake: Preheat the oven to 350°F (175°C). Bake the cookies for 9–10 minutes. They will still look slightly soft in the center — this is okay. Allow cookies to cool on the sheet for 5 minutes, then transfer to a wire rack to cool completely before glazing. Prepare the glaze: Combine 1 cup semi-sweet chocolate chips, 2 tablespoons butter, 2 tablespoons light corn syrup, and 3 tablespoons milk in a microwave-safe bowl. Heat in 20–25 second intervals, stirring in between, until smooth and glossy. The corn syrup gives the glaze a nice shine and the milk thins it to a drizzleable consistency. Glaze the cookies: Use a spoon or small piping bag to drizzle the chocolate over the cooled cookies. Allow the glaze to set at room temperature for about 20–30 minutes, or refrigerate briefly to speed up setting.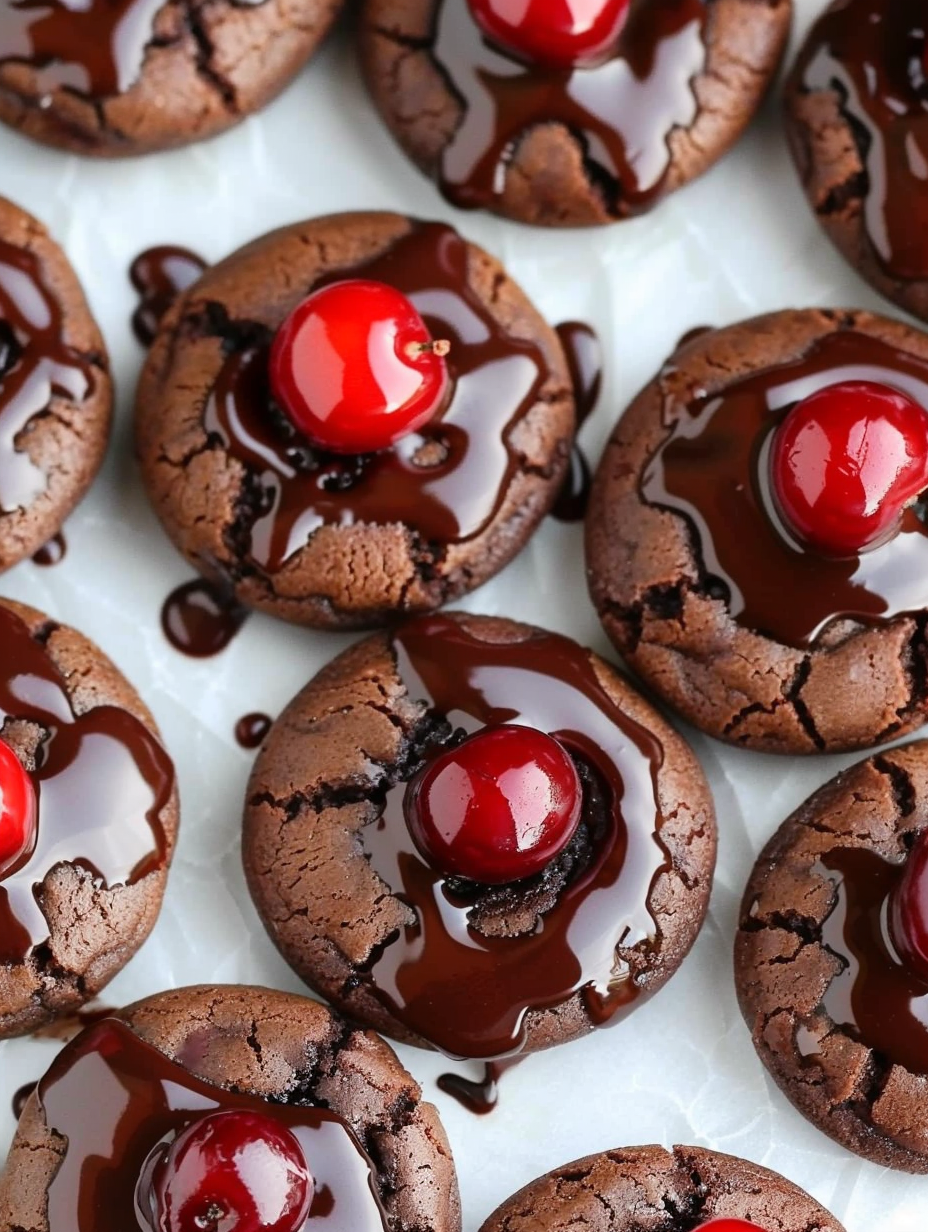
You Must Know
- Storage: Store cookies in an airtight container at room temperature for up to 3 days or refrigerate for up to a week; freeze baked cookies in a single layer on a tray then transfer to a freezer bag for up to 3 months.
- Nutritional note: These contain butter, egg, and wheat flour — they are not dairy-free, gluten-free, or vegan.
- Visual cue for doneness: Edges will be set and slightly glossy while centers remain soft; they firm up on cooling.
- Make-ahead tip: Shape and freeze raw dough balls on a tray, then pop into a freezer bag; bake from frozen, adding 1–2 minutes to the bake time.
- Chocolate choice: Semi-sweet works best to balance the sweetness of the cherry filling; use higher-quality chips for better melt and flavor.
My favorite part is the moment the glaze sets: the glossy finish makes the cookies look bakery-made even when they’re assembled at home. Family members always comment on the bright pop of cherry against the dark chocolate—simple, nostalgic, and reliably delicious.
Storage Tips
For short-term storage, place cooled cookies in a single layer in an airtight container with parchment between layers to prevent sticking. At room temperature they’ll remain soft for around 2–3 days; refrigeration extends life to a week but can slightly firm the texture. For longer storage, freeze baked cookies on a sheet until solid, then transfer to a freezer-safe bag or container and store for up to 3 months. To reheat, let frozen cookies come to room temperature or warm gently in a 300°F (150°C) oven for 5–7 minutes to refresh the chew and re-melt the glaze slightly.
Ingredient Substitutions
If you prefer a different texture, substitute half the all-purpose flour with whole wheat pastry flour for a nuttier flavor and slightly denser crumb. To make dairy-free, use a vegan butter substitute and swap the milk in the glaze for a plant-based milk; results will be slightly less glossy. For a gluten-free version, replace the flour with a 1:1 gluten-free baking blend and add 1/8 teaspoon xanthan gum if your blend lacks binding agents. If you want a fruit alternative, apricot or raspberry preserves spooned into the center work beautifully — reduce syrup quantity to avoid soggy centers.
Serving Suggestions
Serve these cookies warm with a dusting of powdered sugar for a festive look or alongside coffee or a glass of cold milk. They pair well with whipped cream or a scoop of vanilla ice cream for a simple dessert plate. For parties, arrange on a decorative platter with fresh mint sprigs and whole cherries for visual appeal. Their sturdy but tender texture makes them suitable for cookie exchanges and picnic boxes.
Cultural Background
Thumbprint-style confections trace back to European baking traditions where small indentations were filled with preserves or curds. The adaptation using chocolate and cherry filling is influenced by classic Black Forest flavor combinations — dark chocolate paired with tart cherries — common in Central European desserts. Over time, thumbprints became a popular holiday and gift-bake across the U.S., prized for their portability and decorative centers.
Seasonal Adaptations
In summer, swap canned cherry filling for a quick homemade cherry compote made from fresh cherries, sugar, and lemon zest. In winter, add a pinch of cinnamon or espresso powder to the dough to deepen flavors. For Valentine’s Day, use heart-shaped sprinkles around the cherry center before baking for a playful holiday twist.
Meal Prep Tips
Make the dough in the evening and form into balls, then refrigerate overnight to develop flavor and make shaping easier. Alternatively, freeze formed dough balls on a tray then store in a bag; bake straight from frozen when needed, adding 1–2 minutes to the bake time. The glaze can be made in advance and rewarmed gently in the microwave in 10-second bursts; keep it slightly warm so it drizzles smoothly.
These cookies combine nostalgia with dependable technique — they’re both an approachable weekend project and a dependable go-to when you want a crowd-pleasing treat. Enjoy making them, share generously, and feel free to tweak the fruit or chocolate to suit your tastes.
Pro Tips
Chill the dough for 10–15 minutes if it’s too soft to shape; this prevents spreading during baking.
Spoon only a small amount of cherry filling (about 3 cherries) into each indentation to avoid soggy cookies.
Use light corn syrup in the glaze for a glossy finish and to prevent cracking when it sets.
Measure flour by spooning into the cup and leveling with a knife to avoid dense cookies.
Bake sheets should be cooled between batches to maintain cookie shape and consistent bake.
This nourishing chocolate cherry thumbprint cookies recipe is sure to be a staple in your kitchen. Enjoy every moist, high protein slice — it is perfect for breakfast or as a wholesome snack any time.
FAQs about Recipes
Can I freeze the dough?
Yes — the dough balls can be frozen on a tray until firm, then transferred to a sealed bag. Bake from frozen adding 1–2 minutes to the bake time.
How should I store finished cookies?
Store in an airtight container at room temperature for 2–3 days, refrigerate up to a week, or freeze for up to 3 months.
Tags
Chocolate Cherry Thumbprint Cookies
This Chocolate Cherry Thumbprint Cookies recipe makes perfectly juicy, tender, and flavorful steak every time! Serve with potatoes and a side salad for an unforgettable dinner in under 30 minutes.
Ingredients
Dry Ingredients
Wet Ingredients
Filling & Glaze
Instructions
Combine dry ingredients
In a medium bowl whisk together all-purpose flour, baking soda, baking powder, salt, and unsweetened cocoa until even. Sifting optional to remove lumps.
Cream butter and sugars
In a separate large bowl, cream unsalted butter with granulated and brown sugars until light and fluffy, then beat in the egg and vanilla until incorporated.
Mix the dough
Slowly add the dry mixture to the wet mixture and beat on low until just combined; avoid overmixing to keep cookies tender.
Shape and press
Scoop rounded tablespoon portions of dough, roll into balls, place on parchment-lined sheet, and press each with your thumb twice (forming an X-shaped indentation).
Fill with cherries and bake
Spoon roughly three cherries into each indentation and bake at 350°F for 9–10 minutes. Cool on the sheet for 5 minutes, then transfer to a rack.
Prepare and drizzle glaze
Melt chocolate chips with butter, corn syrup, and milk in short intervals until glossy. Drizzle over cooled cookies and let set before serving.
Last Step: Please leave a rating and comment letting us know how you liked this recipe! This helps our business to thrive and continue providing free, high-quality recipes for you.
Nutrition
Did You Make This?
Leave a comment & rating below or tag
@savoryte on social media!
Categories:
You might also like...

Tilapia with Lemon Butter
Flaky pan-seared tilapia topped with a velvety lemon butter sauce. Quick to cook, bright with citrus, and weeknight-easy yet dinner-party special.

Healthy Egg Muffin Cups
Start your morning with veggie-loaded, protein-packed egg muffins at just 50 calories each. Perfect for make-ahead breakfasts, freezer-friendly, and easy to customize.

TikTok Breakfast Tortilla Fold
Crispy, cheesy, and ready in minutes, this viral tortilla fold layers bacon, egg, avocado, and melty cheese into a perfectly portable triangle.
Did You Make This?
Leave a comment & rating below or tag @savoryte on social media!
Rate This Recipe
Share This Recipe
Enjoyed this recipe? Share it with friends and family, and don't forget to leave a review!
Comments (1)
This recipe looks amazing! Can't wait to try it.
Comments are stored locally in your browser. Server comments are displayed alongside your local comments.

Hi, I'm Sophia!
What's Popular

30-Minute Meals!
Join to receive our email series which contains a round-up of some of our quick and easy family favorite recipes.