
Chocolate Cheesecake Truffles

Decadent bite-sized cheesecake centers made with chocolate cake mix and cream cheese, coated in a silky chocolate shell—perfect for potlucks or a personal treat.
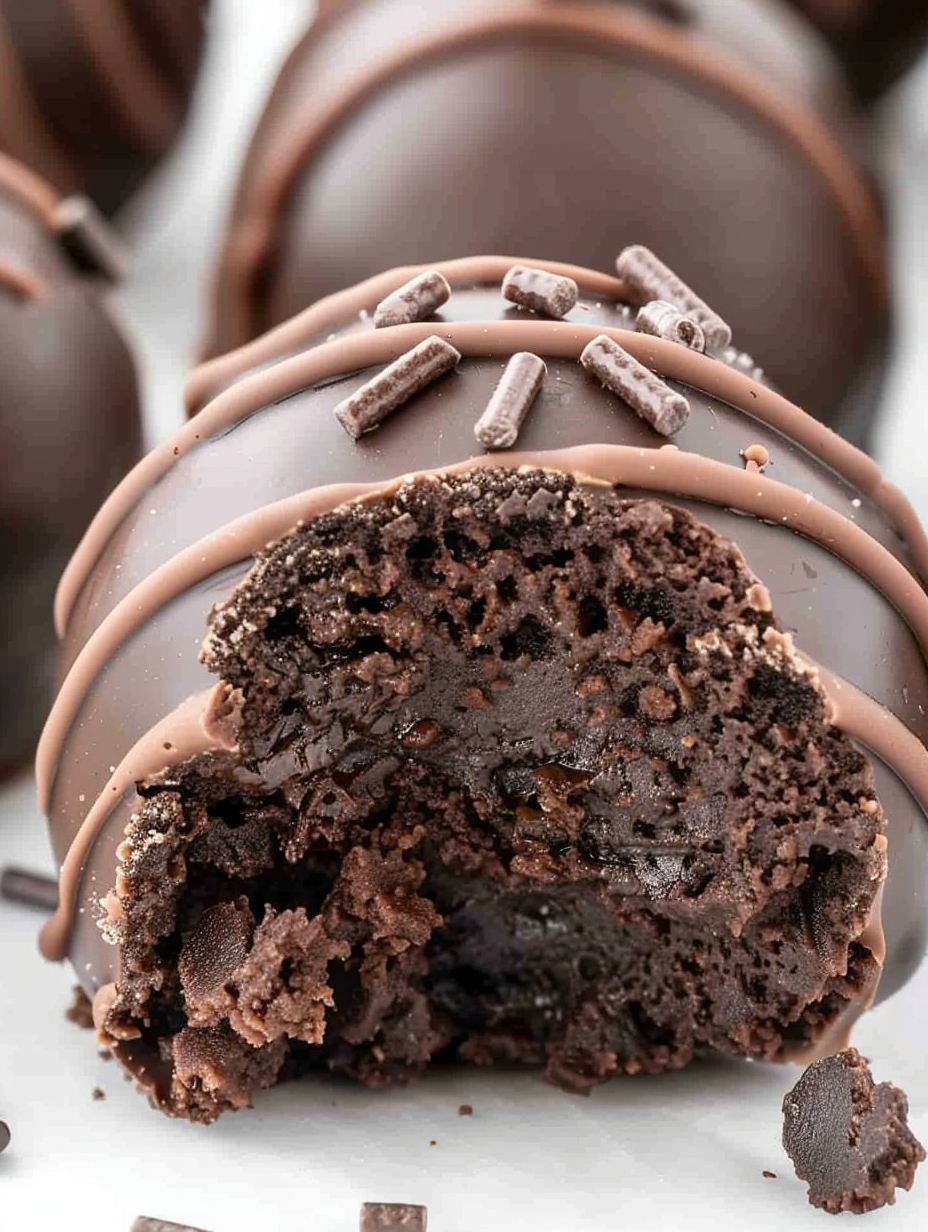
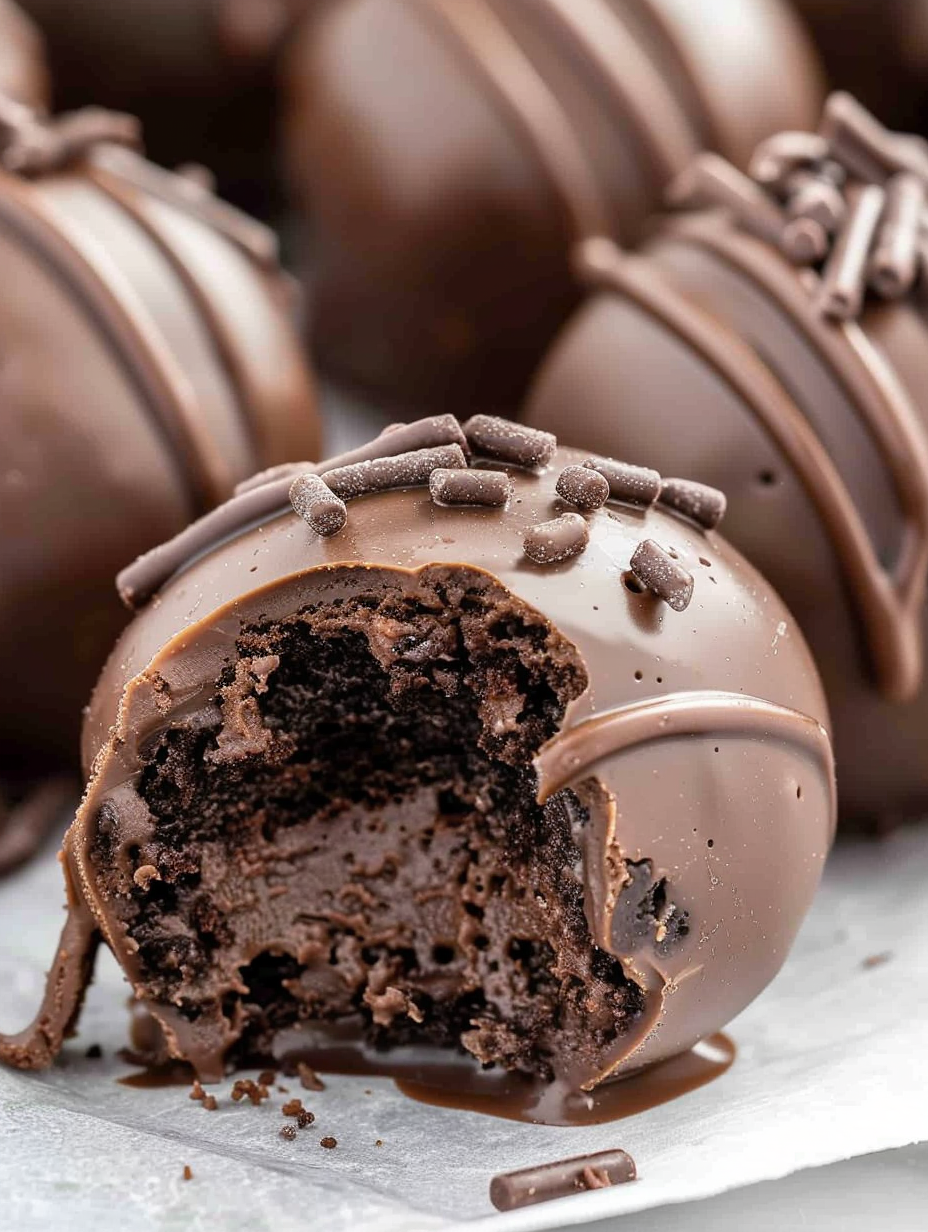
This recipe for Chocolate Cheesecake Truffles is one I reached for the first time when I wanted a dessert that combined two irresistible comforts: chocolate cake and creamy cheesecake. I discovered the technique while testing easy no-bake sweets for a holiday get-together, and the simple chemistry of softened cream cheese folded with dry cake mix turned into an instant favorite. The center is dense, tangy, and fudgy, and the chocolate coating adds a crisp, glossy shell that snaps in the mouth before giving way to the creamy interior.
I love these because they travel well and require no oven time; the microwave handles the almond bark and the refrigerator does the rest. The texture is balanced—rich but not cloying—with chocolate sprinkles adding a playful crunch. Over the years I have made them small and elegant for parties, larger for celebrations, and tucked a few into school lunchboxes as a special surprise. Whether you bring them to a potluck or hide them in the back of the fridge for yourself, they disappear fast.
Why You'll Love This Recipe
- No-bake, ready in just over two hours including chill time; only 10 minutes of active work required, making it perfect for busy hosts.
- Uses pantry-friendly ingredients: boxed chocolate cake mix and cream cheese—easy to source and budget-friendly.
- Make-ahead friendly: you can form the centers a day ahead and coat them when you are ready, which makes entertaining effortless.
- Kid-friendly and crowd-pleasing: the candy-like chocolate shell and sprinkles make these popular with all ages.
- Versatile: swap coatings or toppings to suit dietary needs or theme a platter for holidays and celebrations.
- Portable and giftable: they travel well in an airtight container and look lovely arranged in a box.
My first batch was met with gleeful silence—people simply ate and smiled before asking for the recipe. At a backyard birthday they became the unexpected hit next to the cupcakes. The ease and reliability of this combination have made these truffles a staple when I need a quick dessert that still feels special.
Ingredients
- Chocolate fudge cake mix (15.25 ounces): Use a boxed chocolate fudge or devil's food mix for the deepest chocolate flavor. I often reach for a well-known national brand because it gives consistent texture; ensure the box is the standard 15.25-ounce size so ratios stay correct.
- Cream cheese (8 ounces, softened): Full-fat cream cheese is best for a smooth, rich center; room temperature ensures no lumps and easier blending. If you prefer tangier bites, brand choices with a slightly higher tang will show through.
- Chocolate almond bark (8 ounces): This coating melts smoothly and sets with a glossy finish. You can substitute melting wafers or high-quality dark chocolate if you prefer. Almond bark often contains stabilizers that make dipping easier.
- Chocolate sprinkles (2 tablespoons): For garnish and texture contrast. Use nonpareils or jimmies depending on the look you want; keep extras on hand for re-dusting after setting.
Instructions
Heat-treat the dry cake mix: Place the dry cake mix into a medium-sized heat-safe bowl. Microwave in two 30-second bursts, stirring between intervals to eliminate any bacterial concerns from dry mixes. Allow the mix to cool completely to room temperature before combining with the cream cheese so it does not melt or loosen the cream cheese. Soften and smooth the cream cheese: Put the 8 ounces of room-temperature cream cheese into a medium mixing bowl. Using a handheld mixer on medium-high, beat for 2 to 2 1/2 minutes until completely smooth and free of lumps. Scrape the bowl sides once to ensure even texture. Combine with cake mix: Sprinkle the cooled, heat-treated dry cake mix evenly over the beaten cream cheese. Mix on low to medium just until incorporated; avoid overworking or the mixture can become dry. You want a moist, pliable dough that holds together when scooped. Chill the mixture: Tightly cover the bowl with plastic wrap and refrigerate for 2 hours. Chilling firms the mixture and helps the centers keep their shape during dipping. If you refrigerate longer, allow a few minutes at room temperature before scooping so the center is not rock-hard. Portion the centers: Line a baking sheet with parchment paper. Using a 1-tablespoon scoop, portion out the chilled mixture and roll it gently between your palms into uniform balls. Place them on the prepared sheet and continue until all mixture is used; you should get about 26 bites. Melt the coating: In a heat-safe medium bowl, microwave the almond bark in 30-second intervals, stirring between each, until smooth and fully melted. Keep the melted coating warm but not bubbling to avoid seizing. Dip and finish: Working quickly, dip each cheesecake ball into the melted almond bark using a fork to support it. Tap gently to remove excess coating and set back on parchment. Sprinkle with chocolate sprinkles while the coating is still wet. If any spots are missed, use a spoon to drizzle extra coating over them. Set and chill: Return the coated bites to the refrigerator until fully set, at least 15 to 30 minutes. For best texture, chill 30 minutes to an hour. Store chilled until serving.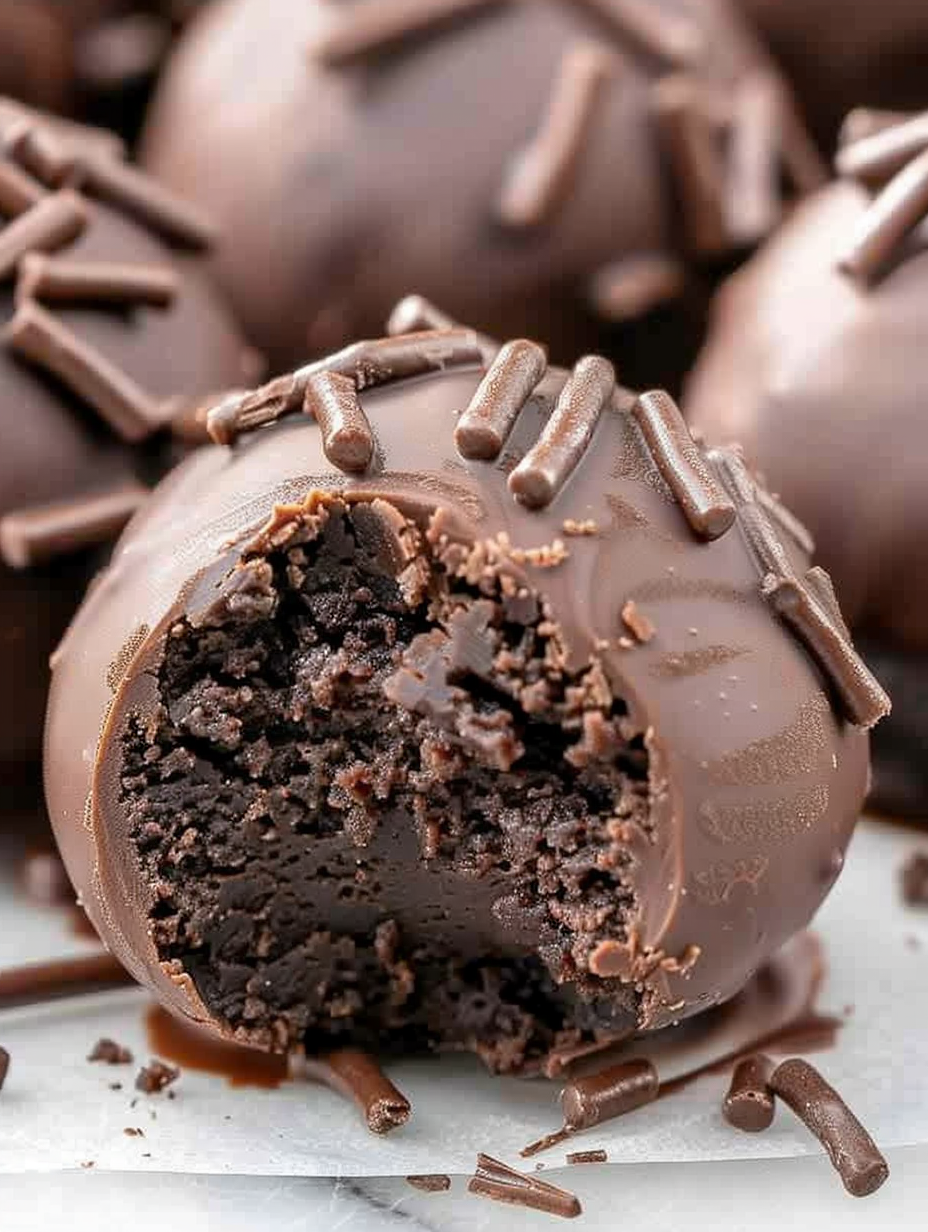
You Must Know
- Heat-treating the dry mix is an important safety step because boxed mixes are not pasteurized; brief microwaving renders them safer for no-bake preparations.
- Allow the mixture to chill fully; under-chilled centers can expand under the coating and cause cracking.
- Use room-temperature cream cheese for a silky texture—cold cream cheese will clump and make mixing difficult.
- Store in the refrigerator in an airtight container for up to 7 days or freeze for up to 3 months; thaw in the refrigerator before serving.
My favorite part is the way the glossy shell snaps and the center yields into a creamy, almost mousse-like interior. At holiday potlucks guests always comment on the balance of tang and sweetness; some have even called them the grown-up cousin of a chocolate truffle. Preparing them becomes meditative—scooping, rolling, dipping—and gives you time to chat with guests while the refrigerator does the heavy lifting.
Storage Tips
Store finished pieces in a single layer or separated with parchment in an airtight container in the refrigerator. They keep their best texture for up to 7 days. For longer storage, freeze on a parchment-lined sheet until firm, then transfer to a freezer-safe container. Frozen truffles will keep up to 3 months; thaw in the refrigerator for several hours or overnight before serving. Avoid leaving them at room temperature for more than two hours, especially in warm weather, because the centers soften and coatings can sweat.
Ingredient Substitutions
If you want a gluten-free option, choose a certified gluten-free chocolate cake mix; texture may vary slightly. For a dairy-free version, use plant-based cream cheese and a dairy-free dipping chocolate; results will be slightly less tangy. Swap the almond bark for dark chocolate melting wafers for a more intense chocolate flavor, or white chocolate for contrast—if using white chocolate, temper it carefully or add a small amount of neutral oil to improve flow. You can also fold in 1 tablespoon of cocoa powder for a denser chocolate profile.
Serving Suggestions
Present them on a decorative platter lined with doilies or in individual candy cups for a polished look. Pair with coffee, espresso, or a fortified dessert wine like tawny port for adults. For festive occasions, dust with cocoa, crushed nuts, or colored sprinkles to match the theme. They also pair nicely with fresh raspberries or a small scoop of vanilla ice cream for a plated dessert.
Cultural Background
These bites combine two classic American dessert elements: boxed cake mix convenience and the richness of cream cheese-based desserts. Cake mix hacks blossomed in home baking culture during the mid-20th century when convenience products met inventive home cooks. The truffle-like form channels European confections, but the eco-system of boxed mixes and no-bake techniques is distinctly modern American, reflecting a trend toward approachable yet indulgent treats.
Seasonal Adaptations
Change the topping for seasons: use red and green sprinkles at Christmas, pastel jimmies for spring, or crushed peppermint in winter for a festive crunch. In summer, pair the chocolate exterior with a light dusting of freeze-dried strawberry powder for brightness. For autumn, fold in a pinch of cinnamon to the cake mix before chilling and top with toasted pecans after dipping for a warm, spiced variation.
Meal Prep Tips
Prepare the centers up to 24 hours in advance and keep them chilled, covered. Dip them the day you plan to serve for the best-looking shell, as the centers can expand slightly if left too long and may crack the coating. Use a small scoop for consistent sizing and keep melted coating warm in 10- to 15-second microwave bursts if it begins to set. Line sheets with parchment and use a toothpick to tidy bottoms for a clean presentation.
These bites are a small luxury that feel like hours of effort but deliver in minutes of work—perfect for gifting, sharing, or savoring privately. Give them a try and make them your own with small tweaks for flavor and presentation.
Pro Tips
Heat-treat the dry cake mix in short microwave bursts and let it cool completely before mixing with cream cheese.
Use a 1-tablespoon cookie scoop for uniform bites so they set evenly and look professional.
Keep melted coating warm but not boiling; reheat in 10-second intervals to avoid seizing.
If coating cracks, rewarm the coating and re-dip or drizzle extra melted chocolate over cracks and re-chill.
Use parchment-lined trays and refrigerate between batches to speed up setting and ease handling.
This nourishing chocolate cheesecake truffles recipe is sure to be a staple in your kitchen. Enjoy every moist, high protein slice — it is perfect for breakfast or as a wholesome snack any time.
FAQs about Recipes
Can I prepare the centers ahead of time?
You can chill the uncoated centers overnight and dip them the next day. Let them sit at room temperature a few minutes before scooping if they are too firm.
How long will they keep?
Store in a sealed container in the refrigerator for up to 7 days or freeze for up to 3 months. Thaw in the refrigerator before serving.
Is heat-treating the cake mix necessary?
Yes—heat-treat the dry cake mix to reduce any bacterial risk when using dry mixes in no-bake preparations.
Tags
Chocolate Cheesecake Truffles
This Chocolate Cheesecake Truffles recipe makes perfectly juicy, tender, and flavorful steak every time! Serve with potatoes and a side salad for an unforgettable dinner in under 30 minutes.
Ingredients
Main
Instructions
Heat-treat the cake mix
Place the dry cake mix in a medium heat-safe bowl and microwave in two 30-second intervals, stirring after each. Let cool completely to room temperature before using.
Beat the cream cheese
Place 8 ounces softened cream cheese in a mixing bowl and beat on medium-high for 2 to 2.5 minutes until completely smooth and free of lumps.
Combine cake mix and cream cheese
Sprinkle the cooled cake mix over the cream cheese and mix on low just until the dry mix is incorporated and the dough is moist and pliable.
Chill the mixture
Cover the bowl tightly and refrigerate for 2 hours to firm up the mixture so it holds shape when scooped and dipped.
Portion and roll
Line a baking sheet with parchment. Use a 1-tablespoon scoop to portion the chilled mixture and roll into balls, placing them on the sheet until all are formed.
Melt the coating
Melt the almond bark in a microwave-safe bowl in 30-second bursts, stirring between intervals, until smooth and fully melted.
Dip and decorate
Dip each ball into the melted coating using a fork, tap off excess, place back on parchment, and sprinkle with chocolate sprinkles while coating is wet.
Chill to set
Refrigerate the coated bites until the coating is fully set, at least 15 to 30 minutes, then store chilled until serving.
Last Step: Please leave a rating and comment letting us know how you liked this recipe! This helps our business to thrive and continue providing free, high-quality recipes for you.
Nutrition
Did You Make This?
Leave a comment & rating below or tag
@savoryte on social media!
Categories:
You might also like...

Tilapia with Lemon Butter
Flaky pan-seared tilapia topped with a velvety lemon butter sauce. Quick to cook, bright with citrus, and weeknight-easy yet dinner-party special.

Healthy Egg Muffin Cups
Start your morning with veggie-loaded, protein-packed egg muffins at just 50 calories each. Perfect for make-ahead breakfasts, freezer-friendly, and easy to customize.

TikTok Breakfast Tortilla Fold
Crispy, cheesy, and ready in minutes, this viral tortilla fold layers bacon, egg, avocado, and melty cheese into a perfectly portable triangle.
Did You Make This?
Leave a comment & rating below or tag @savoryte on social media!
Rate This Recipe
Share This Recipe
Enjoyed this recipe? Share it with friends and family, and don't forget to leave a review!
Comments (1)
This recipe looks amazing! Can't wait to try it.
Comments are stored locally in your browser. Server comments are displayed alongside your local comments.

Hi, I'm Sophia!
What's Popular

30-Minute Meals!
Join to receive our email series which contains a round-up of some of our quick and easy family favorite recipes.