
Cherry Cheesecake Brownies

Fudgy brownies layered with creamy cheesecake and bright cherry pie filling. A show stopping dessert that is simple to make and impossible to resist.
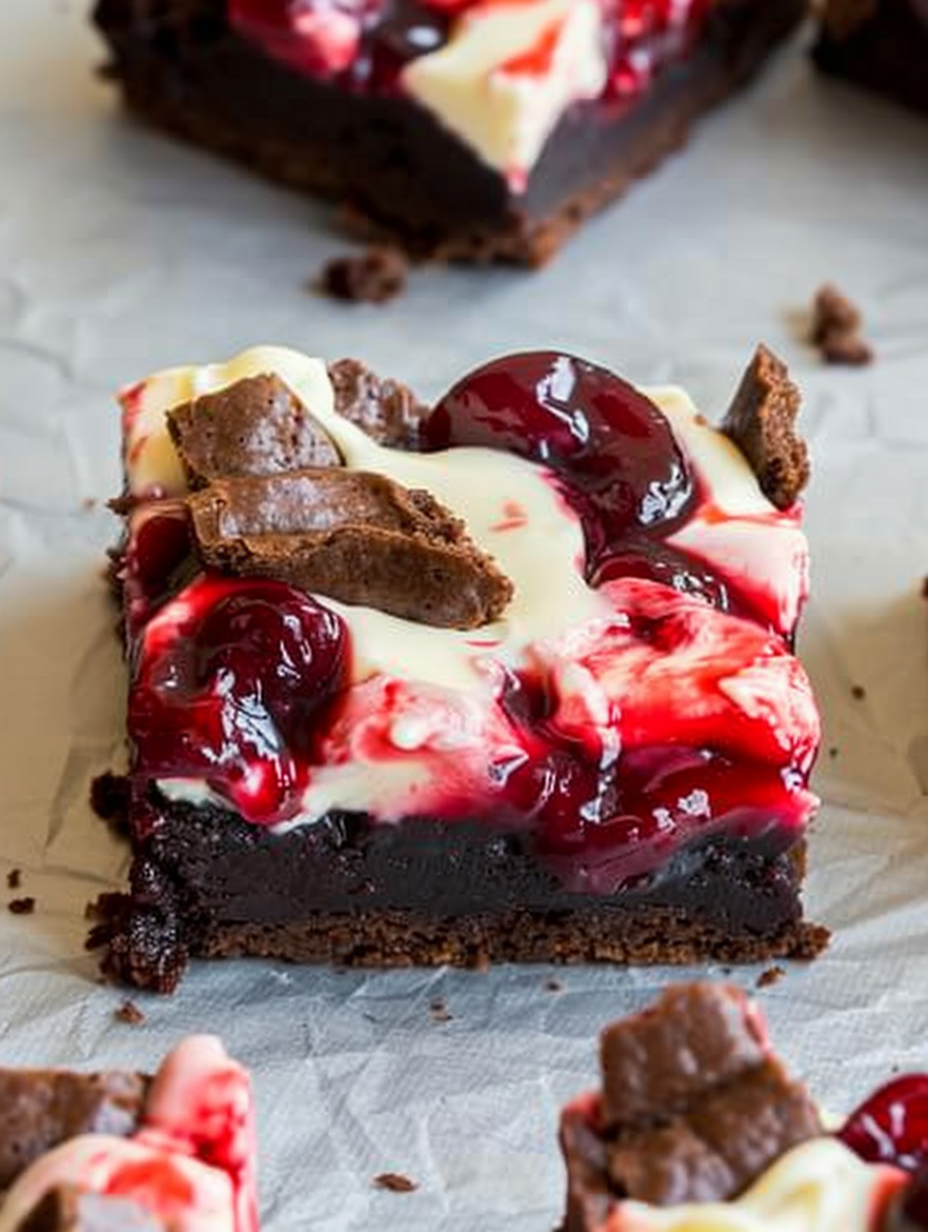
This is one of those desserts that arrives at family gatherings and instantly becomes the centerpiece. These Cherry Cheesecake Brownies combine a deeply fudgy chocolate base with a smooth, tangy cheesecake layer and pockets of bright cherry pie filling. I first made them on a rainy weekend when I wanted something impressive but not fussy. The combination of textures and flavors was so delightful that they became a regular request from friends and relatives.
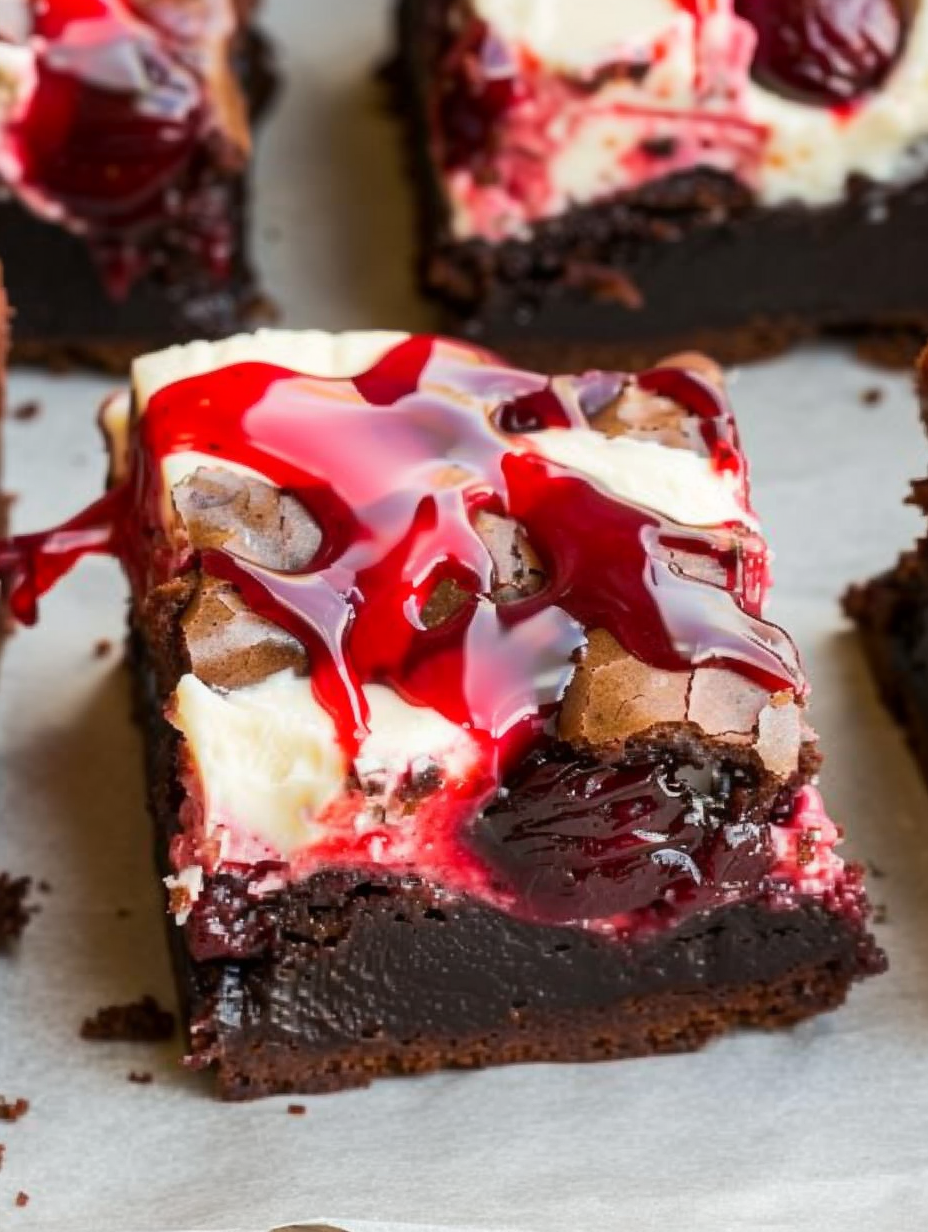
The brownie layer is dense and chocolate forward, with a slightly crackly top and a moist interior. The cheesecake layer is silky and slightly tangy, which balances the sweetness of the cherries. Every bite offers a contrast between dense chocolate, creamy cheese, and juicy fruit. I love how the cherries peek through the top and how the layers hold together after chilling, which makes them easy to slice for parties or potlucks.
Why You'll Love This Recipe
- Big impact with little fuss, ready to assemble in about 20 minutes and baked in 30 minutes making it perfect for last minute entertaining.
- Uses pantry staples for the base, with a simple cheesecake layer that comes together in one bowl.
- Textural contrast is a highlight, with fudgy chocolate, smooth cheese, and jewel like cherry filling in every bite.
- Make ahead friendly, these bars hold up well refrigerated and slice cleanly after a few hours chilling.
- Flexible ingredient swaps allow for lighter flours or different fruit fillings while keeping the essential flavor profile intact.
When I first brought these to a neighborhood potluck everyone asked for the recipe. I remember watching as tiny hands reached for the corners first. Over time I have tweaked the bake time and how much cherry I spoon on top. Those small changes make a big difference in the final look and texture. This dessert consistently draws compliments and second helpings.
Ingredients
- Brownie Base 1 cup melted butter, slightly cooled, adds rich mouthfeel and glossy top, use unsalted butter for control, I prefer Challenge brand when available.
- Sugar 2 1/2 cups granulated sugar, provides sweetness and helps the top set with that desirable crackle.
- Vanilla 1 tablespoon vanilla extract, use pure vanilla for the best aroma and flavor lift.
- Eggs 4 large eggs, room temperature, they add structure and help create the fudgy crumb.
- Flour 1 1/2 cups whole wheat flour or substitute all purpose if you prefer a lighter crumb, spoon and level when measuring to avoid heavy bars.
- Cocoa 1 cup unsweetened cocoa powder, use Dutch processed for deeper chocolate notes or natural cocoa for a brighter chocolate flavor.
- Salt 1/2 teaspoon table salt, small but essential to balance the sweetness and accentuate the chocolate.
- Cheesecake Layer 8 ounces cream cheese, softened to room temperature for a silky filling.
- Cheesecake Egg 1 large egg, room temperature helps the filling blend without lumps.
- Cheesecake Vanilla 1 teaspoon vanilla extract for a subtle aromatic lift.
- Cheesecake Sugar 1/3 cup granulated sugar, sweetens the cheese while allowing its tang to come through.
- Cherry Topping 1/2 can cherry pie filling, about 9 to 10 ounces, use your favorite brand, I prefer a filling with whole cherries for texture.
Instructions
Prepare the Pan and OvenLine a 9 by 13 inch pan with foil leaving overhang for easy removal, coat the foil lightly with cooking spray to prevent sticking. Preheat the oven to 350 degrees F and position the rack in the center of the oven for even heat distribution.Make the Brownie BatterIn a large mixing bowl whisk together the melted butter and 2 1/2 cups granulated sugar until smooth and slightly glossy. Add the tablespoon of vanilla and the eggs one at a time, whisking after each addition until fully combined. Fold in the 1 1/2 cups flour, 1 cup cocoa powder and 1/2 teaspoon salt until just combined. The batter will be thick and dense which is what gives these bars a fudgy texture.Spread the First LayerSpoon roughly half of the brownie batter into the prepared pan and use an offset spatula to press it into an even layer covering the bottom. It does not need to be perfect, but aim for even coverage so the cheesecake sits on a stable base.Make the Cheesecake LayerWith an electric mixer beat the softened 8 ounces cream cheese, 1 egg, 1 teaspoon vanilla and 1/3 cup sugar on medium speed until the mixture is completely smooth and no lumps remain. Scrape the bowl with a spatula to ensure uniform texture and spread the cheesecake mixture gently over the brownie base.Add Cherry FillingSpoon dollops of cherry pie filling across the cheesecake layer. You want to distribute the cherries so they create pockets of fruit without saturating the cheesecake layer. Use the back of the spoon to gently spread the filling slightly without mixing it into the cheese layer.Top with Remaining Brownie BatterDrop spoonfuls of the remaining brownie batter over the cherries and cheesecake. It is normal that you cannot smoothly spread this top layer. Try to cover as much of the filling as possible, smoothing gently where you can to create an even top. Small gaps are fine they create lovely marbling.BakeBake at 350 degrees F for 30 to 35 minutes. Check at 30 minutes, the center should look set though it may still have a slight jiggle because of the creamy cheesecake. If using a dark nonstick pan I recommend the full 35 minutes. Avoid overbaking to keep the center fudgy.Cool and SliceAllow the bars to cool to room temperature in the pan. For neat slices refrigerate for at least two hours, the cooler temperature firms the layers and makes cutting clean bars easier. Lift the foil out of the pan and slice into 16 bars with a sharp knife wiped between cuts for tidy pieces.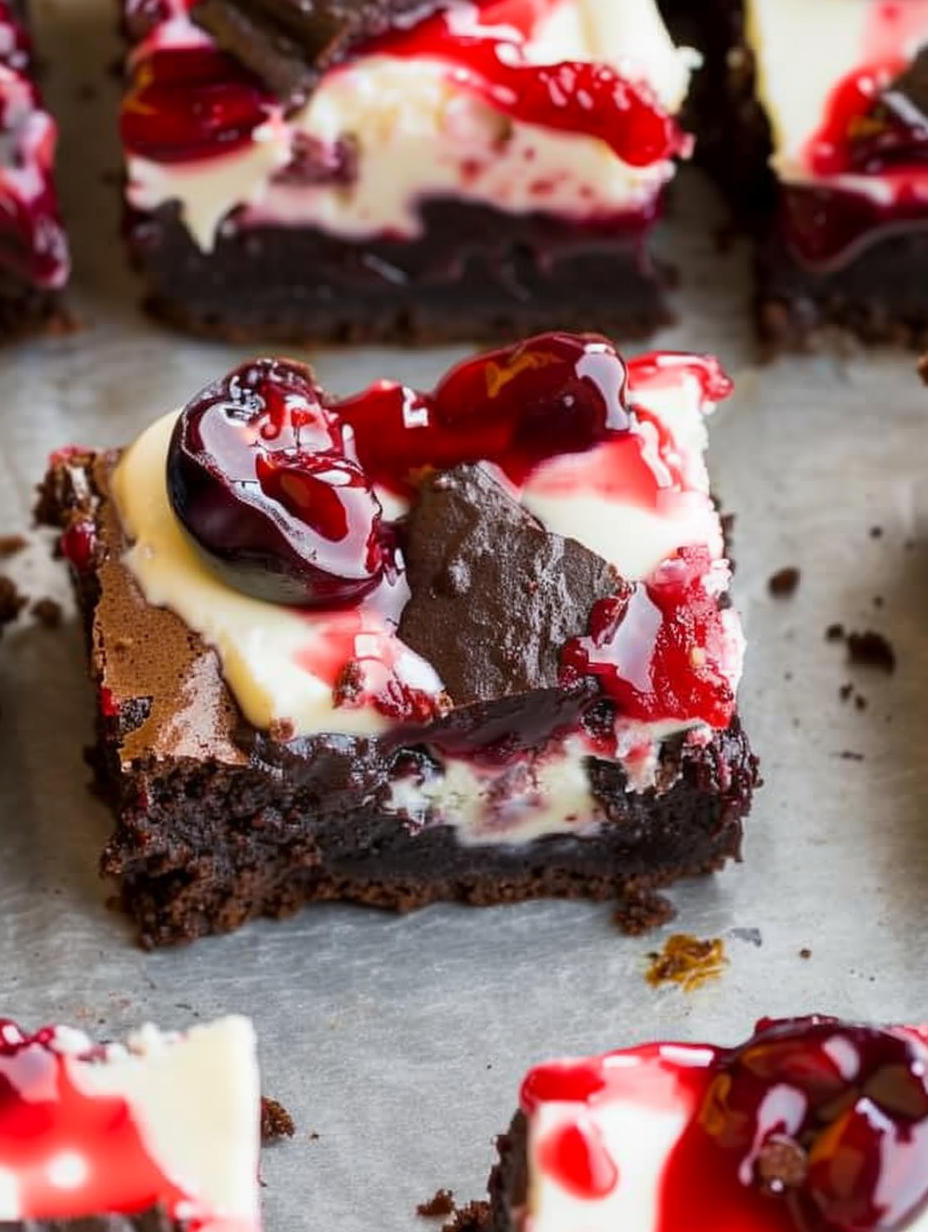
You Must Know
- These bars are best stored chilled and will keep in the refrigerator up to 4 days. They also freeze well for up to 3 months if wrapped tightly for longer storage.
- When cutting, use a hot sharp knife and wipe it clean between cuts for clean edges and minimal crumb transfer.
- Because the recipe uses whole wheat flour you may notice a slightly heartier crumb. Swapping in all purpose flour will give a lighter texture.
- Calories are approximately 312 per bar based on 16 slices, and the bars provide a balance of fat and carbohydrate that makes them a satisfying dessert portion.
My favorite aspect of these bars is how the cherries brighten a very chocolate heavy dessert. I served them once at a holiday cookie exchange and the way they stood out against plain cookies made guests come back for more. I learned early on to let them chill for a couple of hours when I want neat presentation, but on busy nights I will still slice and serve them warm and that is delicious too.
Storage Tips
Store cooled bars in an airtight container in the refrigerator. Use layering parchment between the bars to prevent sticking if stacking. For the freezer wrap the cut bars individually in plastic wrap then place them in a zip top freezer bag to protect against freezer burn. Thaw overnight in the refrigerator before serving. To refresh chilled bars serve at room temperature for 15 to 20 minutes or warm individual squares in the microwave for 8 to 12 seconds for a just baked feel.
Ingredient Substitutions
If you prefer a lighter crumb swap whole wheat flour for 1 1/2 cups all purpose flour using the same measure. For a richer chocolate note use Dutch processed cocoa in place of natural cocoa powder in equal measure. To reduce sweetness try a low sugar cherry filling or half the cherry topping to let the cheesecake tang shine. For a dairy free version use dairy free cream cheese and a plant based butter substitute though texture will be slightly different.
Serving Suggestions
Present bars on a simple platter with a dusting of powdered sugar or a drizzle of melted dark chocolate. Pair with lightly whipped cream or a scoop of vanilla ice cream to complement the warm chocolate and tangy cheese. These bars work well at potlucks, boxed lunches, and holiday dessert spreads. Garnish with a few fresh cherries or mint leaves for color and contrast when serving to guests.
Cultural Background
Brownies are a classic American dessert with roots in late 19th century cooking. The idea of combining chocolate with cheesecake and fruit draws on a long tradition of layered desserts that balance richness and acidity. Fruit topped bars became popular as convenience baking spread in the mid 20th century when canned pie fillings were widely available, offering a way to create visually appealing desserts quickly.
Seasonal Adaptations
In summer swap cherry pie filling for mixed berry filling or fresh macerated cherries for a fresher flavor. For winter consider using a spiced cranberry topping with orange zest to add a holiday note. You can also add a tablespoon of instant espresso powder to the brownie batter in cooler months to deepen the chocolate profile.
Meal Prep Tips
Make the batter and cheesecake layer the day before and assemble before baking for fresher texture on the day you serve. Baked bars slice cleaner after chilling so plan at least two hours of refrigeration before serving. For large gatherings double the recipe and bake in two pans to keep bake times consistent and make serving simpler.
Success Stories
Readers have shared that these bars are a crowd pleaser at bake sales and family reunions. One friend told me they were the only dessert left after a bridal shower and that guests asked for the recipe on the spot. Another reader swapped in blueberry filling for a summer picnic and reported rave reviews. Small tweaks to bake time help adjust fudginess to personal preference.
These Cherry Cheesecake Brownies have become a go to when I want something that feels homemade but looks special. They are forgiving, adaptable, and loved by both kids and grown ups. I encourage you to make them your own and enjoy how well they travel from kitchen to table.
Pro Tips
Soften the cream cheese to room temperature for a lump free cheesecake layer.
Chill the pan for at least two hours before slicing for cleaner bars.
Use a hot sharp knife wiped between cuts to make neat slices.
This nourishing cherry cheesecake brownies recipe is sure to be a staple in your kitchen. Enjoy every moist, high protein slice — it is perfect for breakfast or as a wholesome snack any time.
Tags
Cherry Cheesecake Brownies
This Cherry Cheesecake Brownies recipe makes perfectly juicy, tender, and flavorful steak every time! Serve with potatoes and a side salad for an unforgettable dinner in under 30 minutes.
Ingredients
Brownie Base
Cheesecake Layer and Topping
Instructions
Prepare the pan and oven
Line a 9 by 13 inch pan with foil leaving overhang and spray lightly with cooking spray. Preheat the oven to 350 degrees F and place the oven rack in the center position.
Make the brownie batter
In a large bowl whisk together the melted butter and 2 1/2 cups sugar until smooth. Add 1 tablespoon vanilla and the 4 eggs, whisking after each addition. Fold in 1 1/2 cups flour, 1 cup cocoa powder and 1/2 teaspoon salt until just combined. Batter will be thick.
Spread first layer
Spread roughly half of the batter into the bottom of the prepared pan using an offset spatula to create an even base layer.
Prepare cheesecake mixture
Beat 8 ounces softened cream cheese with 1 egg, 1 teaspoon vanilla and 1/3 cup sugar until smooth and lump free. Spread evenly over the brownie base.
Add cherry filling and top
Spoon dollops of cherry pie filling across the cheesecake. Drop spoonfuls of the remaining brownie batter over the cherries and try to cover most of the filling. Smooth gently where possible.
Bake and cool
Bake at 350 degrees F for 30 to 35 minutes until the center appears set but may still have a slight jiggle. Cool to room temperature then refrigerate for at least two hours for best slicing.
Last Step: Please leave a rating and comment letting us know how you liked this recipe! This helps our business to thrive and continue providing free, high-quality recipes for you.
Nutrition
Did You Make This?
Leave a comment & rating below or tag
@savoryte on social media!
Categories:
You might also like...

Tilapia with Lemon Butter
Flaky pan-seared tilapia topped with a velvety lemon butter sauce. Quick to cook, bright with citrus, and weeknight-easy yet dinner-party special.

Healthy Egg Muffin Cups
Start your morning with veggie-loaded, protein-packed egg muffins at just 50 calories each. Perfect for make-ahead breakfasts, freezer-friendly, and easy to customize.

TikTok Breakfast Tortilla Fold
Crispy, cheesy, and ready in minutes, this viral tortilla fold layers bacon, egg, avocado, and melty cheese into a perfectly portable triangle.
Did You Make This?
Leave a comment & rating below or tag @savoryte on social media!
Rate This Recipe
Share This Recipe
Enjoyed this recipe? Share it with friends and family, and don't forget to leave a review!
Comments (1)
This recipe looks amazing! Can't wait to try it.
Comments are stored locally in your browser. Server comments are displayed alongside your local comments.

Hi, I'm Sophia!
What's Popular

30-Minute Meals!
Join to receive our email series which contains a round-up of some of our quick and easy family favorite recipes.